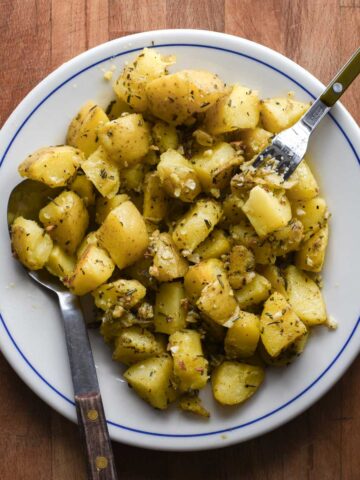
These Garlic Rosemary Potatoes are a perfect versatile side dish – they're boiled so they have a fluffy insides, then roasted get a little crispy and gently to infuse the rosemary and garlic flavors in. They're great for an everyday dinner or special occasion because of how easy yet flavorful they are.

Ingredients
Just a few ingredients are needed for these potatoes, because each is super flavorful in their own right and when combined are absolutely delicious.

- Potatoes: yukon gold potatoes – they cook through really well with a buttery texture. If you don’t have yukon golds you can use red potatoes, russet potatoes, or baby potatoes.
- You could even use sweet potatoes.
- Fresh rosemary: fresh rosemary is one of the most flavorful herbs, and when cooked all the aromas really bloom.
- Olive oil: extra virgin olive oil is good for this recipe to bring the best flavor, since it only roasts for a short period of time.
- Garlic: fresh chopped garlic – 5 garlic cloves is about 3 tbsp.
- Salt: kosher salt.
- Pepper: cracked black pepper.
How to make
To make these crispy rosemary potatoes check out the steps below and full ingredient quantities in the recipe card at the end of this post.

1. Boil the potatoes. Place the potatoes in a large pot and fill it with water at least 1-inch over the potatoes. Bring to a boil and cook for 8-10 minutes until fork tender. Drain.

2. Warm the olive oil in the oven. Pour the olive oil onto your baking sheet and place into your oven for at least 15 minutes.

3. Combine ingredients. Take the baking sheet out of the oven and add the cooked potatoes, garlic, rosemary, salt, and pepper. Toss together carefully (as the pan and oil will be hot) and spread out into a single layer.

4. Roast. For 15 minutes until slightly golden brown.
Recipe variations
- You can use garlic powder instead of fresh garlic – 1-2 teaspoon would be ideal based on how much you love garlic.
- Similarly you can use dried rosemary if needed (but it’s not preferred) – 1-2 tsp.
- Other fresh herbs that work are oregano or thyme. Similarly you can use these as dried herbs.
- Instead of olive oil, you can use avocado oil or vegetable oil.
- Serve with a sprinkle of parmesan cheese if you'd like.
- You can use a baking dish or cast iron skillet instead of a sheet pan if needed.
Serving suggestions
These rosemary potatoes are perfect side dish that go well with so many mains – a few suggestions below:
- A delicious sunday roast or pork chops
- A roast chicken
- Meatballs stewed in tomato sauce
- Shrimp oreganata
- Other sides you can serve with it: green beans, brussels sprouts, or a side salad.
Tips and tricks
- Warming the oil in the oven prior to adding the potatoes helps get crispy outsides because the amount of oil absorbed is minimized.
- Do this carefully.
- Start potatoes in cold water then bring them to a boil. Don’t add them once boiling, they won’t cook evenly and the outsides will overcook before the center cooks through.
- If you are preparing this recipe in advance, put your chopped potatoes in a bowl of water to keep them from getting green. This also helps remove excess starch however is not necessary for this recipe.
- Don’t crowd the pan, this will prevent crispy potatoes.
- It's best if you actually don't use parchment paper, similar to over crowding the pan, doing so will make it harder for the potatoes to get crispy, and the paper will get soggy with the amount of oil we're using.
- I like to keep the skin on for the texture and how it looks, but you can peel them off if you prefer.

Storage and reheating
If you have any leftovers of these rosemary garlic potatoes you can –
- Store in an airtight container for up to 4 days in the fridge
- Reheat in the microwave for 2-3 minutes until warmed through, however they won’t be as crispy. Alternatively you can warm them in a 350°F oven for 15 or so minutes.
FAQs
You don’t have to, but in this recipe it helps ensure everything cooks properly and doesn’t burn – if you only roasted them the garlic would burn by the time they are done.
In this case, we only add it at the end. In other cases, ensuring the temperature isn’t too high is key.
Did you make this recipe? Leave a rating and review below and tag me on social!
📖 Recipe

Garlic Rosemary Potatoes
Ingredients
- 1.5 lbs yukon gold potatoes cut into 1" chunks
- 2 tablespoon fresh rosemary
- ¼ cup extra virgin olive oil
- 5 cloves garlic minced
- 1 teaspoon kosher salt
- 1 tsp black pepper
Instructions
- Preheat oven to 425°F.
- Place the potatoes in a large pot and fill it with water at least 1-inch over the potatoes. Bring to a boil and cook for 8-10 minutes until fork tender. Drain.
- Pour the olive oil onto your baking sheet and place into the hot oven for at least 15 minutes.
- Take the baking sheet out of the oven and add the cooked potatoes, garlic, rosemary, salt, and pepper. Toss together carefully (as the pan and oil will be hot) and spread out into a single layer.
- Roast for 15 minutes until slightly golden brown.