• Recipes
  • Contact
  • About
  • Shop

Cozy Cravings

menu icon
go to homepage
  • RECIPES
  • ABOUT
  • CONTACT
  • SUBSCRIBE
    • Facebook
    • Instagram
    • Pinterest
  • subscribe
    search icon
    Homepage link
    • RECIPES
    • ABOUT
    • CONTACT
    • SUBSCRIBE
    • Facebook
    • Instagram
    • Pinterest
  • ×
    Home

    Shrimp Scampi Risotto

    Shrimp scampi risotto in a blue bowl with a wood fork.

    This Shrimp Scampi Risotto combines two of my favorite dishes – garlicky herby shrimp and creamy risotto loaded with parmesan and a good amount of lemon. It's slightly brothy to resemble the sauciness of shrimp scampi, so serve with some toasty bread to soak it all up. 

    Shrimp scampi risotto in a blue bowl with a wood fork.
    [feast_advanced_jump_to]

    Ingredients 

    Ingredients needed to make shrimp scampi risotto labeled on a table.
    For the shrimp scampi 
    • Olive oil: extra virgin olive oil is best – healthiest and most robust flavor. 
    • Unsalted butter: adds a bit of richness.
    • Shrimp: Medium-sized defrosted or fresh shrimp; usually 36-40 per lb. 
    • Garlic: five cloves of garlic, sliced. 
    • Red pepper flakes: adds a little depth, not necessarily making the dish spicy though. 
    • Lemon juice: the acidity and brightness known to a classic shrimp scampi.
    • Salt and black pepper: seasoning! Kosher salt and fresh cracked pepper if you can. 
    • White wine: a dry white wine such as sauvignon blanc or pinot grigio. 
    For the risotto
    • Olive oil: extra virgin olive oil.
    • Onion: yellow onion minced fairly small. 
    • Arborio rice: this is the best rice to make risotto with – it’s a short grain white starchy rice, so as it cooks it releases its starch to thicken the sauce as it cooks through. If you are having trouble finding this variety of rice, I suggest using any other short grain white rice. 
    • White wine: same as you used for the shrimp – a dry white wine. 
    • Vegetable or chicken stock: this is what you use to cook the rice in intervals, vegetable stock or chicken stock are my preference as they add flavor without overpowering. Chicken broth or vegetable broth also work. 
    • Parmesan: fresh grated parmesan makes the risotto nice and creamy.  
    • Lemon zest: adds a hit of brightness at the end that pairs really well with the shrimp scampi. 
    • Salt and black pepper: kosher salt and fresh cracked pepper if you can. 
    • Parsley: a fresh element to balance everything. 
    • Unsalted butter: to finish the dish and make it nice and luscious. 

    What is risotto?

    Risotto is an Italian dish believed to have originated in Northern Italy. It uses a cooking process of gradually adding liquid as it cooks so the rice slowly releases its starch, resulting in a creamy, luscious texture. More on the history of risotto here.

    How to make shrimp scampi risotto 

    Shrimp combined with salt, pepper, and red pepper flakes.

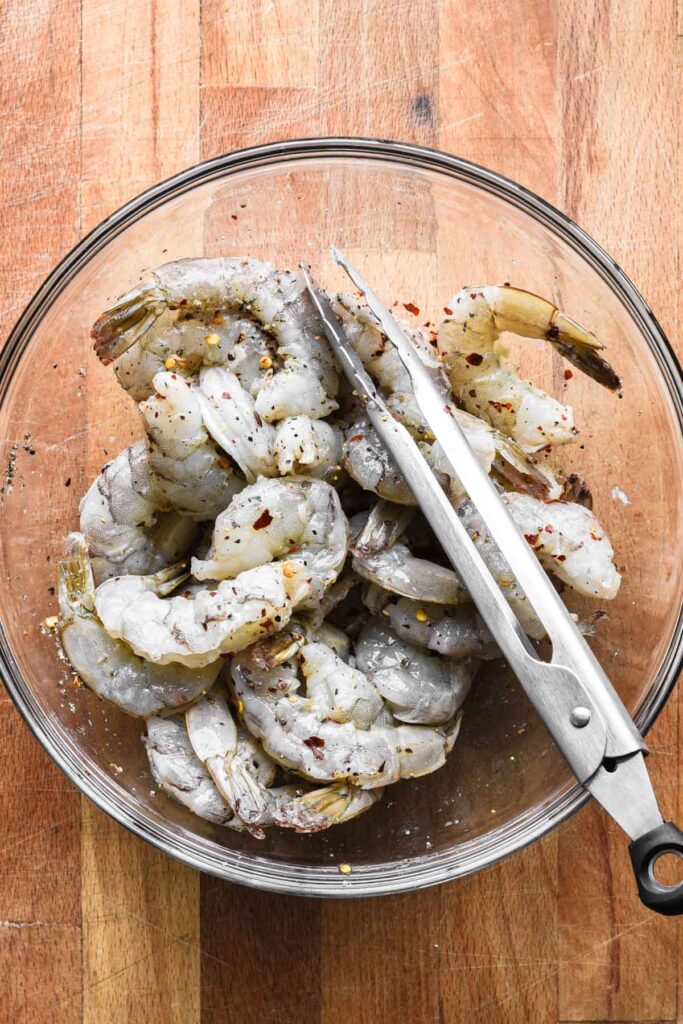
    1. Season the shrimp with salt, pepper, and red pepper flakes.

    Melting butter in a large skillet.

    2. In a large skillet warm the butter and olive oil over medium heat. 

    Shrimp and sliced garlic added to the skillet.

    3. Once warm, add the shrimp and fresh garlic. Cook undisturbed for 3 minutes, then flip and cook 3 more minutes on the other side (until the shrimp are all white and pink, and no longer translucent).

    Shrimp cooked on the other side, with lemon juice and wine added to the skillet.

    4. Add the lemon juice and simmer for about 2 minutes, then remove the shrimp and set aside. 

    Garlic and onion added to the skillet with olive oil.

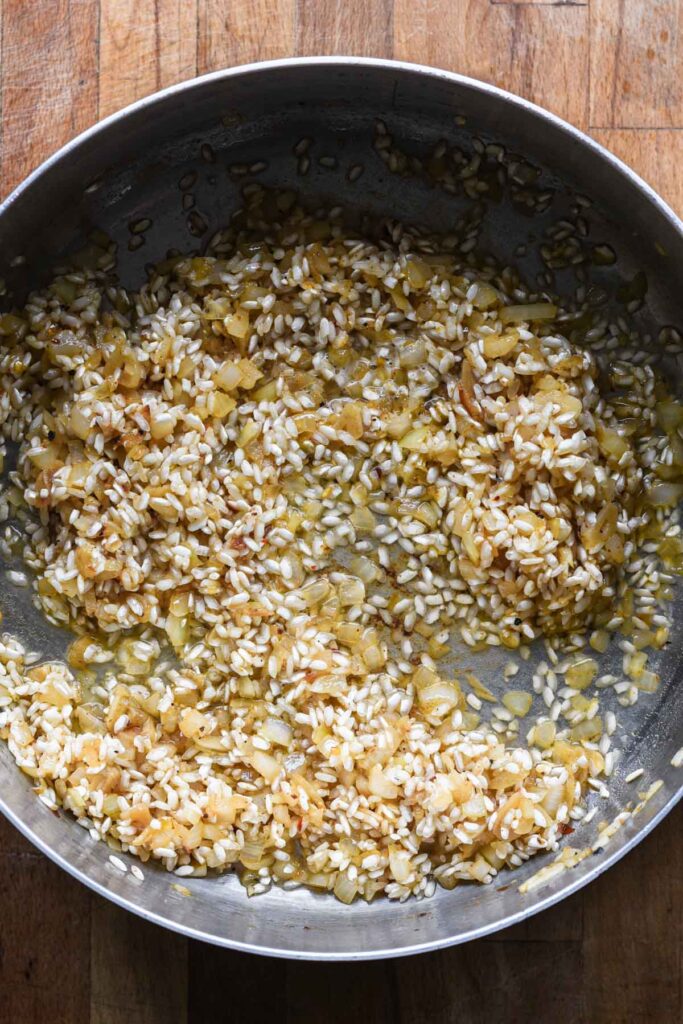
    5. Add the olive oil, minced onion, and a pinch of salt. Cook for 4-5 minutes until softened. 

    Arborio rice added to toast.

    6. Add the rice and toast for 1-2 minutes. 

    White wine added to deglaze the pan.

    7. Add the white wine and let it simmer with the rice for 2-3 minutes until absorbed. 

    First round of stock added to the rice.

    8. Add a heaping cup of stock into the rice, stirring constantly as it simmers until it’s 90% absorbed - about 3-4 minutes. Continue this pattern – adding a cup of liquid, stirring and letting it absorb, then adding more – until you’ve used all the liquid and the rice is cooked to al dente. 

    Finishing the dish with lemon, parsley, parmesan, and butter.

    9. Once you’ve added all the stock and the rice is cooked through, finish with a tablespoon of butter, lemon zest, parmesan cheese, fresh parsley, and salt and pepper to taste. 

    Shrimp added back into the pot with the risotto.

    10. Stir in the sautéed shrimp and serve. 

    Tips and tricks 

    • Use frozen shrimp and thaw when you need it. Most times, grocery stores are selling pre-frozen shrimp anyway, so if you buy it frozen yourself you get it as fresh as possible because you can defrost it on your own terms. 
    • Stir the risotto very frequently as it cooks - this ensures nothing sticks to the bottom of the pan and the rice cooks as evenly as possible. 
    • Always use warm stock, it helps make sure it absorbs into the rice evenly.
    • Monitor the heat so it’s always simmering but never boiling. 

    Storage and reheating 

    • Store in an airtight container in the fridge. 
    • To reheat, warm in the microwave for a few minutes, stirring halfway through, until warm. 
    Finished shrimp scampi risotto with fresh parsley on top.

    FAQs

    If I don’t have stock can I use water?

    Yes! You can, however it’ll be less flavorful. If you have bouillon paste I’d recommend using that and mixing it into water. 

    What is the difference between stock and broth? 

    Stock is made primarily from bones, and broth is made primarily from meat / vegetables. 

    Is risotto pasta or rice? 

    Risotto is a rice dish – it’s made from arborio rice. 

    Did you make this recipe? Leave a rating and review below and tag me on social!

    📖 Recipe

    Shrimp scampi risotto in a blue bowl with a wood fork.

    Shrimp Scampi Risotto

    This Shrimp Scampi Risotto combines two of my favorite dishes – garlicky herby shrimp and creamy risotto loaded with parmesan and a good amount of lemon. It's slightly brothy to resemble the sauciness of shrimp scampi, so serve with some toasty bread to soak it all up.
    5 from 1 vote
    Print Pin Rate
    Prep Time: 20 minutes minutes
    Cook Time: 30 minutes minutes
    Total Time: 50 minutes minutes
    Servings: 2 servings

    Ingredients

    For the shrimp

    • 1 lb medium-sized raw shrimp tails on
    • 1 teaspoon kosher salt
    • 1 teaspoon black pepper
    • ½ teaspoon red pepper flakes
    • 1 tablespoon extra virgin olive oil
    • 1 tablespoon unsalted butter
    • 5 cloves garlic sliced
    • 1 tablespoon lemon juice

    For the risotto

    • 1 tablespoon extra virgin olive oil
    • ½ cup yellow onion minced (½ an onion)
    • 1 cup arborio rice
    • ½ cup dry white wine
    • 4 cups chicken stock
    • ¼ cup grated parmesan cheese
    • 1 teaspoon lemon zest
    • 1 tablespoon unsalted butter

    Instructions

    • Add the stock to a pot and keep it warm over low heat.
    • Season the shrimp with salt, pepper, and red pepper flakes.
    • In a large skillet warm the 2 tablespoon butter and 1 tablespoon olive oil over medium heat. 
    • Once warm, add the shrimp and fresh garlic. Cook undisturbed for 3 minutes, then flip and cook 3 more minutes on the other side (until the shrimp are all white and pink, and no longer translucent).
    • Add 1 tablespoon lemon juice and simmer about 2 minutes, then remove the shrimp and set aside. 
    • Add the 1 tablespoon olive oil, minced onion, and a pinch of salt. Cook for 4-5 minutes until softened. 
    • Add 1 cup rice and toast for 1-2 minutes. 
    • Add ½ cup white wine and let it simmer with the rice for 2-3 minutes until absorbed. 
    • Add a heaping cup of stock into the rice, stirring constantly as it simmers until it’s 90% absorbed - about 3-4 minutes. Continue this pattern – adding a cup of liquid, stirring and letting it absorb, then adding more – until you’ve used all the liquid and the rice is cooked to al dente. Stir frequently.
    • Once you’ve added all the stock and the rice is cooked through to al dente, finish with a tablespoon of butter, lemon zest, parmesan cheese, fresh parsley, and salt and pepper to taste. 
    • Stir in the sautéed shrimp and serve. 

    Video

    Nutrition Estimate

    Calories: 1062kcal | Carbohydrates: 110g | Protein: 55g | Fat: 38g | Saturated Fat: 13g | Polyunsaturated Fat: 4g | Monounsaturated Fat: 17g | Trans Fat: 0.5g | Cholesterol: 341mg | Sodium: 3370mg | Potassium: 1044mg | Fiber: 4g | Sugar: 10g | Vitamin A: 1037IU | Vitamin C: 11mg | Calcium: 297mg | Iron: 6mg
    Course: Dinner, lunch, Lunch/Dinner
    Cuisine: Italian, Italian/American
    Keyword: garlic, rice bowl, Risotto, scampi, Shrimp
    Author: Haley

    Sprinkle Cookies

    Close up of fresh baked sprinkle cookies.

    These Sprinkle Cookies are just about as cheerful as it gets – delicious tender chewy sugar cookies dotted with rainbow sprinkles. They come together in one bowl either by hand or with a stand mixer and require no chill time, so they’re easy as can be. 

    Freshly baked sprinkle cookies.
    [feast_advanced_jump_to]

    Ingredients 

    Grab the quantities for this sprinkle cookie recipe in the card at the end of this post. 

    Ingredients to make sprinkle cookies.
    • Sugar: standard baking sugar – granulated sugar. Brown sugar does not work for this recipe. 
    • Butter: unsalted butter, room temperature. 
    • Eggs: large eggs, room temperature. Pasture raised are always best because it means the chickens have access to a full pasture and are as healthy as possible resulting in the most nutrient rich eggs. 
    • Vanilla: vanilla extract or vanilla bean paste flavors the cookies. You could also add ⅛tsp of almond extract if you are particularly keen on that flavor. 
    • Flour: all purpose flour, bleached or unbleached. 
    • Baking soda: the leavening agent. 
    • Salt: kosher salt, always.
    • Cream of tartar: found in the spices aisle,  this helps with the texture of the cookies. 
    • Colorful sprinkles: this is what makes the cookies sprinkle cookies! The best sprinkles to use are classic rainbow jimmies, the ones that are shaped like little bars. 

    How to make sprinkle cookies 

    Sprinkle cookies are a relatively easy recipe to make, they take perfect sugar cookie that's slightly crispy on the edges and soft on the inside with rainbow confetti sprinkles to make them even more fun. 

    Butter and sugar creamed together.

    1. Cream or whisk butter and sugar. In a large bowl (or the bowl of a stand mixer), beat together the room temperature butter and sugar until light and fluffy – high speed on the stand mixer, your best effort if by hand.

    Eggs and vanilla added.

    2. Add eggs and vanilla. Add the eggs and vanilla extract to the butter mixture and beat to combine. Be sure to scrape the sides of the bowl to make sure everything is getting incorporated. 

    Dry ingredients and sprinkles mixed in.

    3. Add dry ingredients. Switch to a spatula and mix in the flour, baking soda, kosher salt, and cream of tartar. When the dry ingredients are 90% of the way combined with the wet, add the sprinkles and continue mixing until everything comes together. 

    Cookie dough balls on baking sheet.

    4. Scoop into cookie dough balls. Place each ball of dough 2-inches apart on prepared baking sheets (cookie sheet or baking sheet lined with parchment paper).

    Freshly baked cookies.

    5. Bake at 350°F for 12-14 minutes until the edges are just getting golden. Let the baked cookies cool on the baking sheet for 5 or so minutes, then transfer to a wire rack to cool completely. 

    Tips and tricks 

    • You can use a stand mixer with a paddle attachment, electric hand mixer, or just a bowl and whisk for these cookies. 
    • Use a cookie scoop to get even sized dough balls. 
    • Use room temperature ingredients when baking, it helps them all combine seamlessly for an even bake. 
    • If your cookies don’t come out as perfect circles, use a miscellaneous circular object in your kitchen and swirl it around the warm cookie to gently push it back into shape.
    • To keep the inside of the cookies chewy, you really want to make sure there’s just a glimmer of golden brown around the edges when you take them out of the oven. Fully golden and the inside will be cooked all the way through.

    When to make sprinkle cookies

    Look, there is no wrong answer here – the time to make cookies is always. However, if you have an occasion coming up like any of the below, that's a great opportunity to make some festive cookies. 

    • These are great for a birthday party, even more so if you sandwich them with some vanilla ice cream or slather a cream cheese frosting over top.
    • They're fun to customize for certain holidays or occasions, for example – use red and green sprinkles to make these a festive Christmas cookie, orange and black for Halloween, or even pink and red for Valentine's day. Even use blue sprinkles or pink sprinkles for a gender reveal celebration. 
    Inside of cookies split in half.

    Storage

    • Store leftover cookies in an airtight container at room temperature for up to 4 days. 
    • You can freeze the cookie dough – form it into dough balls, place them on a parchment paper lined baking sheet, put the sheet in the freezer. After about an hour, take them out and transfer to a freezer bag or container then return them to the freezer. Can be kept frozen for up to 4 months. 

    FAQs

    Can I use other kind of sprinkles?

    Sure! They just might bake up a little differently. 

    What is cream of tartar made out of? 

    It is chemically known as potassium bitartrate, and is used to enhance flavor and help activate baking soda. 

    Are sprinkle cookies and funfetti cookies the same?

    Yes, they are! Just different names for the same thing; similar to "soda" and "pop."

    ​Can I use gluten free flour?

    I haven't tried making this recipe with gluten free flour, but your best bet would be 1:1 Bob's Red Mill Baking Flour. 

    Did you make this recipe? Leave a rating and review below and tag me on social!

    📖 Recipe

    Close up of fresh baked sprinkle cookies.

    Sprinkle Cookies

    These Sprinkle Cookies are just about as cheerful as it gets – delicious tender chewy sugar cookies dotted with rainbow sprinkles. They come together in one bowl either by hand or with a stand mixer and require no chill time, so they’re easy as can be. 
    No ratings yet
    Print Pin Rate
    Prep Time: 20 minutes minutes
    Cook Time: 15 minutes minutes
    Servings: 15 cookies

    Ingredients

    • 1 cup unsalted butter, room temperature
    • 1 cup granulated sugar
    • 1 large egg, room temperature
    • 1 ½ teaspoon vanilla extract
    • 2 cups + 1 tablespoon flour
    • 1 teaspoon baking soda
    • 1 teaspoon salt
    • ½ teaspoon cream of tartar
    • ¾ cup rainbow sprinkles

    Instructions

    • Preheat your oven to 350℉.
    • In a large bowl (or the bowl of a stand mixer), beat together the room temperature butter and sugar until light and fluffy – high speed on the stand mixer, your best effort if by hand.
    • Add the eggs and vanilla extract to the butter mixture and beat to combine. Be sure to scrape the sides of the bowl to make sure everything is getting incorporated. 
    • Switch to a spatula and mix in the flour, baking soda, kosher salt, and cream of tartar. 
    • When the dry ingredients are 90% of the way combined with the wet, add the sprinkles and continue mixing until everything comes together. 
    • Scoop into cookie dough balls, 3 tablespoon size. Place each ball of dough 2-inches apart on prepared baking sheets (cookie sheet or baking sheet lined with parchment paper).
    • Bake at 350°F for 12-14 minutes until the edges are just getting golden. Let the baked cookies cool on the baking sheet for 5 or so minutes, then transfer to a wire rack to cool completely. 

    Nutrition Estimate

    Calories: 260kcal | Carbohydrates: 34g | Protein: 2g | Fat: 13g | Saturated Fat: 8g | Polyunsaturated Fat: 1g | Monounsaturated Fat: 3g | Trans Fat: 0.5g | Cholesterol: 43mg | Sodium: 234mg | Potassium: 43mg | Fiber: 0.5g | Sugar: 21g | Vitamin A: 394IU | Calcium: 8mg | Iron: 1mg
    Course: Dessert
    Cuisine: American
    Keyword: cookies, sprinkles
    Author: Haley

    Buttermilk Pancakes for Two

    Close up of pancakes with a pat of butter and pure maple syrup.

    This recipe for Buttermilk Pancakes for Two is the perfect small batch recipe for when you just need six or so pancakes. The buttermilk gives the pancakes a perfect slight tang, while the vanilla and little bit of sugar and cinnamon sweetens them up. Cooked in butter for perfectly crispy edges, the signature sign of homemade pancakes (and the best part). 

    Close up of pancakes with a pat of butter and pure maple syrup.
    [feast_advanced_jump_to]

    Ingredients

    To make these fluffy pancakes you need a few simple ingredients. Quantities can be found in the recipe card at the end of this post. 

    Ingredients to make buttermilk pancakes for two.
    • Flour: Standard all purpose flour. I usually try to buy unbleached so it’s less processed, but that is personal preference. 
    • Baking powder: The leavening agent to help your pancakes get nice and fluffy. Baking soda does not work in this recipe. 
    • Granulated sugar: Adds a hint of sweetness that is necessary to balance with the tangy buttermilk. 
    • Vanilla: Vanilla extract or vanilla bean paste. 
    • Cinnamon: My secret ingredient which isn't really anything revolutionary but I don't think everyone puts it in pancake batter – a hint of warm spice makes all the difference in flavor. 
    • Salt: Diamond Crystal Kosher Salt. 
    • Egg: One large egg, room temperature ideally. 
    • Butter: Unsalted butter, melted and slightly cooled.
    • Buttermilk: With a slightly tangy flavor, buttermilk is perfect for pancakes. Full fat is ideal but any kind works. 

    How to make homemade buttermilk pancakes

    Wet batter ingredients mixed together.

    In a large bowl, whisk together the wet ingredients – buttermilk, eggs, vanilla, sugar, and melted butter. 

    Dry batter ingredients folded in.

    Whisk dry ingredients – flour, salt, baking powder, and cinnamon – into the wet ingredients until just combined; leaving a few small lumps is ok. Set it aside to let the batter rest for at least 5 minutes, this helps it thicken up to give you an extra fluffy pancake.

    Batter dolloped into skillet with butter.

    Melt the butter in a non-stick skillet over medium heat. Once melted, dollop ¼ cup of batter a few inches apart.

    Cooked flipped pancakes.

    Once the first side is set on the edges, golden on the bottom, and starting to bubble on the top (about 3-5 minutes), flip to the other side and finish cooking for another 3-5 minutes until the second side is also golden brown.  

    Tips and tricks

    To help you make the best fluffy buttermilk pancakes possible, check out the tips and tricks below.

    • To get same sized pancakes use a measuring cup or cookie scoop. 
    • If the pancakes start to brown too fast on the bottom before you see bubbles on top, turn the temperature down to medium-low. 
    • Room temperature ingredients will combine in the batter more smoothly without risk of curdling the egg or chilling the butter. 
    • Pancakes are ready to be flipped once the edges are set and the top starts to get a few bubbles. 
    • To prevent the butter from burning, after you cook each batch of pancakes, wipe the skillet clean with a paper towel and add a new pat of butter. 
    • If you have a griddle (an electric griddle is fine) that would be great to use. 
    • Use pure maple syrup if you can, it tastes so much better. And warm up before serving, it really elevates the experience of eating pancakes.

    How to make buttermilk

    Buttermilk is much more readily available in stores these days, but if for some reason you can't find store-bought buttermilk or you have all the ingredients except for that and don't want to go out to the store again, you can make it yourself by combining one scant cup of milk with 1 tablespoon of lemon juice or white vinegar and let it sit for about 5 minutes. 

    Best pancake toppings and mix ins

    While I am a firm believer that the best pancakes don't need any fancy toppings and stand deliciously on their own, a fun topping (or even a topping bar!) can be so tasty and fun. Most pancake toppings can also be mixed into the batter and cooked right into the pancakes, so there’s a lot of room for customization and flexibility if you want. Some of my favorite mix ins and toppings are listed below:

    • Chocolate chips (mini or full sized) or chopped chocolate
    • Fresh fruit / berries such as blueberries or sliced strawberries
    • Sliced bananas 
    • Sprinkles 
    • Peanut butter 
    • In place of maple syrup if you want to try a topping that’s a little healthier you can use whipped greek yogurt with a little honey.
    • Jam or jelly
    • Nutella 
    • Stewed apples 

    Storage and reheating

    • If you have leftover pancakes, store them in an airtight container or bag in the fridge for up to 3 days.
    • If you want to freeze pancakes (great to have on hand for a quick school breakfast!), cook them through, let them cool, wrap them individually and put them in a freezer safe bag or container. 
    • To reheat pancakes:
      • From refrigerated: warm in the oven at 350°F for 10ish minutes until warmed through OR in the microwave for 2-3 minutes.
      • From frozen: warm in the oven at 350°F for 15ish minutes until warmed through OR pop them individually in the toaster oven for a few minutes until warm. 
    Close up buttermilk pancakes for two with fork.

    FAQs

    Can I make the pancake batter ahead of time?

    Yes, you can make the batter up to 1 day in advance. Store it covered in the fridge and let it sit at room temperature for 15 minutes before using it.

    How can I keep the pancakes warm?

    Put cooked pancakes on a wire rack on top of a rimmed baking sheet and keep them in a warm oven preheated to 325°F.

    Do I need to use buttermilk?

    In this recipe, yes, because the acid in buttermilk reacts with the baking powder to make the pancakes fluffy. If you were to use milk, for example, the leavening agent wouldn’t react properly and they would be flat pancakes. 

    Can I make these dairy free?

    Sure! If you have dairy free alternatives to the dairy ingredients, feel free to give them a try. 

    Did you make this recipe? Leave a rating and review below and tag me on social!

    📖 Recipe

    Close up of pancakes with a pat of butter and pure maple syrup.

    Buttermilk Pancakes for Two

    This recipe for Buttermilk Pancakes for Two is the perfect small batch recipe for when you just need six or so pancakes. The buttermilk gives the pancakes a perfect slight tang, while the vanilla and little bit of sugar and cinnamon sweetens them up. Cooked in butter for perfectly crispy edges, the signature sign of homemade pancakes (and the best part).
    5 from 1 vote
    Print Pin Rate
    Prep Time: 15 minutes minutes
    Cook Time: 15 minutes minutes
    Total Time: 30 minutes minutes
    Servings: 2 servings

    Ingredients

    • 1 ¼ cup flour
    • ½ teaspoon kosher salt
    • 1 ½ teaspoon baking powder
    • 1 tablespoon granulated sugar
    • 1 teaspoon vanilla extract
    • 1 large egg room temp
    • 2 tablespoon butter melted + brought to room temp
    • 1 cup buttermilk room temp
    US Customary - Metric

    Instructions

    • In a large bowl, whisk together the wet ingredients – buttermilk, eggs, vanilla, sugar, and melted butter.
    • Whisk dry ingredients – flour, salt, baking powder, and cinnamon – into the wet ingredients until just combined; leaving a few small lumps is ok. Set it aside to let the batter rest for at least 5 minutes, this helps it thicken up to give you an extra fluffy pancake.
    • Melt the butter in a non-stick skillet over medium heat. Once melted, dollop ¼ cup of batter a few inches apart.
    • Once the first side is set on the edges, golden on the bottom, and starting to bubble on the top (about 3-5 minutes), flip to the other side and finish cooking for another 3-5 minutes until the second side is also golden brown. 

    Video

    Nutrition Estimate

    Calories: 521kcal | Carbohydrates: 73g | Protein: 15g | Fat: 18g | Saturated Fat: 10g | Polyunsaturated Fat: 1g | Monounsaturated Fat: 5g | Trans Fat: 0.5g | Cholesterol: 125mg | Sodium: 1148mg | Potassium: 283mg | Fiber: 2g | Sugar: 12g | Vitamin A: 667IU | Calcium: 342mg | Iron: 4mg
    Course: Breakfast
    Cuisine: American
    Keyword: buttermilk, Pancakes
    Author: Haley

    Rice and Bean Tacos

    Assembled tacos up close.

    These Rice and Bean Tacos are an incredibly easy and quick meal to throw together. They use simple microwave Spanish rice and canned black beans that get zhuzhed up a bit with chopped chiles. 

    Assembled tacos up close in a serving table.
    [feast_advanced_jump_to]

    Ingredients

    Ingredients for black bean and rice tacos.
    • Rice: microwave rice works great here to keep it simple. I like Ben’s Ready Rice Spanish Style. Here's a recipe if you'd like to make your own Spanish style rice, and one if you'd like to make your own Mexican style rice. 
    • Black beans: canned black beans work well here. You could substitute pinto beans or kidney beans if you like something a little creamier. 
    • Spices: a mixture of cumin, chipotle powder, garlic powder, and onion powder – all of which add a nice well rounded flavor to the canned black beans. 
    • Mild chopped green chiles: sold in a can, available in most grocery stores. 
    • Tortillas: corn tortillas or flour tortillas, whichever you prefer. 
    • Salt: balance and bring out the flavors. 
    • Toppings: my preferred toppings are avocado for creaminess, limes for acidity, cilantro to brighten it up, and white onion for a little bite.

    How to make rice and black bean tacos

    Cooked beans and chiles in a pot.

    1. Make the bean mixture – set a medium non-stick skillet over medium heat. Add the olive oil, beans, spice, and chiles. Cook for 5-10 minutes until warmed through, smashing up some of the beans as you mix them together.

    Assembled tacos in a silver platter.

    2. Assemble – to your tortillas add rice, beans, and all the toppings you’d like. 

    Tips and tricks

    • Warm your tortillas, it makes them more malleable and more enjoyable to eat. 
    • Squeeze lime juice on the avocado to prevent it from going brown. 
    • Drain and rinse your beans, you don’t want the liquid they sit in going into your tacos. 
    • To make the onions more mild and less pungent, run them under cold water and pat them dry before you add them to the tacos. 
    • If you want to avoid the tortilla, you can serve the rice and beans over some shredded lettuce, with whatever additional toppings you’d like – chopped fresh tomatoes, cucumbers,  avocado, etc.!
    • To meal prep these rice and bean tacos – make the bean mixture and warm the rice, store each separately in the fridge in an airtight container for up to 4 days. 

    Ingredient substitutions

    • Rice: Cilantro lime rice would also be great. Brown rice also works as a back-up option although will be lacking in flavor. 
    • Spies: Rather than using all those spices individually, you can add a teaspoon or two of taco seasoning. 
    • Onion: Red onion or pico de gallo can be used in place of a white onion.
    • Chopped green chiles: If you're not able to find this in a can, I'd suggest getting a poblano pepper in its place. Poblano peppers are nice and mild.
    • Tortillas: if you prefer crispy tacos, you can use the hard taco shells. 

    Taco toppings

    Taco toppings are really up to personal preference. While I like avocado, lime juice, cilantro, and onion, some other great options are:

    • Coleslaw 
    • Red cabbage 
    • A crumbly cheese (like cotija cheese or queso fresco) 
    • Some hot sauce or chipotle crema
    • Chopped jalapeno pepper
    • Corn salsa or tomato salsa

    Storage and reheating

    • To store any leftovers, I suggest storing the pieces individually – rice in one container, beans in another, and toppings in another. Keep in the fridge for up to 5 days in airtight containers.
      • To reheat, assemble the taco and warm in the microwave for a few minutes. Or you can reheat each ingredient separately and then assemble once all are warmed. 

    FAQs

    What’s the difference between corn tortillas and flour tortillas?

    Corn tortillas are made from ground corn (masa harina) whereas flour tortillas are made from flour. Corn tortillas are less sturdy than flour tortillas, therefore are usually smaller. If you prefer corn tortillas and find that they are breaking, I tend to double them up. More on choosing between corn or flour tortillas here.

    Which bean is the healthiest?

    Overall beans are pretty healthy – a good source of fiber and protein – so it really just matters what you prioritize. Take a look here at some of the most common beans and their health benefits. 

    Is rice gluten free?

    Yes, rice is naturally gluten free. However double check any premade rice packaging to ensure no added ingredients contain gluten or may be cross contaminated. 

    What is in "Spanish style" rice or "Mexican style" rice?

    In addition to the rice it is typically tomato sauce and/or tomato paste, garlic, and spices. There are some nuanced differences in the two types of rices by way of quantities and added ingredients, but more or less the base is similar.

    Did you make this recipe? Leave a rating and review below and tag me on social!

    📖 Recipe

    Assembled tacos up close.

    Rice and Bean Tacos

    These Rice and Bean Tacos are an incredibly easy and quick meal to throw together. They use simple microwave Spanish rice and canned black beans that get zhuzhed up a bit with chopped chiles. 
    5 from 3 votes
    Print Pin Rate
    Prep Time: 10 minutes minutes
    Cook Time: 10 minutes minutes
    Total Time: 20 minutes minutes
    Servings: 4 tacos

    Ingredients

    • 4 taco size flour tortillas
    • 9 oz Spanish-Style ready rice
    • 15 oz can of black beans drained and rinsed
    • 1 tablespoon olive oil
    • ¼ teaspoon cumin
    • ¼ teaspoon chipotle powder
    • ½ teaspoon garlic powder
    • ½ teaspoon onion powder
    • 1 teaspoon kosher salt
    • 5 oz can mild chopped green chiles

    Optional for topping

    • 1 avocado
    • fresh lime juice
    • fresh chopped cilantro
    • minced white onion

    Instructions

    • Set a medium non-stick skillet over medium heat. Add the olive oil, beans, spices, and chiles. Cook for 5-10 minutes until warmed through, smashing up some of the beans as you mix them together.
    • Assemble the tacos – to your tortillas add rice, beans, and all the toppings you’d like. 

    Video

    Notes

    • If you have time, I'd recommend heating up your tortillas a bit before filling them. You can do this by putting them in the oven for a few minutes on 350℉, heating them on the stove top in a skillet, for 15 seconds in the microwave, or even directly on the open flame of your stovetop (careful with this one, they char quick!).

    Nutrition Estimate

    Calories: 587kcal | Carbohydrates: 98g | Protein: 18g | Fat: 14g | Saturated Fat: 3g | Polyunsaturated Fat: 2g | Monounsaturated Fat: 8g | Sodium: 953mg | Potassium: 784mg | Fiber: 15g | Sugar: 2g | Vitamin A: 163IU | Vitamin C: 17mg | Calcium: 112mg | Iron: 5mg
    Course: Main Course
    Cuisine: Mexican
    Keyword: Tacos
    Author: Haley

    Vanilla Chai Spice Muffins

    Close up of muffin with glaze drips.

    These Vanilla Chai Spice Muffins with a simple glaze have a delicious mixture of spices that are reminiscent of chai lattes. Baked with a simple crumble on top, then drizzled with a sweet glaze made of powdered sugar and a little vanilla. It's a fun way to spice up a classic vanilla muffin.

    Close up of muffin with glaze drips.
    [feast_advanced_jump_to]

    Ingredients 

    For the vanilla chai spice muffin batter:

    • All purpose flour: standard baking flour.
    • Granulated sugar: for the sweetness.
    • Dark brown sugar: also for sweetness – specifically dark brown sugar so that it adds the extra molasses-y flavor that pairs nicely with the chai spice.
    • Baking powder & baking soda: leavening agents
    • Spices: a combination of cinnamon, cardamom, ginger, allspice, cloves, and nutmeg make up a perfect chai flavor. 
    • Kosher salt: to bring out all the flavors and balance the sweetness.
    • Eggs: to bind and give moisture.
    • Butter: for richness, flavor, and moisture.
    • Greek yogurt: mostly for texture.
    • Whole milk: add more moisture.
    • Vanilla extract: a must in baking for flavor; vanilla bean paste can also be used. 

    For the crumb topping:

    • All purpose flour: standard baking flour. 
    • Dark brown sugar: to sweeten the crumb.
    • Cinnamon: round out the warm spice flavors further. 
    • Butter: to bind the crumb mixture together. 
    • Kosher salt: to balance out the sweetness. 

    For the glaze: 

    • Powdered sugar: also known as icing sugar is the base 
    • Whole milk: to thin the icing out just enough so you can drizzle it.
    • Vanilla extract: to flavor the icing. 

    How to make vanilla chai spice muffins 

    1. Make the batter. In a large bowl whisk together the wet ingredients (eggs, unsalted melted butter, whole milk, Greek yogurt, vanilla, granulated sugar, and dark brown sugar). On top of the wet ingredients add the dry (AP flour, baking powder, baking soda, salt, and all the spices) and whisk to combine.

    2. Make the crumb topping. In a small bowl, combine the flour, brown sugar, cinnamon, butter and salt. Pinch the ingredients together with your fingers until everything is moistened by the butter and able to stick together. 

    3. Assemble & Bake. Pour the batter into the cups of a prepared muffin tin, leaving just a hint of space at the top. Sprinkle the crumb topping over top of the batter. Bake at 350°F for 12-15 minutes until a cake tester comes out clean.

    4. Make the glaze. In a small bowl, mix together the powdered sugar, vanilla, whole milk, and salt until you get a smooth consistency. Drizzle over the freshly baked muffins.

    Finished vanilla chai spice muffins batter mixed together.
    Crumb topping mixed together.
    Vanilla bean glaze.

    Tips and tricks 

    • To tell if the muffins are cooked through, insert a cake tester or toothpick into the center of one. If any batter comes out, it’s not ready. If just a few crumbs come out, it’s ready. 
    • If you can’t find any of the spices needed for chai spice, you can substitute pumpkin spice mix in a pinch. 
    • Don’t over mix your batter, it can lead to dense and tough muffins. 
    • Baking with room temperature ingredients is preferred because it helps ensure they mix together fully, but I don’t find that it’s crucial for things like muffins. 
    • If you want the most accurate result when baking, I recommend using a kitchen scale. 
    • ​Keep an oven thermometer in your oven to make sure it's at the temperature it says it is. 

    Storage

    • Store any leftover muffins in an airtight container at room temperature for 2 days, or in the fridge for up to 5. 
    Baked vanilla chai spice muffins sliced in half.

    FAQs

    Why are sugars considered wet ingredients in baking? 

    Because they need to be mixed with the wet ingredients to properly dissolve and incorporate evenly into the batter.

    What is chai?

    Chai is a spiced tea that originated in India and is made with black tea, milk, and spices. More information on it here.

    Can I skip the crumble? 

    Sure! If you do, I’d recommend a light sprinkling of turbinado sugar (raw sugar) on top to give them a little crunch. 

    Can I use chai tea bags for this recipe?

    I haven’t tried it that way, I more emulate the spice flavor with ground spices. If you want to take it up a notch, you could steep some chai tea in the whole milk. However, I wouldn’t replace or remove the spices. 

    Did you make this recipe? Leave a rating and review below and tag me on social!

    📖 Recipe

    Close up of muffin with glaze drips.

    Vanilla Chai Spice Muffins

    These Vanilla Chai Spice Muffins with a simple glaze have a delicious mixture of spices that are reminiscent of chai lattes. Baked with a simple crumble on top, then drizzled with a sweet glaze made of powdered sugar and a little vanilla. It's a fun way to spice up a classic vanilla muffin.
    3 from 3 votes
    Print Pin Rate
    Prep Time: 15 minutes minutes
    Cook Time: 15 minutes minutes
    Total Time: 30 minutes minutes
    Servings: 12 muffins

    Ingredients

    For the muffin batter:

    • 2 large eggs room temp
    • ½ cup unsalted butter melted and cooled
    • ½ cup whole milk
    • ¼ cup full fat plain Greek yogurt
    • 2 teaspoon vanilla extract
    • ½ cup granulated sugar
    • ½ cup dark brown sugar
    • 2 cups all purpose flour
    • 1 teaspoon baking powder
    • 1 tsp baking soda
    • 2 teaspoon kosher salt
    • 3 teaspoon ground cinnamon
    • 1 teaspoon ground cardamom
    • 1 teaspoon ground ginger
    • ½ teaspoon ground allspice
    • ½ teaspoon ground cloves
    • ½ teaspoon ground nutmeg

    For the crumb topping:

    • ½ cup all purpose flour
    • ¼ cup dark brown sugar
    • ½ teaspoon ground cinnamon
    • ¼ cup unsalted butter cold
    • ½ teaspoon kosher salt

    For the glaze:

    • 1 cup powdered sugar
    • 2 tablespoon whole milk
    • ½ teaspoon vanilla extract

    Instructions

    • Preheat your oven to 350℉.
    • Make the batter. In a large bowl whisk together the wet ingredients (eggs, unsalted melted butter, whole milk, Greek yogurt, vanilla, granulated sugar, and dark brown sugar). On top of the wet ingredients add the dry (AP flour, baking powder, baking soda, salt, and all the spices) and whisk to combine.
    • Make the crumb topping. In a small bowl, combine the flour, brown sugar, cinnamon, butter and salt. Pinch the ingredients together with your fingers until everything is moistened by the butter and able to stick together. 
    • Assemble & Bake. Pour the batter into the cups of a prepared muffin tin, leaving just a hint of space at the top. Sprinkle the crumb topping over top of the batter. Bake at 350°F for 12-15 minutes until a cake tester comes out clean.
    • Make the glaze. In a small bowl, mix together the powdered sugar, vanilla, whole milk, and salt until you get a smooth consistency. Drizzle over the freshly baked muffins.

    Video

    Nutrition Estimate

    Calories: 346kcal | Carbohydrates: 54g | Protein: 5g | Fat: 13g | Saturated Fat: 8g | Polyunsaturated Fat: 1g | Monounsaturated Fat: 3g | Trans Fat: 0.5g | Cholesterol: 60mg | Sodium: 634mg | Potassium: 95mg | Fiber: 1g | Sugar: 32g | Vitamin A: 417IU | Vitamin C: 0.1mg | Calcium: 71mg | Iron: 2mg
    Course: Breakfast
    Cuisine: American
    Keyword: muffin
    Author: Haley

    Spinach and Ricotta Lasagna

    Sliced spinach and ricotta lasagna.

    This Spinach and Ricotta Lasagna is a staple recipe from my childhood, with layers of homemade tomato sauce and a creamy ricotta and spinach filling between noodles, topped with more cheese and baked until the edges are crisp and the inside is tender and perfectly cooked. I added a few new things to spice it up – lemon zest and nutmeg – and they really take it to the next level.

    Sliced spinach and ricotta lasagna.
    [feast_advanced_jump_to]

    Ingredients 

    Ingredients to make this spinach ricotta lasagna are below, with quantities listed in the recipe card at the end of this post. 

    Ingredients to make lasagna.
    • Pasta noodles: I like to use the no boil pasta noodles. Yes, it’s cutting a corner, but I feel like the biggest annoyance of a lasagna is par-boiling the noodles in a huge pot and then separating them and dealing with all that. 
    • Passata: Strained tomatoes (no chunks, even smoother than a tomato puree) which is perfect for a smooth tomato sauce. Learn more about passata here.
    • Yellow onion: Minced onion creates the perfect base of flavor for the tomato sauce. 
    • Garlic: About four garlic cloves, minced, flavors the sauce.
    • Cheeses: A mixture of ricotta cheese, shredded mozzarella cheese, and grated parmesan cheese are combined to make the cheese layer. 
    • Olive oil: For sautéing the onion and garlic. 
    • Egg: Binds together the cheese mixture and gives it a somewhat custardy texture. 
    • Parsley: A fresh element in the cheese layer. 
    • Spinach: Fresh spinach or frozen spinach can be used. I like to use fresh and cook it down. If you’re using frozen spinach make sure you defrost it and squeeze out the excess water.
    • Lemon zest: The smallest hint of lemon zest brings the dish to life with acidity and a very mild background flavor of citrus. 
    • Nutmeg: A dash of nutmeg brings a subtle warmth and depth of flavor. 
    • Salt and pepper

    How to make spinach and ricotta lasagna

    Cooked garlic and onion.

    Make the sauce. In a medium pot over medium heat, warm olive oil. Once warm, sauté the onion and garlic for 5 minutes until softened and very fragrant.

    Passata added to sauce.

    Add the salt and passata, reduce the heat to low, and simmer for about 10 minutes. 

    Cooked spinach.

    Cook the spinach. Warm another skillet over medium heat. Add all the spinach and cook for 5 minutes until it’s all wilted.

    Chopped spinach.

    Chop the spinach. Let it cool then squeeze out the excess liquid and chop it up.

    Ricotta and spinach mixture.

    Make the ricotta filling. In a large bowl, mix together the ricotta cheese, parmesan cheese, mozzarella cheese, parsley, lemon zest, nutmeg, salt, pepper, egg, and chopped spinach. 

    Sauce on bottom of dish.

    Layer. Spread a ladle full of sauce on the bottom of your baking dish.

    Layer of noodles.

    Place a single layer of noodles on top of the sauce.

    Layer of cheese mixture.

    Followed by a layer of the ricotta mixture (using about ½ cup).

    Sauce on top of cheese layer.

    Followed by a layer of sauce (1-2 ladles).

    Finished pre-baked lasagna.

    Repeat with layers of lasagna noodles, cheese, and sauce until you’re out of both ending your final layer with noodles, sauce, and then top with additional remaining mozzarella cheese. 

    Fresh baked lasagna out of the oven.

    Bake. Cover the baking dish with aluminum foil and bake for 40 minutes, then remove the foil and bake for a final 10-15 minutes until golden brown. 

    What is lasagna?

    It’s an Italian baked pasta dish made with bolognese and bechamel sauce (meat sauce and white sauce), however many regions make it differently, so there is no one traditional lasagna recipe. For example, in southern Italy they use ricotta instead of bechamel, and that is how I like it (the Italian part of my family is from Sicily). Then, to make it vegetarian, I use a classic marinara sauce in place of meat sauce (bolognese). 

    Tips and tricks 

    • The no-boil noodles expand as they bake so if they don’t cover the entirety of the pan don’t worry.
      • If you want to use regular noodles or fresh lasagna sheets you can – just par boil lasagna noodles to al dente (a few minutes shy of package instructions), then drain the cooked noodles and lay them out individually so they don't get stuck together while you prep the rest of the ingredients. Cooking time will vary based on the noodle you use, so make sure you check the packaging. 
    • If you want an extra crispy top, broil the lasagna for a few minutes before you take it out of the oven.
    • If you have a jarred marinara sauce that you swear by, feel free to use it in this recipe instead of making your own sauce. 
    • While this is a vegetarian lasagna recipe, if you want to make it a meat lasagna I’d suggest browning some ground beef and adding it to the sauce (you can cook it in the same skillet before you add the onion and garlic). 
    • You can use a food processor to cut up the spinach and make the ricotta mixture. 
    • If you want to add more protein, use half cottage cheese and half ricotta cheese. 
    • To make it a little spicy, add some red pepper flakes or chopped Calabrian chili to the tomato sauce. 

    Storage and reheating

    • Store leftover lasagna in the fridge in an airtight container. 
    • Reheat lasagna in the microwave for a few minutes or the oven at 350°F for 10-15 minutes. 
    • Lasagna can be par baked and frozen, then finished baking when you’d like to eat it. I like to do this in a foil baking dish as opposed to ceramic. 

    What to serve with spinach and ricotta lasagna 

    Lasagna is quite filling on its own, but if you want to balance the meal with something additional here are some suggestions!

    • A simple arugula salad with lemon juice, extra virgin olive oil, and pistachios or pine nuts.
    • If you'd like to add meat, a grilled steak or roasted chicken would be delicious. 
    • A vegetable side dish like roasted zucchini or carrots glazed with maple and chili. 
    Slice of lasagna on a plate.

    How to make lasagna ahead 

    Prepare and assemble the lasagna in your baking dish, wrap it in foil or plastic wrap and place it in the fridge for up to two days. Before you bake it, take it out 30 minutes to start bringing it to room temperature.

    FAQs

    Can I make this dairy free?

    If you have dairy free alternatives you like for all the cheeses used in this recipe, I don’t see why not! I have not tried it, though.

    Can I use gluten free noodles?

    Similar to dairy free, I haven’t tried it, but if you have gluten free lasagna noodles that you like, go for it. 

    Should you bake lasagna uncovered or covered? 

    Covered to start so the inside cooks, then uncovered to finish so the top browns. 

    Is there a difference between lasagna and lasagne?

    Not really, formally, one is single (a single sheet of lasagna) one is plural (multiple sheets of lasagne).

    Did you make this recipe? Leave a rating and review below and tag me on social!

    📖 Recipe

    Sliced spinach and ricotta lasagna.

    Spinach and Ricotta Lasagna

    This Spinach and Ricotta Lasagna is a staple recipe from my childhood, with layers of homemade tomato sauce and a creamy ricotta and spinach filling between noodles, topped with more cheese and baked until the edges are crisp and the inside is tender and perfectly cooked. I added a few new things to spice it up – lemon zest and nutmeg – and they really take it to the next level.
    No ratings yet
    Print Pin Rate
    Prep Time: 30 minutes minutes
    Cook Time: 50 minutes minutes
    Total Time: 1 hour hour 20 minutes minutes
    Servings: 8 servings

    Equipment

    • 10.5 x 7.5 baking dish

    Ingredients

    • 2 boxes oven ready lasagna noodles

    Sauce

    • 26 oz passata (strained tomatoes)
    • ½ yellow onion minced, ½ cup
    • 4 cloves garlic minced, 1 tbsp
    • 1 teaspoon kosher salt

    Ricotta cheese mixture

    • 32 oz whole milk ricotta cheese
    • 1 large egg
    • ½ cup shredded mozzarella cheese
    • ½ cup grated parmesan cheese + more for topping
    • 2 tablespoon chopped parsley
    • 1 teaspoon kosher salt
    • ¾ teaspoon black pepper
    • ¼ teaspoon lemon zest
    • ⅛ teaspoon nutmeg
    • 8 oz spinach
    • 1 tablespoon olive oil

    Instructions

    • Preheat your oven to 375℉

    Make the sauce

    • In a medium pot over medium heat, warm olive oil. Once warm, sauté the onion and garlic for 5 minutes until softened and very fragrant.
    • Add the salt and passata, reduce the heat to low, and simmer for about 10 minutes. 

    Cook the spinach

    • Warm another skillet over medium heat. Add the olive oil and spinach, and cook for 5 minutes until it’s all wilted.
    • Let it cool then squeeze out the excess liquid and chop it up.

    Make the ricotta filling

    • In a large bowl, mix together the ricotta cheese, parmesan cheese, mozzarella cheese, parsley, lemon zest, nutmeg, salt, pepper, egg, and chopped spinach. 

    Assemble

    • Spread a ladle full of sauce on the bottom of your baking dish.
    • Place a single layer of noodles on top of the sauce.
    • Followed by a layer of the ricotta mixture (using about ½ cup).
    • Followed by a layer of sauce (1-2 ladles).
    • Repeat with layers of lasagna noodles, cheese, and sauce until you’re out of both ending your final layer with noodles, sauce, and then top with additional remaining mozzarella cheese. 

    Bake

    • Cover the baking dish with aluminum foil and bake for 40 minutes, then remove the foil and bake for a final 10-15 minutes until golden brown. 

    Video

    Nutrition Estimate

    Calories: 522kcal | Carbohydrates: 62g | Protein: 27g | Fat: 20g | Saturated Fat: 12g | Polyunsaturated Fat: 1g | Monounsaturated Fat: 5g | Trans Fat: 0.003g | Cholesterol: 121mg | Sodium: 866mg | Potassium: 727mg | Fiber: 4g | Sugar: 6g | Vitamin A: 1195IU | Vitamin C: 12mg | Calcium: 352mg | Iron: 2mg
    Course: Dinner
    Cuisine: Italian, Italian/American
    Keyword: lasagna, Pasta, Vegetarian
    Author: Haley

    Leek and Gruyere Quiche

    Close up image of sliced leek and gruyere quiche.

    This Leek and Gruyere Quiche highlights a classic flavor pairing in a perfectly custardy dish with a few shortcuts that make it even more enjoyable. With tender leeks and creamy gruyere cheese, it's an impressive brunch or even meal prep for the week. 

    Close up image of sliced leek and gruyere quiche.
    [feast_advanced_jump_to]

    Ingredients 

    Ingredient quantities and full recipe can be found in the recipe card at the end of this post. 

    Ingredients labeled on a table.
    • Pie crust: When I have time and plan ahead, I like to make a homemade pie crust. But when I don’t (which is the more often scenario) I buy a frozen store-bought pie crust. 
    • Leeks: The white and light green parts of about 3 large leeks sliced into half moons.
    • Gruyere cheese: One of my favorite cheeses. It’s mild, semi-hard, with a little funk. Similar to a cheddar cheese but less sharp.
      • The closest substitution is Swiss cheese if you’re having trouble finding gruyere. 
    • Eggs: Four large eggs. If you only have medium eggs, use five of them. 
    • Heavy cream and whole milk: The combination of heavy cream and whole milk creates a perfect creamy consistency that helps result in a custardy moist egg mixture. 
    • Salt and pepper: Always kosher salt and fresh black pepper, if you can.
    • Olive oil: To sauté the leeks before adding them to the quiche. 

    How to make a Leek and Gruyere Quiche 

    Par-baked pie crust.

    1. Par-bake your pie crust in a pie pan at 400°F for 10 minutes then remove. Reduce the oven temperature to 375°F.

    Sautéed leeks.

    2. Warm a large skillet over medium heat. Add the olive oil, once warm add the leeks and sauté until soft, about 5-10 minutes. Set them aside to get to room temperature.

    Egg mixture with cream, milk, salt, and pepper.

    3. In a large bowl, whisk together the eggs, heavy cream, whole milk, salt and pepper. 

    Leeks added to crust.

    4. Place the pre-made pie crust on a rimmed baking sheet, put the sautéed leeks on the bottom.

    Egg mixture poured on top of leeks.

    5. Pour the egg mixture directly on top of the leeks. 

    Cheese added on top.

    6. Scatter the grated cheese overtop, allowing it to sink in a bit. 

    Fresh baked quiche out of the oven.

    7. Bake for approximately 30 minutes until golden brown and set. Remove and let the baked quiche cool for at least 15 minutes before digging in. 

    Tips and tricks

    This leek and cheese quiche is one of the simpler ones to make, but with a ton of flavor.

    • Leeks are dirty, especially between their layers. Make sure you are cleaning them well after you cut them (by rinsing under cold water). 
    • To par-bake your crust use a piece of parchment paper topped with pie weights or dried beans to help keep its shape. If you use dried beans, you should not use them for cooking in the future. 
    • To know if your quiche is set and ready to take out of the oven, give it a gentle wiggle. If the center looks liquidy it is not set yet. 
    • To get a flaky crust and to keep the bottom of the quiche crust from getting soggy, par-baking is crucial.
      • Good to know: Par-baking and blind baking are two different things – par-baking bakes the crust only a little, whereas blind baking fully bakes the crust with no filling. 
    • If you want to add some more veggies, sautéed spinach or mushrooms would be great. 

    How to make your own pie crust

    Ingredients: 

    • 1 ¼ cups all purpose flour 
    • ½ cup unsalted butter, cold and cubed 
    • ½ teaspoon kosher salt
    • 3-4 tablespoon cold water (ice water preferred)

    Combine the flour, butter and salt in the bowl of a food processor. Add 3 tablespoon water and pulse until you get moist crumbles that stick together when squeezed in your fist. If you need to add more water, do so a splash at a time. Turn it out onto a clean surface and form it into a disc. Wrap in plastic wrap and refrigerate until ready to use. When ready to use, roll it out on a lightly floured surface using a rolling pin until roughly ¼ inch thin. 

    ​Storage and reheating 

    • Store in an airtight container in the fridge for up to 3 days. 
    • Reheat in the microwave for a few minutes until warmed through or in an oven at 350°F for 10-15 minutes. 
    • To freeze, bake it until cooked through then wrap tightly and store in the freezer for up to 3 months, but eating it after 1 month is recommended. 
    Slice of quiche on a plate.


    What to serve alongside leek and gruyere quiche

    • Simple green salad
    • Berries or citrus fruit 
    • Crispy maple bacon or breakfast sausage 


    FAQs

    How are leeks different than onions?

    They are in the same family (allium), but leeks are more mild than an onion. 

    Can I add meat?

    Sure! Any meat you add, make sure it’s cooked before you bake everything. 

    Do I need to cook leeks before adding them to a quiche?

    Yes, you do. They will not cook fully if added raw. 

    What’s the easiest way to cut leeks?

    Trim off the root end and the dark green parts. Slice in half lengthwise, then cut thin slices of half moons. 

    Is heavy cream or milk better for a quiche?

    Milk will give you a lighter quiche, and cream will give you a richer quiche - that’s why I use a combination of the two, light yet rich. 

    Can this be made in a tart pan?

    No, there's too much filling it would overflow. 

    Did you make this recipe? Leave a rating and review below and tag me on social!

    📖 Recipe

    Close up image of sliced leek and gruyere quiche.

    Leek and Gruyere Quiche

    This Leek and Gruyere Quiche highlights a classic flavor pairing in a perfectly custardy dish with a few shortcuts that make it even more enjoyable. With tender leeks and creamy gruyere cheese, it's an impressive brunch or even meal prep for the week. 
    5 from 1 vote
    Print Pin Rate
    Prep Time: 15 minutes minutes
    Cook Time: 45 minutes minutes
    Total Time: 1 hour hour
    Servings: 6 servings

    Ingredients

    • 4 eggs
    • ¼ cup whole milk
    • ¾ cup heavy cream
    • 3 leeks sliced into half-moons, 2 cups
    • ¾ cup shredded gruyere cheese
    • 2 teaspoon kosher salt
    • 1 teaspoon black pepper
    • 1 tablespoon olive oil
    • 1 store bought pie crust

    Instructions

    • Preheat your oven to 400℉.
    • Par-bake your pie crust in a pie pan at 400°F for 10 minutes then remove. Reduce the oven temperature to 375°F.
    • Warm a large skillet over medium heat. Add the olive oil, once warm add the leeks and sauté until soft, about 5-10 minutes. Set them aside to get to room temperature.
    • In a large bowl, whisk together the eggs, heavy cream, whole milk, salt and pepper. 
    • Place the pre-made pie crust on a rimmed baking sheet, put the sautéed leeks on the bottom.
    • Pour the egg mixture directly on top of the leeks. 
    • Scatter the grated cheese overtop, allowing it to sink in a bit. 
    • Bake for approximately 30 minutes until golden brown and set. Remove and let the baked quiche cool for at least 15 minutes before digging in. 

    Video

    Nutrition Estimate

    Calories: 395kcal | Carbohydrates: 22g | Protein: 12g | Fat: 29g | Saturated Fat: 14g | Polyunsaturated Fat: 3g | Monounsaturated Fat: 11g | Trans Fat: 0.01g | Cholesterol: 162mg | Sodium: 1071mg | Potassium: 210mg | Fiber: 2g | Sugar: 3g | Vitamin A: 1513IU | Vitamin C: 6mg | Calcium: 249mg | Iron: 2mg
    Course: Breakfast, Brunch
    Cuisine: American, French
    Keyword: Eggs, quiche
    Author: Haley
    • « Previous Page
    • 1
    • 2
    • 3
    • 4
    • 5
    • …
    • 32
    • Next Page »

    HEY THERE!

    Welcome to Cozy Cravings! Happy to have you. Here, you’ll find comfort food recipes & other delicious things to enjoy and devour.

    POPULAR POSTS

    • Close up of broccoli au gratin.
      Broccoli Au Gratin (Broccoli Casserole)
    • Finished french onion pasta in a bowl.
      One Pot French Onion Pasta
    • close up image of maple candied bacon on a plate.
      Maple Candied Bacon
    • Overhead image of lasagna fresh out of the oven with sage on top.
      Butternut Squash and Spinach Lasagna

    Footer

    ↑ back to top

    about

    • ABOUT
    • CONTACT
    • PRIVACY POLICY

    Let's Keep In Touch!

    Subscribe here for delicious recipes, updates & more!

    Thank you!

    You have successfully joined our subscriber list.

    .

    recipe index

    • APPETIZERS
    • BREAKFAST & BRUNCH
    • LUNCH & DINNER
    • SNACKS & SIDES
    • DESSERTS

    Copyright © 2026 · CozyCravings.com

    Rate This Recipe

    Your vote:


    A rating is required
    A name is required
    An email is required