• Recipes
  • Contact
  • About
  • Shop

Cozy Cravings

menu icon
go to homepage
  • RECIPES
  • ABOUT
  • CONTACT
  • SUBSCRIBE
    • Facebook
    • Instagram
    • Pinterest
  • subscribe
    search icon
    Homepage link
    • RECIPES
    • ABOUT
    • CONTACT
    • SUBSCRIBE
    • Facebook
    • Instagram
    • Pinterest
  • ×
    Home

    Chicks in a Blanket with Everything Bagel Seasoning

    Chicken in a blanket in a pile on a tray.

    These Chicks in a Blanket with Everything Bagel Seasoning are a perfect appetizer for when you want something traditional (pigs in a blanket) with a little twist. Puff pastry-wrapped chicken sausage dipped in everything bagel seasoning and baked until golden brown.

    [feast_advanced_jump_to]

    Ingredients

    This 3 ingredient easy appetizer is an absolute gem. It's just chicken pigs in a blanket, which if you don't love pork is a perfect swap.

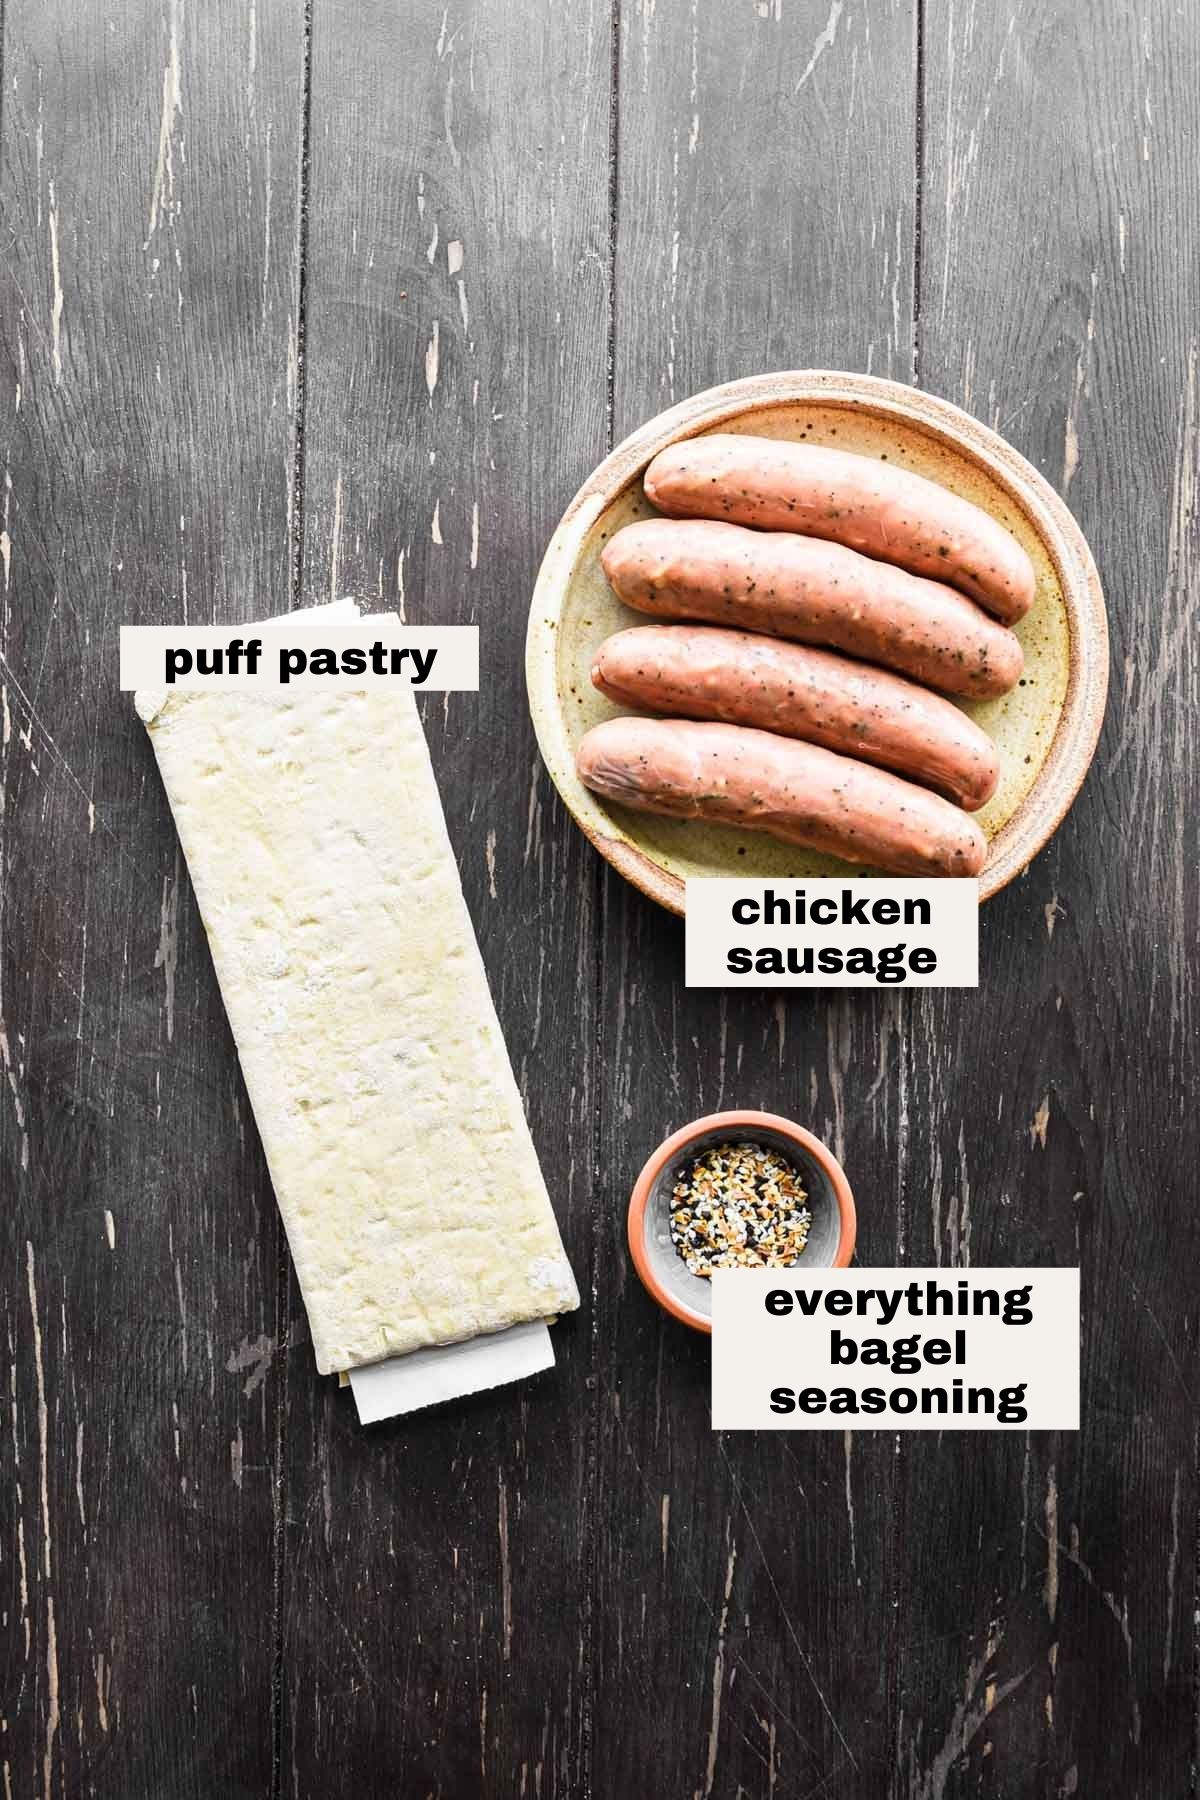
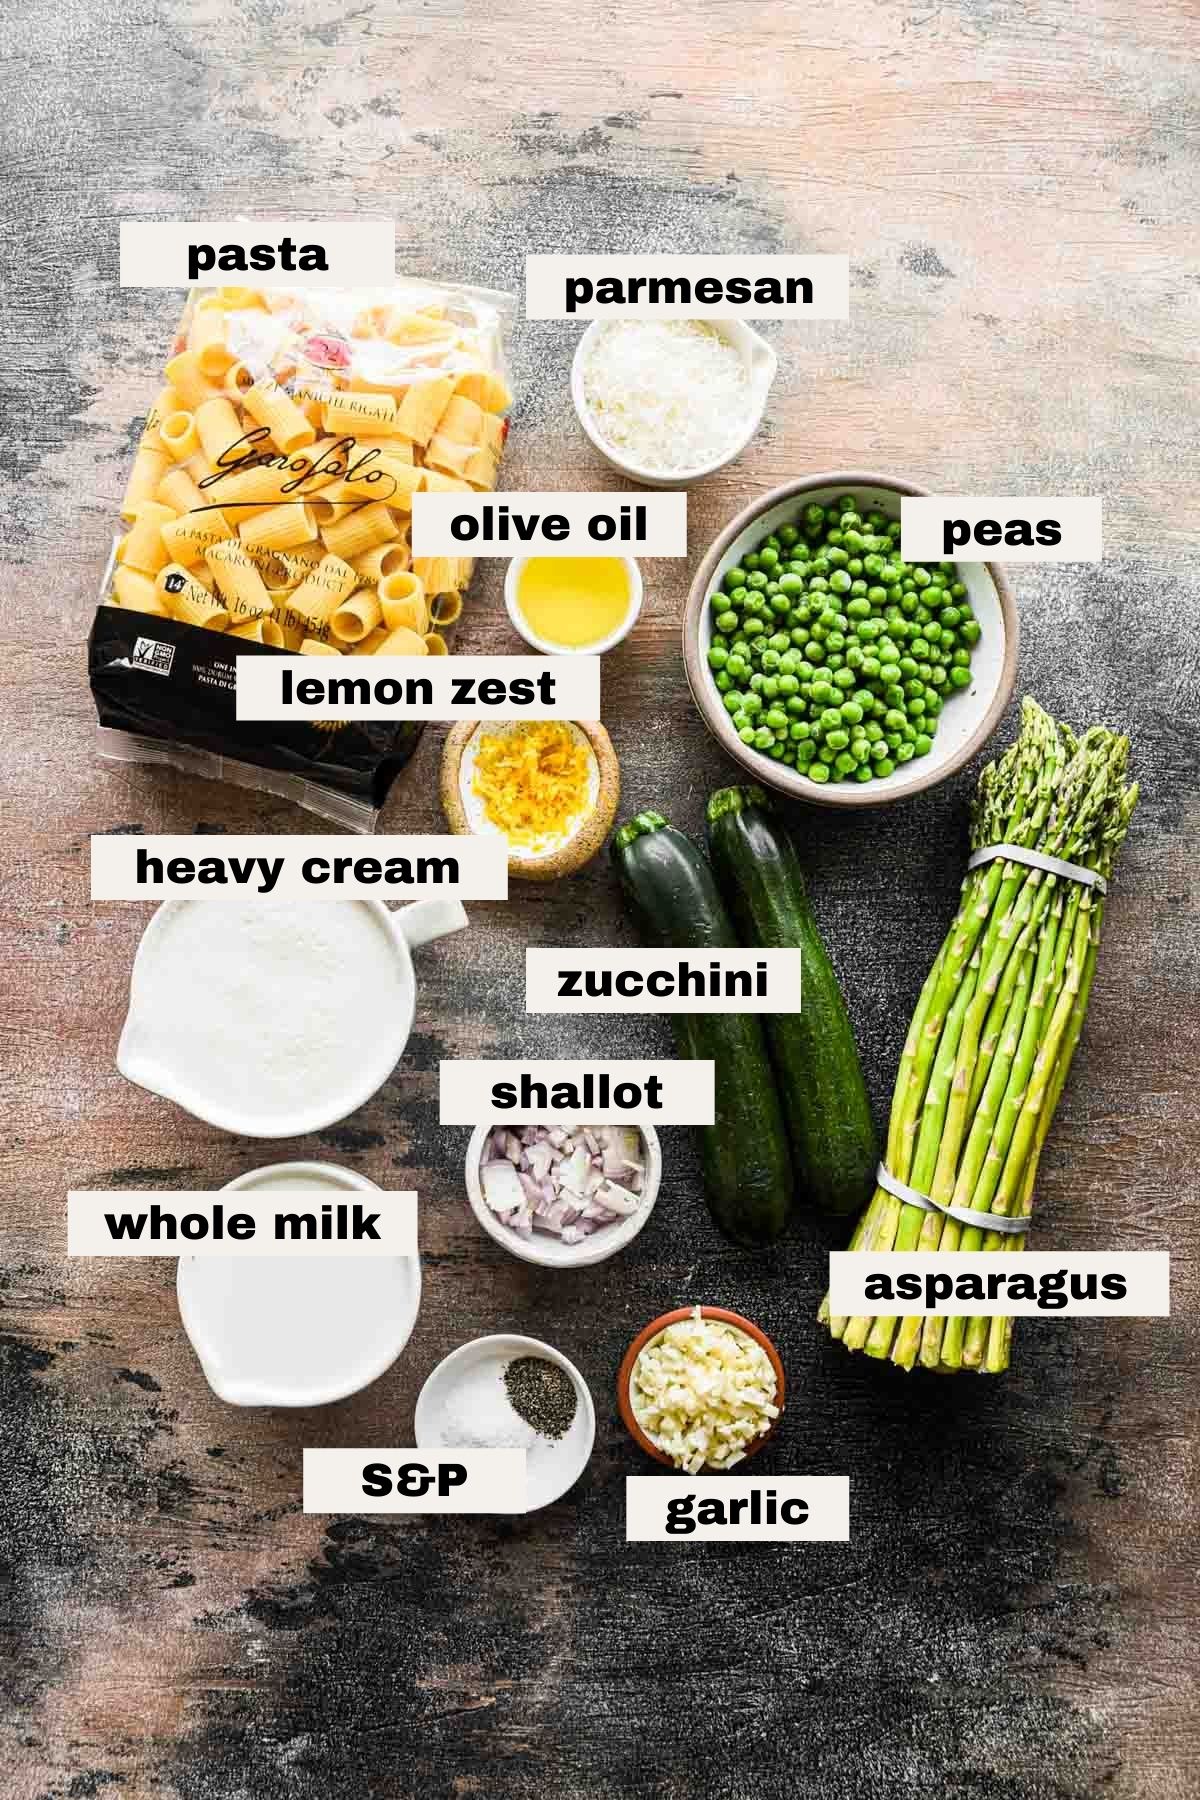
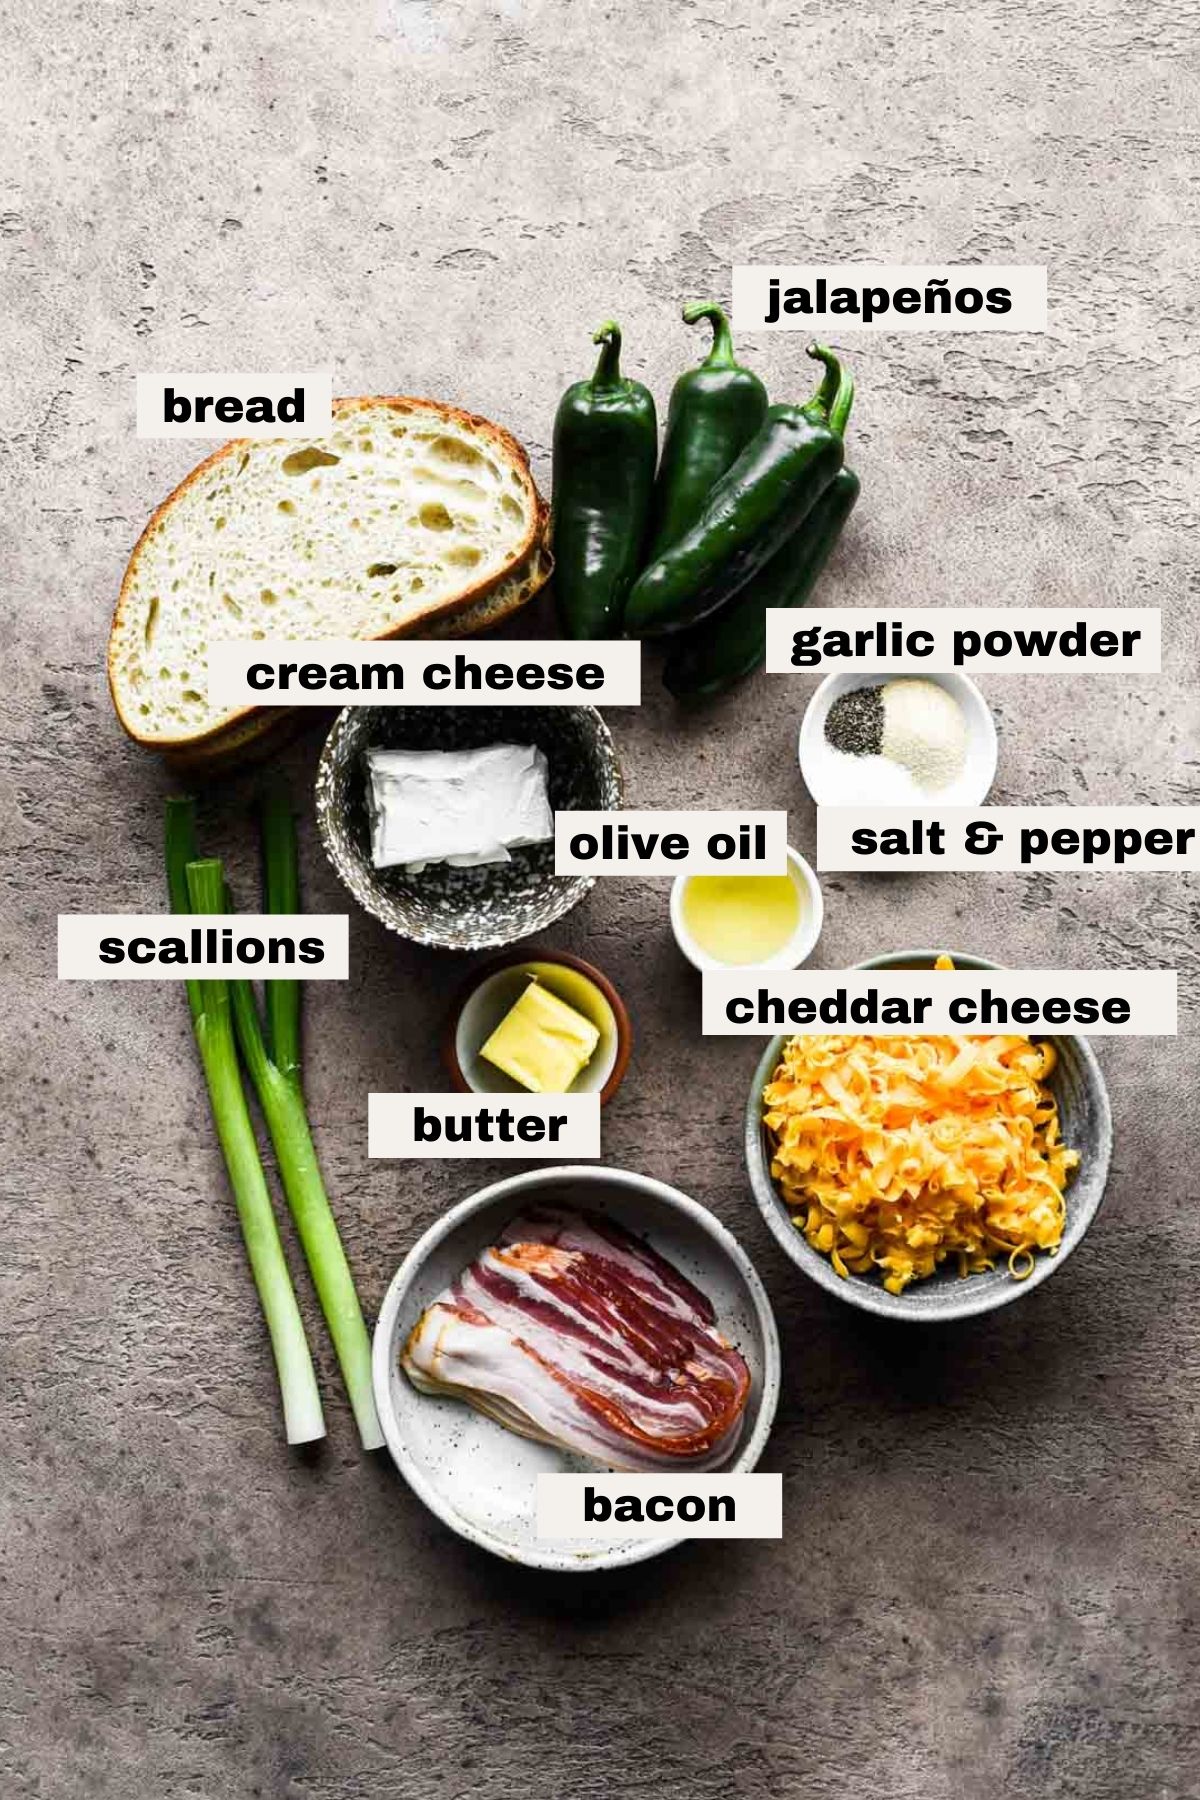
    • Puff pastry: This acts as the "blanket" in the chicks in a blanket.
      • You can use crescent rolls instead.
    • Chicken sausage: Fully cooked chicken sausage. You can use your favorite flavor – ones that I think work really well are: Chicken & Apple, Italian, Garlic & Gruyere, and anything spicy.
    • Everything bagel seasoning: made up of salt, sesame seeds, poppy seeds, dried minced garlic, and dried minced onion. If you have all of that on hand and want to make your own, go for it! I buy it pre-mixed at Trader Joe's.

    Step by step instructions

    Note: you need the puff pastry / crescent roll dough to be defrosted. So move it from the freezer into the fridge the night before or at least 6 hours in advance. Here's on thawing puff pastry.

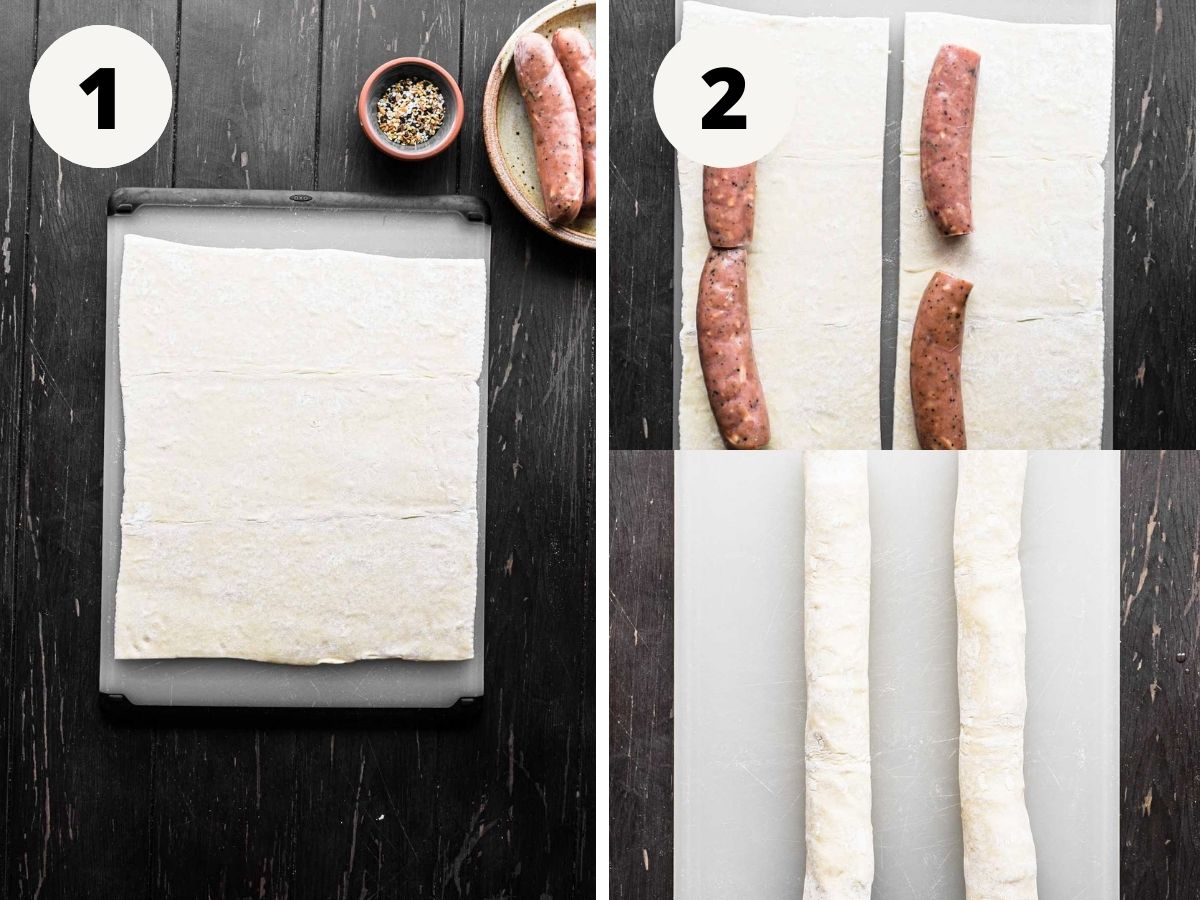
    1. Roll out the dough. Onto a flat surface, unfold / unroll the dough and cut it into 2 equal pieces vertically.

    2. Roll up the chicken sausage. Place 4 links of chicken sausage on top of the 2 pieces of dough. Roll tightly and gently pinch the seam.

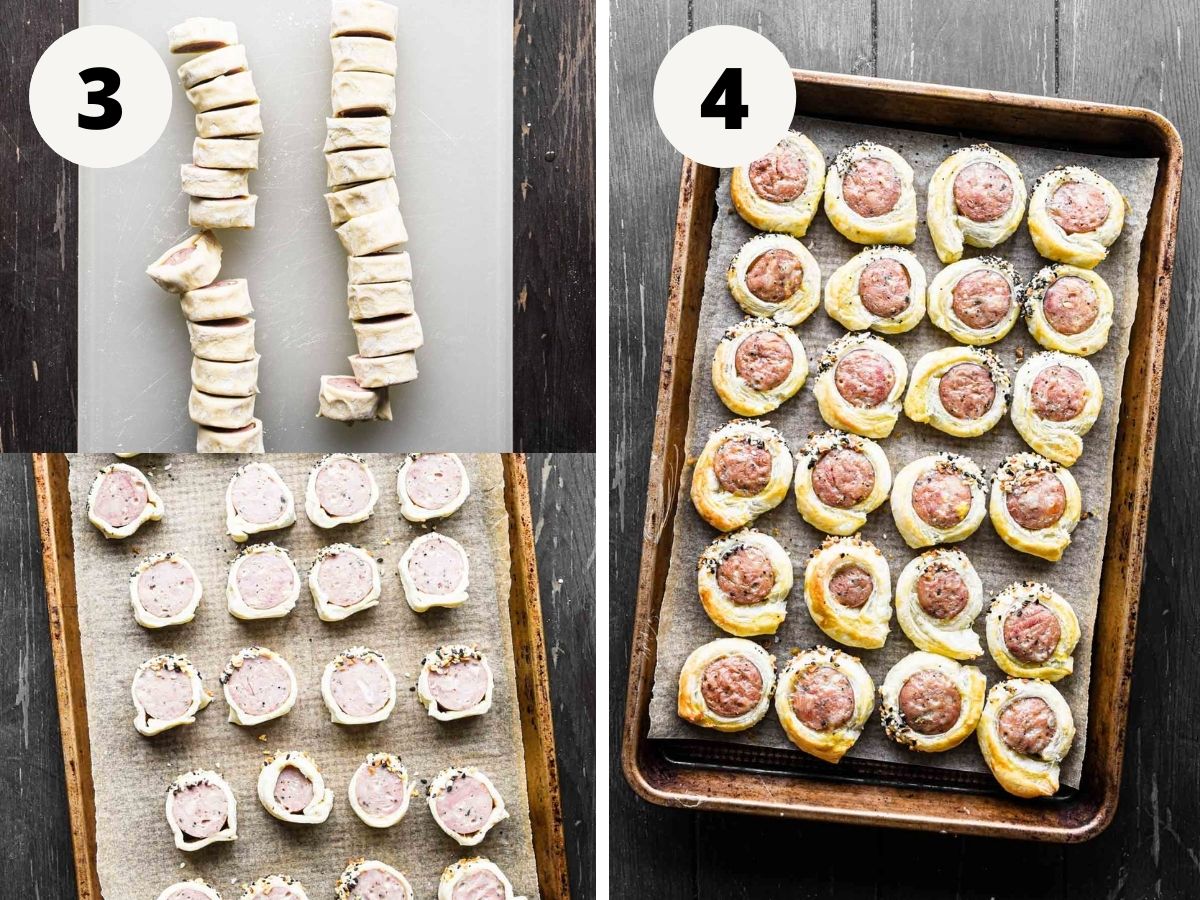
    3. Cut and season. Prep a parchment-lined baking sheet. Cut the rolled sausage into even pieces and dip the dough part into the everything bagel seasoning.

    4. Bake. Bake at 375℉ for about 12-15 minutes until golden.

    Tips and tricks

    • Use your favorite chicken sausage. This recipe chicken in a blanket recipe is pretty forgiving, so use whatever you like most.
    • To get really golden chicks in a blanket, make an egg wash with 1 egg + 1 tablespoon water beaten, then brush on the dough before baking.
    • Use a sharp knife. This will help ensure you get clean, easy cuts when cutting the links.
    • If you forget to defrost your puff pastry dough, wrap it in a paper towel and defrost in the microwave in 30 second increments.

    More easy appetizers

    • Tomato confit on whipped ricotta toasts.
      Tomato Confit Whipped Ricotta Toasts
    • Up close image of finished garlic bread.
      Baguette Garlic Bread
    • Thumbnail
      Roasted Garlic Baked Ricotta Dip

    📖 Recipe

    Chicken in a blanket in a pile on a tray.

    Chicks in a Blanket with Everything Bagel Seasoning

    These Chicks in a Blanket with Everything Bagel Seasoning are a perfect appetizer for when you want something traditional (pigs in a blanket) with a little twist. Puff pastry-wrapped chicken sausage dipped in everything bagel seasoning and baked until golden brown.
    5 from 3 votes
    Print Pin Rate
    Prep Time: 15 minutes minutes
    Cook Time: 15 minutes minutes
    Total Time: 30 minutes minutes
    Servings: 4 people

    Ingredients

    • 1 sheet puff pastry
    • 12 oz pre-cooked chicken sausage
    • 2 tablespoon everything bagel seasoning

    Instructions

    • Preheat your oven to 375℉.
    • Onto a flat surface, unfold / unroll the dough and cut it into 2 equal pieces vertically.
    • Place 4 links of chicken sausage on top of the 2 pieces of dough. Roll tightly and gently pinch the seam.
    • Prep a parchment-lined baking sheet. Cut the rolled sausage into even pieces and dip the dough part into the everything bagel seasoning.
    • Bake at 375℉ for about 12-15 minutes until golden.

    Nutrition Estimate

    Calories: 508kcal | Carbohydrates: 32g | Protein: 17g | Fat: 35g | Saturated Fat: 8g | Polyunsaturated Fat: 3g | Monounsaturated Fat: 13g | Cholesterol: 60mg | Sodium: 1417mg | Potassium: 37mg | Fiber: 1g | Sugar: 1g | Vitamin A: 301IU | Vitamin C: 1mg | Calcium: 6mg | Iron: 2mg
    Course: Appetizer, Appetizers
    Cuisine: American
    Keyword: Chicken appetizer, Chicks in a blanket
    Author: Haley

    Lemon Ricotta Blueberry Muffins

    Fresh baked muffins in a muffin tin.

    These Lemon Ricotta Blueberry Muffins are incredibly tender and moist with fresh blueberries, creamy ricotta, and zesty lemon. A delicious balance of sweet, tart, and creamy, they're a perfect treat for breakfast, brunch, or even dessert.

    [feast_advanced_jump_to]

    Ingredients

    There are a decent amount of ingredients needed to make these lemon ricotta blueberry muffins but it's worth it!

    • Flour: All purpose flour is my standard for baking.
    • Baking powder: The leavening agent! Important that you use baking powder not baking soda.
    • Eggs: Large eggs. Get pasture-raised if you can – this means the chickens are kept on an open pasture as opposed to within cages/a confined area.
    • Ricotta cheese: An absolute dream to cook with because of how much moisture it adds! Whole milk ricotta is best.
    • Oil: Any neutral oil will do. I used vegetable oil but canola or grapeseed would also work.
    • Whole milk: Adds additional moisture to the muffins and a little extra fat (aka flavor).
    • Vanilla: Vanilla extract or vanilla bean paste. If you want little vanilla flecks, try vanilla bean paste!
    • Lemon zest and juice: Both the zest and the juice makes sure the lemon flavor really comes through.
    • Sugar: Regular granulated sugar.
    • Blueberries: Fresh or frozen! Use fresh if you can!
    • Turbinado sugar: A sprinkle of turbinado sugar on top of the muffins before they bake gives them that slightly crisp top that is so good.

    Step by step instructions

    Overview: quick steps to make lemon ricotta blueberry muffins

    • In a large bowl combine the sugar and lemon zest with your fingers.
    • Add the eggs. Then add the ricotta, oil, milk, vanilla, and lemon juice.
    • Add the flour, baking powder, and salt.
    • Coat the blueberries in flour and fold into the batter.
    • Scoop into a muffin tin, sprinkle with turbinado sugar, and bake at 375℉ for 30 minutes.

    Detailed steps

    1. Make the lemon sugar. In a mixing bowl, combine the granulated sugar with the lemon zest by rubbing it together with your fingers to infuse the lemon flavor throughout the sugar.

    2. Add the eggs. To the lemon sugar, add the eggs until fully combined.

    3. Add the remaining wet ingredients. To the same bowl add the ricotta cheese, vegetable oil, whole milk, vanilla, and lemon juice. Mix to combine and until smooth.

    4. Add the dry ingredients. To the bowl add the flour, baking powder, and salt. Mix until just combined.

    5. Flour the blueberries. Toss your blueberries in 1 tablespoon flour until evenly coated.

    6. Add the blueberries. Gently fold the floured blueberries into the muffin batter.

    7. Fill and bake. In a lined muffin tin, scoop batter into the molds until just about at the top of the mold. Sprinkle turbinado sugar evenly over each and bake at 375℉ for 30 minutes until golden brown and a tester comes out clean.

    Tips and tricks

    While these blueberry lemon ricotta muffins are pretty quick and easy to make, the below tips and tricks will help make sure they turn out just right.

    • Zest the lemon before you juice it! It'll be way harder to zest if you juice it first.
    • Fold the blueberries into the batter as gently as you can. This will help prevent smushing the blueberries. It's okay if some get smushed, but try to be as gentle as you can.
    • Use a muffin liner. This helps ensure the muffins don't stick – when you bake with fruit they are more likely to get stuck.
    • Use room temperature ingredients. This will help make sure they all combine together really well and bake appropriately.
    • Let the muffins cool for at least 5 mins before you dig in - they need to settle a little bit.
    • Make mini muffins! Just bake for about 15-20 minutes at the same temperature.
    • Make a loaf cake! I'd recommend 350℉ for about an hour.
    • Add a glaze. Roughly 1 cup powdered sugar + a few tablespoon milk.
      • Make it lemony by subbing lemon juice for one of the tablespoon of milk.

    FAQs

    Why do I add flour to the blueberries before adding them to batter?

    This is to prevent the blueberries from sinking to the bottom of the muffins. If you add the flour it almost gives the blueberries a little grip.

    Can I use frozen blueberries?

    Yes, that works for these lemon ricotta blueberry muffins. Use them straight from frozen. Do not thaw them otherwise they will release too much liquid when they are baking.

    What can I do with the leftover ricotta cheese?

    Sooo many things. Tomato Confit Whipped Ricotta Toasts, One Pot Lemon Ricotta Pasta, or Spring Herbed Ricotta Pizza, to name a few.

    Do they need to be stored in the fridge?

    They do not. The good thing about baking with the ricotta is that removes the need for the ricotta muffins to be refrigerated once they're baked.

    How do I store the muffins?

    Room temp in an air tight container for about 2-3 days.

    Why did my muffins not rise?

    Make sure that the baking powder is not expired or dull. Even if it's not expired, if it has been open for a little while it might have lost its kick and become inactive.

    To test if it is still active, add a teaspoon to hot water. If it fizzes up, it's good to go. If it doesn't, it's dull and should not be used.

    Can I freeze them?

    Sure can! In a freezer friendly bag for up to 3 months. Reheat in the microwave for a few minutes.

    What's the difference between a muffin and a cupcake?

    A few things! Muffins typically have a domed top, whereas cupcakes are a bit flatter. Also, muffins also tend to have berries, chocolate, or other ingredients folded into them whereas cupcakes usually do not or are stuffed after being baked. Lastly, muffins are also usually topped with a streusel or glaze or a hint of sugar, whereas cupcakes are typically topped with a frosting.

    📖 Recipe

    Fresh baked muffins in a muffin tin.

    Lemon Ricotta Blueberry Muffins

    These Lemon Ricotta Blueberry Muffins are incredibly tender and moist with fresh blueberries, creamy ricotta, and zesty lemon. A delicious balance of sweet, tart, and creamy, and perfect treat to add to breakfast or brunch, or enjoy as a snack!
    4.65 from 17 votes
    Print Pin Rate
    Prep Time: 15 minutes minutes
    Cook Time: 30 minutes minutes
    Cool time: 5 minutes minutes
    Total Time: 50 minutes minutes
    Servings: 10 muffins

    Ingredients

    • ½ cup granulated sugar
    • 1 teaspoon lemon zest
    • 2 large eggs
    • ½ cup whole milk ricotta cheese
    • ¼ cup vegetable oil
    • ¼ cup whole milk
    • 1 teaspoon vanilla bean paste or vanilla extract
    • 2 teaspoon lemon juice
    • 2 cups all purpose flour
    • 2 teaspoon baking powder
    • ½ teaspoon kosher salt
    • 1 cup fresh blueberries
    • 1 tablespoon all purpose flour
    • 1 tablespoon turbinado sugar

    Instructions

    • Preheat your oven to 375℉.
    • In a mixing bowl, combine the granulated sugar with the lemon zest by rubbing it together with your fingers to infuse the lemon flavor throughout the sugar.
    • To the lemon sugar, add the eggs until fully combined.
    • To the same bowl add the ricotta cheese, vegetable oil, whole milk, vanilla, and lemon juice. Mix to combine and until smooth.
    • To the bowl add the flour, baking powder, and salt. Mix until just combined.
    • Toss your blueberries in 1 tablespoon flour until evenly coated.
    • Gently fold the floured blueberries into the muffin batter.
    • In a lined muffin tin, scoop batter into the molds until just about at the top of the mold. Sprinkle turbinado sugar evenly over each and bake at 375℉ for 30 minutes until golden brown and a tester comes out clean.

    Video

    Nutrition Estimate

    Calories: 236kcal | Carbohydrates: 34g | Protein: 6g | Fat: 9g | Saturated Fat: 2g | Polyunsaturated Fat: 3g | Monounsaturated Fat: 2g | Trans Fat: 1g | Cholesterol: 44mg | Sodium: 229mg | Potassium: 77mg | Fiber: 1g | Sugar: 13g | Vitamin A: 127IU | Vitamin C: 2mg | Calcium: 91mg | Iron: 2mg
    Course: Breakfast, Brunch, Dessert
    Cuisine: American
    Keyword: Blueberry Muffin, Lemon Ricotta, muffin, Ricotta
    Author: Haley

    Creamy Garlic Spring Vegetable Pasta Primavera

    Close up image of finished creamy pasta.

    This Creamy Garlic Spring Vegetable Pasta Primavera is the perfect way to enjoy some of the best fresh spring produce. With a luscious creamy sauce that has a hint of lemon, it really lets the gorgeous green spring vegetables shine. Sprinkled with a generous amount of parsley bread crumbs for the perfect crunch.

    [feast_advanced_jump_to]

    Ingredients

    Ingredients for this creamy vegetable pasta:

    • Pasta: Any kind of short pasta really works here.
    • Asparagus: So deliciously fresh this time of year!
    • Peas: You could use fresh or frozen for this recipe.
    • Zucchini: Another great spring veggie.
    • Garlic: Creamy garlic pasta is of course loaded with garlic.
    • Shallot: A bit more mild than an onion, perfect for a light sauce.
    • Heavy cream: The base of the cream sauce.
    • Milk: Whole milk makes up the other portion of the sauce.
    • Parmesan cheese: Melts beautifully into the sauce and of course grate more on top. Freshly grated is always preferred but not absolutely necessary.
    • Lemon zest: Brightens up the dish!

    Ingredients for the garlic parsley toasted breadcrumbs:

    • Butter: To toast the breadcrumbs in.
    • Fresh parsley: Chopped finely and added to the toasted breadcrumbs is the perfect topping.
    • Panko breadcrumbs: Toasted in some butter really is a game changer.

    Step by step instructions

    This creamier spring take on more traditional pasta primavera is a delicious, satisfying, and indulgent vegetarian pasta recipe that takes just about 30-minutes start to finish.

    Overview:

    • Sauté the veggies, shallot, and garlic.
    • Add the cream and milk and simmer until thickened.
    • Mix in the parmesan cheese.
    • Add the pasta and continue to thicken the sauce.
    • Add lemon zest.
    • Toast the breadcrumbs in melted butter with crushed garlic. Then mix with fresh parsley.

    Detailed instructions:

    1. Cook the vegetables. In a large pan heat 1 tablespoon olive oil on medium heat. Add the asparagus, peas, zucchini, shallot, garlic, salt, and pepper. Cook until it all starts to get soft, about 5-8 minutes.

    2. Make the sauce. To the pan with the veggies, add the milk and heavy cream. Bring to a light simmer and cook until slightly thickened, about 8-10 minutes. It'll still be a little loose. To test: dip a spoon into the sauce and swipe your finger on the back of it - if the sauce doesn't quickly funnel back together then you're good to go.

    (start cooking your pasta while the sauce is thickening)

    3. Add the parmesan cheese. To the sauce add parmesan cheese and mix together.

    4. Add the pasta. When the pasta is cooked to al dente (a few minutes before the package directions say it's ready) add it to the sauce and continue to simmer. The starch in the pasta will help finish the thickening of the sauce.

    5. Add the lemon zest. Mix in the lemon zest to finish off the pasta and sauce.

    6. (Optional) make the breadcrumbs. Melt the butter over medium heat. Add the panko breadcrumbs and smashed garlic. When the breadcrumbs are golden, remove from the heat, take the garlic out, and mix in the chopped fresh parsley.

    Tips and tricks

    • Use other vegetables. You want 2 - 2 ½ cups of vegetables total. So if you don't like one of the ones I've detailed above, swap for one you do love!
      • Broccoli, leeks, cauliflower, spinach, all would be delicious.
      • Great spring produce list here.
    • Use fresh or frozen peas - whichever is available to you!
    • Swap the kind of pasta! Make it gluten free with gluten free pasta. Sneak in another veggie with lentil pasta. Or make it a bit healthier with whole wheat pasta.
    • Switch up the pasta shapes! Short, ridged pastas are best for this one because they are a similar size to the veggies making it all easier and more enjoyable to eat, and ensuring the sauce gets all stuck in the ridges. This shape is also is ideal for finishing simmering in the sauce.
    • Add a little spice. When you sauté the vegetables add some red pepper flakes to add a some heat.
    • To prep asparagus - bend the lower third of the stem, where it breaks naturally is where it should be separated. You can then cut the other stems at a similar spot.
    • While this is a meat-free, vegetarian pasta recipe, you can add protein if you'd like – chicken or shrimp would be great!
    • If you can't find or don't like parmesan cheese, try pecorino romano. Very similar!

    FAQs

    How do I store this recipe?

    Store this recipe in an air-tight container in the fridge for up to 3 days.

    How do I reheat this recipe?

    Reheat in the microwave for 2-4 minutes depending on the strength of your microwave - mixing half way through.

    Can I add protein/meat to this dish?

    Absolutely! Shrimp or ground chicken/turkey would be my recommendation, but really any meat would be just fine.

    Can this be made dairy free?

    Sub the heavy cream and whole milk for coconut milk and use a dairy free cheese.

    Can I use jarred sauce?

    Sure! Alfredo or something similar. Just add a little pasta water to thin it out, and add the lemon zest to finish it off.

    Is this recipe vegetarian?

    It is!

    Can I make this ahead?

    I recommend making it right before you serve, because cream sauces firm up a bit the longer they sit.

    More pasta recipes

    • Creamy Roasted Red Pepper Pasta
    • Corn & Tomato Pasta
    • Vegetarian Baked Ziti
    • Roasted Butternut Squash Mac & Cheese

    📖 Recipe

    Close up image of finished creamy pasta.

    Creamy Spring Vegetable Pasta

    This Creamy Garlic Spring Vegetable Pasta Primavera is the perfect way to enjoy some of the best fresh spring produce. With a luscious creamy sauce that has a hint of lemon, it really lets the gorgeous green spring vegetables shine. Sprinkled with a generous amount of parsley bread crumbs for the perfect crunch.
    5 from 4 votes
    Print Pin Rate
    Prep Time: 10 minutes minutes
    Cook Time: 20 minutes minutes
    Total Time: 30 minutes minutes
    Servings: 4 servings

    Ingredients

    • 1 lb rigatoni
    • 1 tablespoon olive oil
    • 1 cup frozen peas
    • ½ bunch asparagus trimmed and cut in 3rds
    • 2 zucchini cut into half moons ½ inch thick
    • 4 cloves garlic minced
    • 1 shallot minced
    • 1 ½ cups heavy cream
    • 1 cup whole milk
    • 1 cup parmesan cheese grated
    • 1 teaspoon lemon zest
    • 1 teaspoon kosher salt
    • ½ teaspoon black pepper

    Parsley breadcrumbs:

    • 1 tablespoon unsalted butter
    • ½ cup panko breadcrumbs
    • 2 tablespoon fresh parsley chopped
    • 1 garlic clove smashed

    Instructions

    • In a large pan heat 1 tablespoon olive oil on medium heat. Add the asparagus, peas, zucchini, shallot, garlic, salt, and pepper. Cook until it all starts to get soft, about 5-8 minutes.
    • Start cooking your pasta.
    • To the pan with the veggies, add the milk and heavy cream. Bring to a light simmer and cook until slightly thickened, about 8-10 minutes. It'll still be a little loose.
      To test: dip a spoon into the sauce and swipe your finger on the back of it - if the sauce doesn't quickly funnel back together then you're good to go.
    • Add parmesan cheese to the sauce and combine.
    • When the pasta is cooked to al dente (a few minutes before the package directions say it's ready) add it to the sauce and continue to simmer. The starch in the pasta will help finish the thickening of the sauce.
    • Mix in the lemon zest to finish off the pasta and sauce.

    Breadcrumbs

    • Melt the butter over medium heat. Add the panko breadcrumbs and smashed garlic.
    • When the breadcrumbs are golden, remove from the heat, take the garlic out, and mix in the chopped fresh parsley.

    Video

    Nutrition Estimate

    Calories: 1013kcal | Carbohydrates: 109g | Protein: 34g | Fat: 50g | Saturated Fat: 29g | Polyunsaturated Fat: 3g | Monounsaturated Fat: 14g | Trans Fat: 1g | Cholesterol: 133mg | Sodium: 1105mg | Potassium: 977mg | Fiber: 9g | Sugar: 15g | Vitamin A: 2763IU | Vitamin C: 41mg | Calcium: 521mg | Iron: 5mg
    Course: Dinner, Lunch/Dinner
    Cuisine: American
    Keyword: Pasta, Vegetarian
    Author: Haley

    Homemade Orange Lemonade

    Orange lemonade in a glass on a blue coaster.

    This Orange Lemonade is the perfect drink for warmer weather. It's refreshing, thirst quenching, and both tangy and sweet from the combination of fresh lemon juice and fresh orange juice. You'll be making it on repeat all summer long. 

    [feast_advanced_jump_to]

    Ingredients

    Not only is this orange lemonade recipe completely delicious, but it's also only made with 4 ingredients (which is miles better than regular lemonade you buy in the grocery store). It's a great testament to the fresh flavor of citrus fruit. 

    • Lemons: fresh lemons are the only way to go when you make fresh lemonade. To pick a juicy lemon look for one that is vibrant in color and firm with a slight give. If it's too firm you'll likely have a hard time getting juice out of it. If you have meyer lemons available to you, get those!
    • Oranges: cara cara oranges are great for this - robust in flavor, perfectly sweet, and very juicy. Similar to lemons, you want ones that are vibrant in color and have very a little give.
      • You could use blood oranges which are absolutely delicious as well.
    • Granulated sugar: sugar gets combined with water to make a simple syrup to sweeten up the orange lemonade a little bit.
    • Water: water is used in the simple syrup and also to make the base of the lemonade in combination with the fresh citrus juices.

    Instructions

    Full recipe can be found in the recipe card at the end of this post.

    Overview:

    • Heat sugar and water until the water is dissolved to make the simple syrup.
    • Combine lemon juice, orange juice, water, and cooled simple syrup. Stir to combine.
    • Serve over ice.

    Step by step:

    1. Make the simple syrup. Mix together the water and sugar in a pot and warm over medium low heat until the water is dissolved. Take it off the heat to cool fully. 

    2. Juice the citrus. Juice the lemons and oranges. 

    3. Mix it all together. In a large pitcher combine the fresh squeezed lemon and orange juices, cooled simple syrup, and water. Stir to combine. Add ice cubes right before serving. 

    Tips and tricks

    While this homemade orange lemonade is incredibly easy to make, below are some tips to help!

    • Make sure the simple syrup cools before you add it if you're serving immediately. You don't want to serve warm lemonade! If you are serving at a later date, slightly water simple syrup is fine - just make sure it's not too hot that you'd crack the pitcher from the heat. 
    • Add flavor to your simple syrup – adding ingredients like mint, vanilla, or lavender would be delicious. Add it to the pot when you first mix together the sugar and water. 
    • Go sugar free if you like your lemonade very tart or just want to skip the sweetener, go for it! I do recommend a HINT of sweetener if you can swing it though. 
    • Use FRESH lemon and orange juice. This is truly the only way to make homemade lemonade. If you don't have fresh juice, honestly you'd be better off buying lemonade from the store!
    • To get the most juice out of your citrus, firmly roll each lemon and orange on a flat surface. This helps the juices redistribute and loosen up. 
    • Only add ice right before you serve – if you add the ice too soon it'll melt and water-down the orange lemonade. 
    • Use flat or sparkling water – this is really based on preference! 
    • Make it an adult beverage/cocktail by adding some liquor! Vodka or bourbon would be delicious.
    • Garnish with extra lemon slices or orange slices and a few sprigs of mint leaves if you have. 

    Fun fact: in Gloucestershire, England, an Orange Lemonade is called a Henry!

    Simple syrup alternatives

    If you love the sweetness of lemonade but don't want to use a simple syrup, below are some great alternatives.

    • Agave: generally agave comes in light, amber, and dark. Light will have the least amount of flavor (if any at all), so that's the one you'd want to use here.
    • Maple syrup: a bit thinner and more mild than honey. You can add this right into the orange lemonade as a 1 for 1 to the simple syrup.
    • Honey syrup: warm the honey (use the same amount of honey as you would sugar) in a pot with water. This makes a honey sugar and helps the honey disburse throughout the lemonade.
    • Stevia: add to taste!

    Simple syrup will last for one month in the fridge, so double the batch and save half for a second batch of orange lemonade!

    FAQs

    How long does fresh orange lemonade last?

    Fresh orange lemonade is best in the fridge for up to 2 weeks.

    Can I prep lemonade ahead of time?

    Yes! You can make the orange lemonade entirely and keep it in the fridge until needed, and then just add the ice before you serve.

    Are lemons and oranges good for you?

    Yes! Both are high in vitamin C, and lemons have great antibacterial properties and can aid in digestion. More here.

    Is orange lemonade the same as orangeade?

    Close, but not quite. Orange lemonade has more lemon juice than orange juice, whereas orangeade has more orange juice than lemon juice.

    📖 Recipe

    Orange lemonade in a glass on a blue coaster.

    Homemade Orange Lemonade

    This Orange Lemonade is the perfect warmer weather drink. It's refreshing, thirst quenching, and both tangy and sweet from the combination of fresh lemon juice and fresh orange juice. You'll be making it on repeat all summer long.
    5 from 6 votes
    Print Pin Rate
    Prep Time: 10 minutes minutes
    Cook Time: 5 minutes minutes
    Total Time: 15 minutes minutes
    Servings: 6 cups

    Ingredients

    • ¾ cup granulated sugar
    • 4 ¾ cups water separated
    • ¾ cup fresh squeezed lemon juice roughly 6 lemons
    • ½ cup fresh squeezed orange juice roughly 6 oranges

    Instructions

    • Make simple syrup – mix together ¾ cup water and the sugar in a pot. Warm over medium low heat until the sugar is dissolved into the water. Take it off the heat to cool fully.
    • Juice the lemons and oranges.
    • In a large pitcher combine the fresh squeezed lemon and orange juices, cooled simple syrup, and remaining 4 cups of water. Stir to combine. Add ice right before serving.

    Nutrition Estimate

    Calories: 112kcal | Carbohydrates: 29g | Protein: 1g | Fat: 1g | Saturated Fat: 1g | Polyunsaturated Fat: 1g | Monounsaturated Fat: 1g | Sodium: 10mg | Potassium: 73mg | Fiber: 1g | Sugar: 27g | Vitamin A: 43IU | Vitamin C: 22mg | Calcium: 10mg | Iron: 1mg
    Course: Drinks
    Cuisine: American
    Keyword: Citrus, Lemonade, Lemons, Orange Lemonade, Oranges
    Author: Haley

    Pineapple Pico de Gallo

    A bowl of pineapple pico de gallo with chips and limes.

    This Pineapple Pico de Gallo is a sweet, tart, slightly spicy take on traditional Pico de Gallo. It's a perfect refreshing appetizer great for scooping up with chips or using as a topping on some of your favorite dishes.

    [feast_advanced_jump_to]

    Ingredients

    Just six simple ingredients! AND this recipe is naturally gluten free!

    • Pineapple: A juicy ripe pineapple adds a unique twist on traditional Pico de Gallo that is so delicious.
    • Tomato: A staple ingredient in Pico de Gallo. Roma tomatoes are best. You want them to be a deep red color and firm.
    • Red onion: Adds a little bite and sharpness. You could use white onion instead.
    • Jalapeño: To offset the sweetness of the pineapple with a little spiciness.
    • Lime juice: Brighten everything up with a little acidity.
    • Cilantro: Some fresh herbs really make everything come alive.

    Step by step instructions

    This easy pico de gallo salsa recipe will verrrry quickly become a staple to spruce up any dish.

    Preparation: This recipe is so simple that most of the time is taken up by prep. To prep, you want to cut your pineapple, tomato, onion, and jalapeños into small cubes, roughly all the same size (jalapeño a bit smaller).

    1. Combine all ingredients in a bowl. Add all ingredients to a large bowl and mix together until combined.

    That's it!!

    Tips and tricks

    • Finely dice your ingredients: everything looks really nice when uniformly diced quite small. This also helps make sure that you get a little bit of everything in every bite.
    • Make sure you take the seeds out of the tomatoes: taking the seeds out of the tomatoes helps make sure the dish doesn't get too watery as pineapple is pretty watery on its own.
    • Make it mild: you can completely omit the jalapeños if you want to avoid spice all together.
    • Make it spicier: you can keep the ribs and seeds in the jalapeños to make it spicier, or swap in serrano peppers instead for even more of a kick.
    • If you hate cilantro, omit it
    • Can't find any pineapple? Use mango instead!

    How to serve

    This pineapple pico de gallo salsa is so versatile which makes it the perfect dish to keep on hand. Some of my favorite serving options:

    • Simply eat with tortilla chips
    • Serve as salsa for tacos
    • As a topping for grilled steak, chicken, or fish (or sautéd or baked)
    • Inside fajitas

    FAQs

    What is pico de gallo?

    Pico de gallo, literally translated means roosters beak - and is also known as salsa fresca and salsa picado. It's a traditional Mexican dish made of diced tomatoes, onions, serrano peppers, with cilantro, lime juice, and salt.

    Is pico de gallo healthy?

    The ingredients themselves do lean on the better-for-you side with anti-inflammatory and antioxidant benefits, but keep in mind what you serve and eat it with.

    What are the health benefits of pineapple?

    Pineapple is not only so yummy but has great health benefits. Specifically, it has a bunch of vitamins and nutrients such as vitamin C, Fiber, B Vitamins, and more. It also fights inflammation, aids in digestion, and is helps relieve arthritis pain. More details and other benefits are listed here.

    How can I store it?

    Air-tight container in the fridge for up to 5 days.

    Can I make it in advance?

    Yes! You can make this up to 3 days in advance.

    What's the difference between pico de gallo and salsa?

    Pico de gallo is the chunkier version of salsa, with the ingredients diced up. Whereas with salsa the ingredients are blended together.

    How do I pick a good pineapple?

    A good and ripe pineapple should be firm with a slight give (think: avocado). It should also have healthy green leaves and a sweet smell from the bottom. The closer the color is to yellow the more ripe the fruit is.

    If you love the sweet and spicy salsa combination, try this Mango Habanero Salsa recipe too!

    📖 Recipe

    A bowl of pineapple pico de gallo with chips and limes.

    Pineapple Pico de Gallo

    This Pineapple Pico de Gallo is a sweet, tart, slightly spicy take on traditional Pico de Gallo. It's a perfect refreshing appetizer great for scooping up with chips or using as a topping on some of your favorite dishes.
    5 from 1 vote
    Print Pin Rate
    Prep Time: 20 minutes minutes
    Cook Time: 0 minutes minutes
    Total Time: 20 minutes minutes
    Servings: 6 servings

    Ingredients

    • 1 cup diced roma tomatoes seeds removed
    • 3 cups diced pineapple
    • ¾ cup diced red onion
    • 2 tablespoon diced jalapeños seeds and ribs removed
    • 2 teaspoon lime juice
    • 1 teaspoon salt
    • ½ teaspoon pepper

    Instructions

    • Finely dice the tomatoes, pineapple, onion, and jalapeño.
    • Add all ingredients in a bowl and mix to combine.

    Nutrition Estimate

    Calories: 59kcal | Carbohydrates: 15g | Protein: 1g | Fat: 1g | Saturated Fat: 1g | Polyunsaturated Fat: 1g | Monounsaturated Fat: 1g | Sodium: 391mg | Potassium: 229mg | Fiber: 2g | Sugar: 10g | Vitamin A: 432IU | Vitamin C: 53mg | Calcium: 21mg | Iron: 1mg
    Course: Appetizer
    Cuisine: Mexican
    Keyword: pico de gallo, pineapple, Salsa
    Author: Haley

    Jalapeño Popper Grilled Cheese

    Two grilled cheese sandwiches stacked on top of each other.

    This Jalapeño Popper Grilled Cheese is everything you know and love about the traditional appetizer, but in sandwich form! Roasted jalapeño peppers, a creamy cream cheese scallion mixture, crispy bacon, and melty cheddar cheese. Completely addicting.

    [feast_advanced_jump_to]

    Ingredients

    This recipe really spices up a typical grilled cheese sandwich with just a few additional ingredients to make an even better grilled cheese, if you can believe it.

    • Jalapeños: wouldn't be a jalapeño popper grilled cheese without them!
    • Cream cheese: full fat regular cream cheese (not whipped) to make the layer that resembles the popper filling.
    • Scallions: these go in the filling as well - greens and whites!
    • Garlic powder: also for the filling - add a little more flavor without chunks of garlic.
    • Bacon: crispy bacon on the inside adds such a good salty crunch. If you can, use smoked thick cut bacon.
    • Bread: any of the more sturdy breads with a crispy crust will do. I love sourdough for grilled cheese sandwiches.
    • Cheese: sharp cheddar hand-grated is best and will be the most melty.
    • Butter: to slather the outside of the bread to get a crispy crust.

    Ingredient substitutions

    While the more "traditional" jalapeño popper grilled cheese would use the above ingredients, there's no harm in substitutions for what you have in your kitchen or based on personal preference! See below for some solid swaps.

    • Bacon: you can omit this all together if you want to keep it vegetarian.
    • Bread: sourdough is great but you can also use an Italian loaf, baguette, whole wheat, multigrain, etc. – anything that is a little sturdy.
    • Cheese: you can use monterey jack, pepper jack, colby, or even American cheese. For grilled cheese the best cheeses are the ones that are melty.
    • Butter: instead of butter you can use mayo – which is another fatty product that helps get a nice crisp bread and that beautiful golden brown color.

    Step by step instructions

    Overview:

    1. Roast the jalapeños, steam them and take out the seeds and membrane, and peel off the skin.
    2. Combine cream cheese, scallions, garlic powder, salt, and pepper.
    3. Cook the bacon.
    4. Spread the outside of bread with butter.
    5. Layer cream cheese mixture, then jalapeños, then bacon, then shredded cheese. Top with remaining bread.
    6. Cook medium heat 3-5 mins until golden on both sides.

    Detailed instructions:

    1. Roast the jalapeños. Drizzle the jalapeños with olive oil and bake at 400℉ for 20 minutes until roasted.

    2. Cook the bacon. Place the bacon strips on an aluminum foil lined baking sheet (even better if you have a wire rack!). Bake in the oven with the jalapeños for 15 minutes or until desired crispness.

    3. Steam and slice the jalapeños. Add them to a bag, bowl, or container, and seal closed to steam for 10 minutes. Then cut in half and cut out the seeds and membrane.

    4. Make the cream cheese mixture. In a small bowl combine the softened cream cheese, chopped scallions, garlic powder, salt, and pepper.

    5. Assemble. On two pieces of bread spread the cream cheese mixture, followed by slices of jalapeño, followed by slices of bacon, topped with cheese. Butter the remaining 2 pieces of bread and top the sandwich off.

    6. Grill the sandwich! In a pan on medium heat, place the sandwich buttered bread-side down. While that side is cooking, spread the top slice with butter. Cook each side for 3-5 minutes until golden.

    Tips and tricks

    • When buying jalapeños, the ones with the deeper green color and striations on the skin are more spicy. Lighter color and smoother skin are more mild.
    • Use gloves when handling the jalapeños if you're not used to cooking with peppers. If you don't use gloves just make sure you don't touch anything (especially your face) when cutting the peppers and wash your hands right away.
    • If you want to make these a spicy, you can keep in the seeds and membrane for the jalapeños.
    • You can cut the jalapeños before you roast if you prefer, just cut them in half and remove the seeds and membrane first, then roast skin side up.
    • Shred your own cheese! Pre-shredded has additives that make it less melty. This isn't necessary, but is better.
    • Use a cast iron if you have one - I find that cast irons or heavy-bottomed pots help get a really nice crust on grilled cheese sandwiches.
    • Since this is a bit of a hearty dish, serve with something on the lighter side like a fresh tomato salad or a cozy soup to dip it in.

    FAQs

    Is this recipe spicy?

    It definitely has a little kick but it won't blow you away. If you want to stay away from heat all together, try this Caramelized Onion and Apple Grilled Cheese.

    How do I store leftovers?

    Air tight container in the fridge for up to 4 days!

    How do I reheat?

    Reheating in the oven at 350ºF until warmed through keeps it nice and crispy without burning!

    How spicy are jalapeños?

    Between 2,500 - 8,000 on the Scoville scale of heat. So they are hotter than a poblano pepper, but more mild than a serrano or habanero pepper. More on jalapeños here.

    How do you make jalapeños not hot?

    Make sure you get all the seeds and white-ish membrane out before you eat them – that's where they hold most of their heat.

    Why is my grilled cheese not crispy?

    You are likely either using too low of heat and/or did not cook it long enough.

    📖 Recipe

    Two grilled cheese sandwiches stacked on top of each other.

    Jalapeño Popper Grilled Cheese

    This Jalapeño Popper Grilled Cheese is everything you know and love about the traditional appetizer, but in sandwich form! Roasted jalapeño peppers, a creamy cream cheese scallion mixture, crispy bacon, and melty cheddar cheese. Completely addicting.
    5 from 2 votes
    Print Pin Rate
    Prep Time: 15 minutes minutes
    Cook Time: 35 minutes minutes
    Total Time: 50 minutes minutes
    Servings: 2 servings

    Ingredients

    • 4 jalapeños
    • 1 tablespoon olive oil
    • 2 oz full fat cream cheese room temp
    • ¼ cup scallions chopped greens and whites
    • 1 tsp garlic powder
    • ½ teaspoon kosher salt
    • ¼ teaspoon black pepper
    • 4 slices bacon
    • 4 oz sharp cheddar cheese shredded
    • 4 slices sourdough bread
    • 2 tablespoon unsalted butter room temp

    Instructions

    • Drizzle the jalapeños with olive oil and bake at 400℉ for 20 minutes until roasted.
    • Place the bacon strips on an aluminum foil lined baking sheet (even better if you have a wire rack!). Bake in the oven with the jalapeños for 15 minutes or until desired crispness.
    • Add the cooked jalapeños to a bag or bowl and seal closed to steam for 10 minutes. Then cut in half and cut out the seeds and membrane.
    • In a small bowl combine the softened cream cheese, chopped scallions, garlic powder, salt, and pepper.
    • On two pieces of bread spread the cream cheese mixture, followed by slices of jalapeño, followed by slices of bacon, topped with shredded cheese. Butter the 2 remaining pieces of bread and top the sandwich off.
    • In a pan on medium heat, place the sandwich buttered bread-side down. While that side is cooking, spread the top slice with butter. Cook each side for 3-5 minutes until golden.

    Nutrition Estimate

    Calories: 1042kcal | Carbohydrates: 74g | Protein: 35g | Fat: 68g | Saturated Fat: 31g | Polyunsaturated Fat: 6g | Monounsaturated Fat: 23g | Trans Fat: 1g | Cholesterol: 144mg | Sodium: 2109mg | Potassium: 447mg | Fiber: 4g | Sugar: 9g | Vitamin A: 1743IU | Vitamin C: 36mg | Calcium: 516mg | Iron: 6mg
    Course: Appetizer, Appetizers, Lunch/Dinner, Main Course
    Cuisine: American
    Keyword: Grilled cheese, Jalapeno popper
    Author: Haley

    Fluffy Buttermilk Dutch Baby Pancake

    Close up image of the finished dutch baby with whipped cream and berries.

    This Fluffy Buttermilk Dutch Baby Pancake is an incredibly easy and hands-off breakfast or brunch recipe with a custardy center and crispy edges. Simply blend together the ingredients, melt some butter, and bake. So versatile you can top with any of your favorite fruits, whipped cream, powdered sugar, or all three.

    [feast_advanced_jump_to]

    Ingredients

    • Flour: all purpose flour is my go-to flour for this recipe.
    • Buttermilk: traditionally dutch babies are made with whole milk, but I subbed in buttermilk for a little extra flavor and tang. If you have whole milk that works perfectly fine too.
    • Eggs: three large eggs for the perfect custardy texture.
    • Vanilla: just a hint of vanilla makes this even more delicious.
    • Cinnamon: a little warm cinnamon really pops.
    • Salt: to balance everything out.
    • Butter: unsalted butter - really any brand will work but I love to use Kerrigold.
    • Toppings: this part is up to you, but I love homemade whipped cream and berries.

    Step by step instructions

    This buttermilk cast iron dutch baby is probably one of the easiest recipes you'll ever make but it's definitely not lacking in flavor. Details below!

    Overview

    • Preheat oven to 425℉
    • Blend the pancake ingredients
    • Melt the butter in the skillet in the preheated oven
    • Pour the batter into the skillet with the butter
    • Bake until golden

    Detailed steps

    Preheat oven to 425℉.

    1. Combine batter ingredients. To a blender cup add the flour, buttermilk, eggs, vanilla, cinnamon, and salt.

    2. Blend. Blend the batter together until well combined and and little bubbles have formed (which means it's gotten enough air in it).

    3. Melt the butter. Put the butter in your skillet and put the skillet into a fully preheated 425℉ oven. Take the skillet out when the butter is completely melted.

    4. Add the batter. Pour the batter into the skillet with the melted butter.

    5. Bake. Bake for 25 minutes until golden and puffed. Do not open the oven or the dutch baby will deflate!

    6. Add toppings. Add whipped cream, berries, and a dusting of powdered sugar (or whatever toppings you want!).

    Tips and tricks

    • DON'T(!) open the oven while the dutch baby is baking! If you open the oven too soon the dutch baby will deflate and you won't get any nice bubbles and you risk the edges not growing.
    • Use a blender or whisk vigorously. You want to get air into the batter to help with the leavening since there is no leavening agent in these. So using a blender is an easy way to do that, but if you want to whisk together in a bowl that also works, just whisk vigorously until bubbles appear.
    • Customize the flavor – you can swap the cinnamon or add more spices such as nutmeg, cardamom, or use vanilla bean paste! It would also be delicious to add some lemon or orange zest.
    • Use a heavy bottomed skillet. A cast iron skillet is great because of how it retains the heat, but any oven-safe heavy bottomed skillet will work.

    Dutch baby topping and serving ideas

    There are really SO many ways you can top and serve dutch babies, and all are equally as delicious.

    • Berries! A mixture of strawberries, blueberries, raspberries, and blackberries would be delicious. Or just one of those!
    • Apples! Sliced apples (especially in the fall!) would be great. Go a step further and warm the apples on the stovetop with some cinnamon and maple syrup.
    • Powdered sugar! Just a simple dusting of powdered sugar on top of the dutch baby adds a nice hint of sweetness.
    • Homemade whipped cream! Easier than it seems, just whip together some heavy cream, a dash of vanilla, and a pinch of sugar.
    • Syrup! Keep it classic with a generous pour of syrup.
    • Make it savory! Add some cream cheese and lox.
    • Bacon bacon bacon! My absolute favorite, delicious served alongside a dutch baby. Bonus points for crisping it up, breaking it into pieces, sprinkling it on top of the dutch baby, and finishing with a drizzle of maple syrup. That sweet/salty/savory thing is amazing. Of course breakfast sausage is also an option.

    Origins of the dutch baby

    A dutch baby, more classically referred to as a german pancake, bismarck, dutch puff, puffed pancake, or baked pancake, originated from the German Pfannkuchen. They first popped up in the US in the 1900s in Seattle at Manca's Diner.

    The term "dutch baby" is said to have been created by Manca's daughter, and is derived from Deutsche, the English autonym for Germans. More on it here!

    FAQs

    How do I store a dutch baby?

    It's easiest stored cutting it into slides then storing in an air-tight container in the fridge.

    How do I reheat it?

    You can reheat it in the microwave for a few minutes. But if you want it to get some of the crisp back you're better off reheating in the oven at 400ºF for a few minutes.

    Can I prep this in advance?

    This one is so simple, I recommend doing all the steps at the time that you're going to cook it. If you let the batter sit for too long it will lose some of the air we blended into it and might not rise as well. It's also best for the batter to be closer to room temperature than chilled.

    What's the difference between a dutch baby and a pancake?

    Simply, a dutch baby is one large pancake that is baked. Whereas pancakes are a few inches in diameter and cooked separately on the stovetop. Pancakes are also flipped in the cooking process, while dutch babies are not.

    What makes a dutch baby rise?

    Two things - the air in the batter, and the quick heat in the oven. Which is why it's important to pre-melt the butter (and in turn preheat the pan) and keep the door to the oven closed.

    What does a dutch baby taste like?

    It tastes mostly like a pancake! If you add other spices/zest/etc. it'll alter the taste, but the base is most similar to a classic pancake.

    More pancake recipes

    • Fluffy almond milk pancakes
    • Fluffy buttermilk pancakes with blueberry compote
    • Chocolate chip pancakes

    📖 Recipe

    Close up image of the finished dutch baby with whipped cream and berries.

    Fluffy Buttermilk Dutch Baby Pancake

    This Fluffy Buttermilk Dutch Baby Pancake is an incredibly easy and hands-off breakfast or brunch recipe with a custardy center and crispy edges. Simply blend together the ingredients, melt some butter, and bake. So versatile you can top with any of your favorite fruits, whipped cream, powdered sugar, or all three.
    5 from 2 votes
    Print Pin Rate
    Prep Time: 5 minutes minutes
    Cook Time: 25 minutes minutes
    Total Time: 30 minutes minutes
    Servings: 4 servings

    Ingredients

    • ⅔ cup all purpose flour
    • ½ cup buttermilk
    • 3 large eggs
    • ½ tsp vanilla extract
    • ¼ teaspoon kosher salt
    • ¼ teaspoon cinnamon
    • 4 tablespoon unsalted butter
    • 1 cup fresh berries

    Instructions

    • Preheat your oven to 425℉.
    • To a blender add the flour, buttermilk, eggs, vanilla, cinnamon, and salt.
    • Blend the batter together until well combined and and little bubbles have formed (which means it's gotten enough air in it).
    • Put the butter in your skillet and put the skillet into a fully preheated 425℉ oven. Take the skillet out when the butter is completely melted.
    • Pour the batter into the skillet with the melted butter.
    • Bake for 25 minutes until golden and puffed. Do not open the oven or the dutch baby will deflate!
    • Add whipped cream, berries, and a dusting of powdered sugar (or whatever toppings you want!).

    Nutrition Estimate

    Calories: 264kcal | Carbohydrates: 22g | Protein: 8g | Fat: 16g | Saturated Fat: 9g | Polyunsaturated Fat: 1g | Monounsaturated Fat: 4g | Trans Fat: 1g | Cholesterol: 156mg | Sodium: 226mg | Potassium: 134mg | Fiber: 2g | Sugar: 5g | Vitamin A: 596IU | Vitamin C: 1mg | Calcium: 64mg | Iron: 2mg
    Course: Breakfast, Brunch
    Cuisine: American, German
    Keyword: dutch baby, easy brunch, german pancake
    Author: Haley
    • « Previous Page
    • 1
    • …
    • 17
    • 18
    • 19
    • 20
    • 21
    • …
    • 32
    • Next Page »

    HEY THERE!

    Welcome to Cozy Cravings! Happy to have you. Here, you’ll find comfort food recipes & other delicious things to enjoy and devour.

    POPULAR POSTS

    • Close up of broccoli au gratin.
      Broccoli Au Gratin (Broccoli Casserole)
    • Finished french onion pasta in a bowl.
      One Pot French Onion Pasta
    • close up image of maple candied bacon on a plate.
      Maple Candied Bacon
    • Overhead image of lasagna fresh out of the oven with sage on top.
      Butternut Squash and Spinach Lasagna

    Footer

    ↑ back to top

    about

    • ABOUT
    • CONTACT
    • PRIVACY POLICY

    Let's Keep In Touch!

    Subscribe here for delicious recipes, updates & more!

    Thank you!

    You have successfully joined our subscriber list.

    .

    recipe index

    • APPETIZERS
    • BREAKFAST & BRUNCH
    • LUNCH & DINNER
    • SNACKS & SIDES
    • DESSERTS

    Copyright © 2026 · CozyCravings.com

    Rate This Recipe

    Your vote:


    A rating is required
    A name is required
    An email is required