• Recipes
  • Contact
  • About
  • Shop

Cozy Cravings

menu icon
go to homepage
  • RECIPES
  • ABOUT
  • CONTACT
  • SUBSCRIBE
    • Facebook
    • Instagram
    • Pinterest
  • subscribe
    search icon
    Homepage link
    • RECIPES
    • ABOUT
    • CONTACT
    • SUBSCRIBE
    • Facebook
    • Instagram
    • Pinterest
  • ×
    Home

    Chicken Mushroom Wild Rice Soup

    Bowl of creamy chicken mushroom wild rice soup.

    This creamy Chicken Mushroom Wild Rice Soup is wildly delicious and comforting, filled with shredded chicken, tender mushrooms, and hearty wild rice, all in a creamy, herby broth. A perfect cold weather soup recipe to snuggle up with this time of year.

    Bowl of creamy chicken mushroom wild rice soup.
    [feast_advanced_jump_to]

    Ingredients

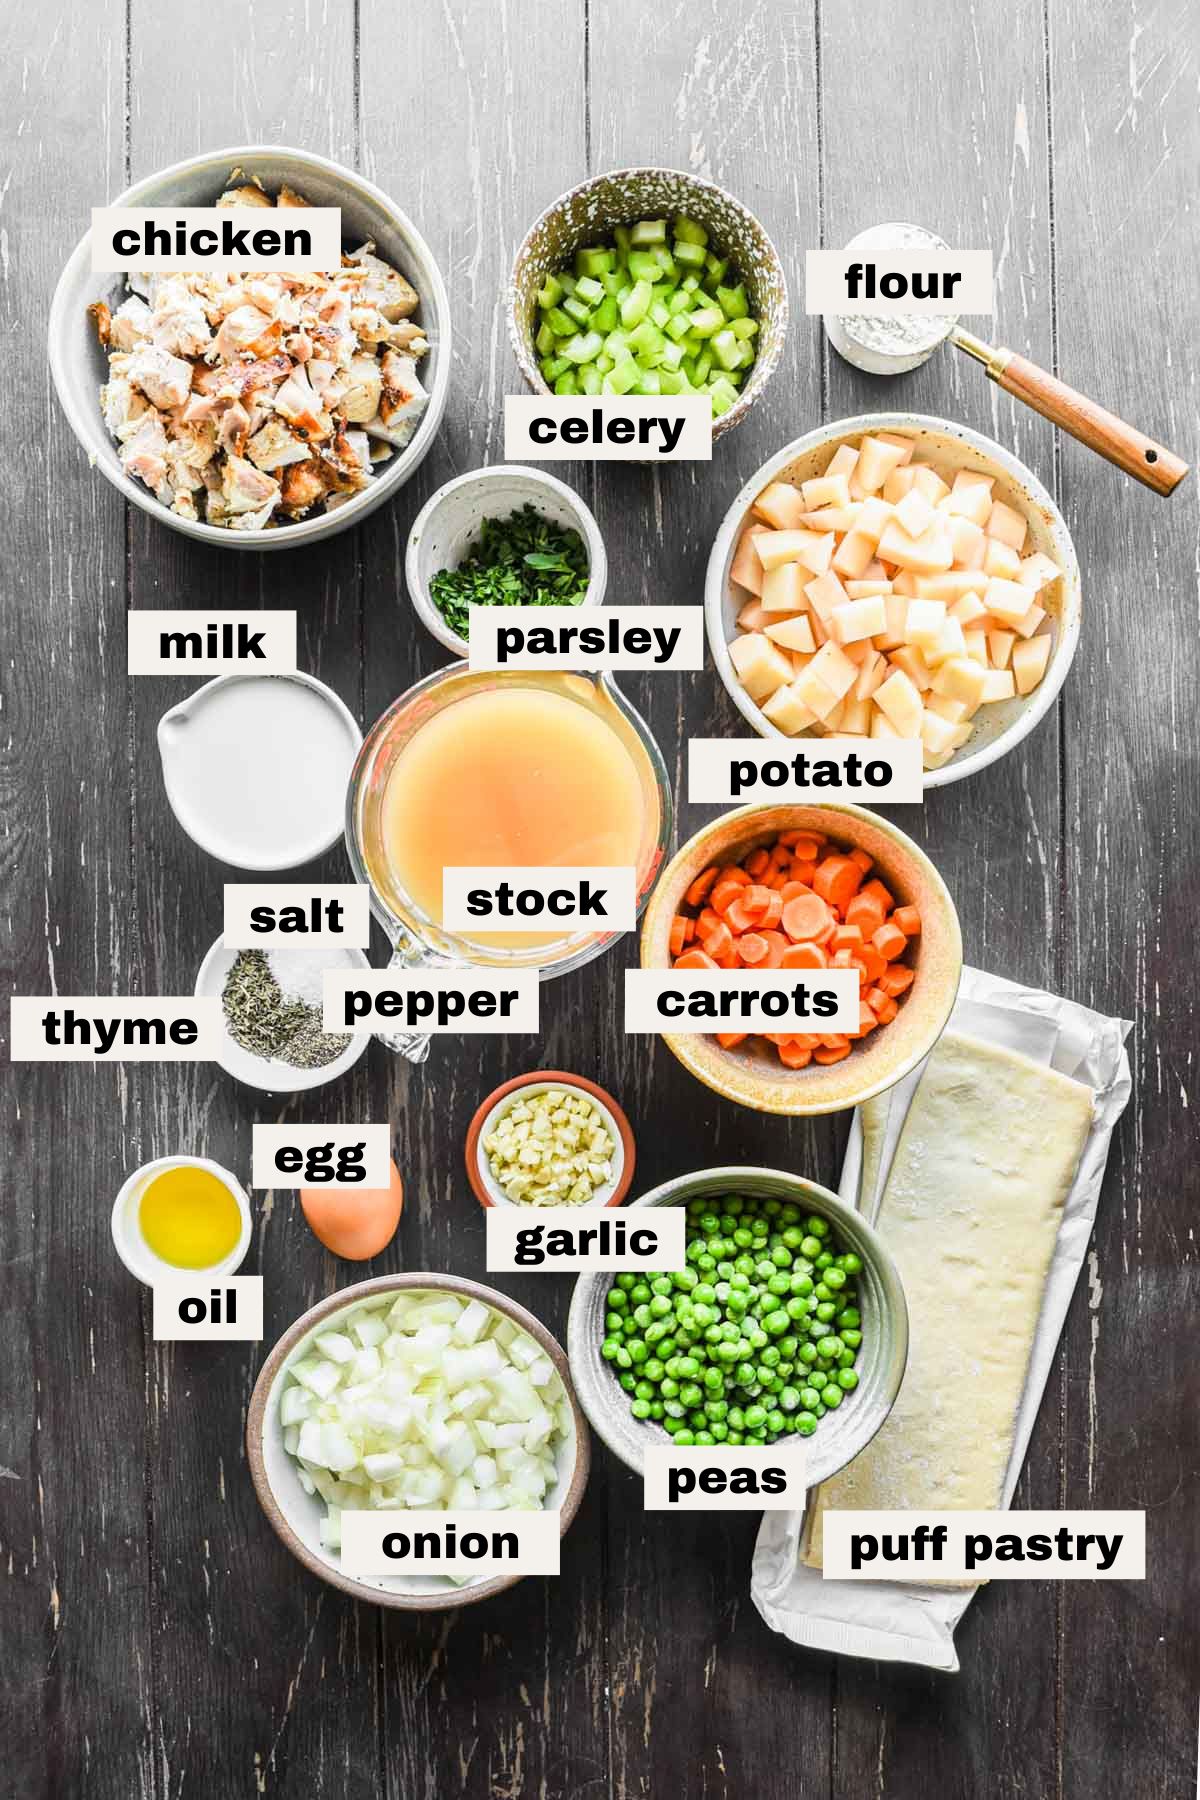
    This creamy chicken soup recipe definitely has a lengthier ingredient list but it’s nothing too far out of the ordinary at all, and you hopefully have a bunch of this already! 

    Ingredients on a table for chicken mushroom wild rice soup.
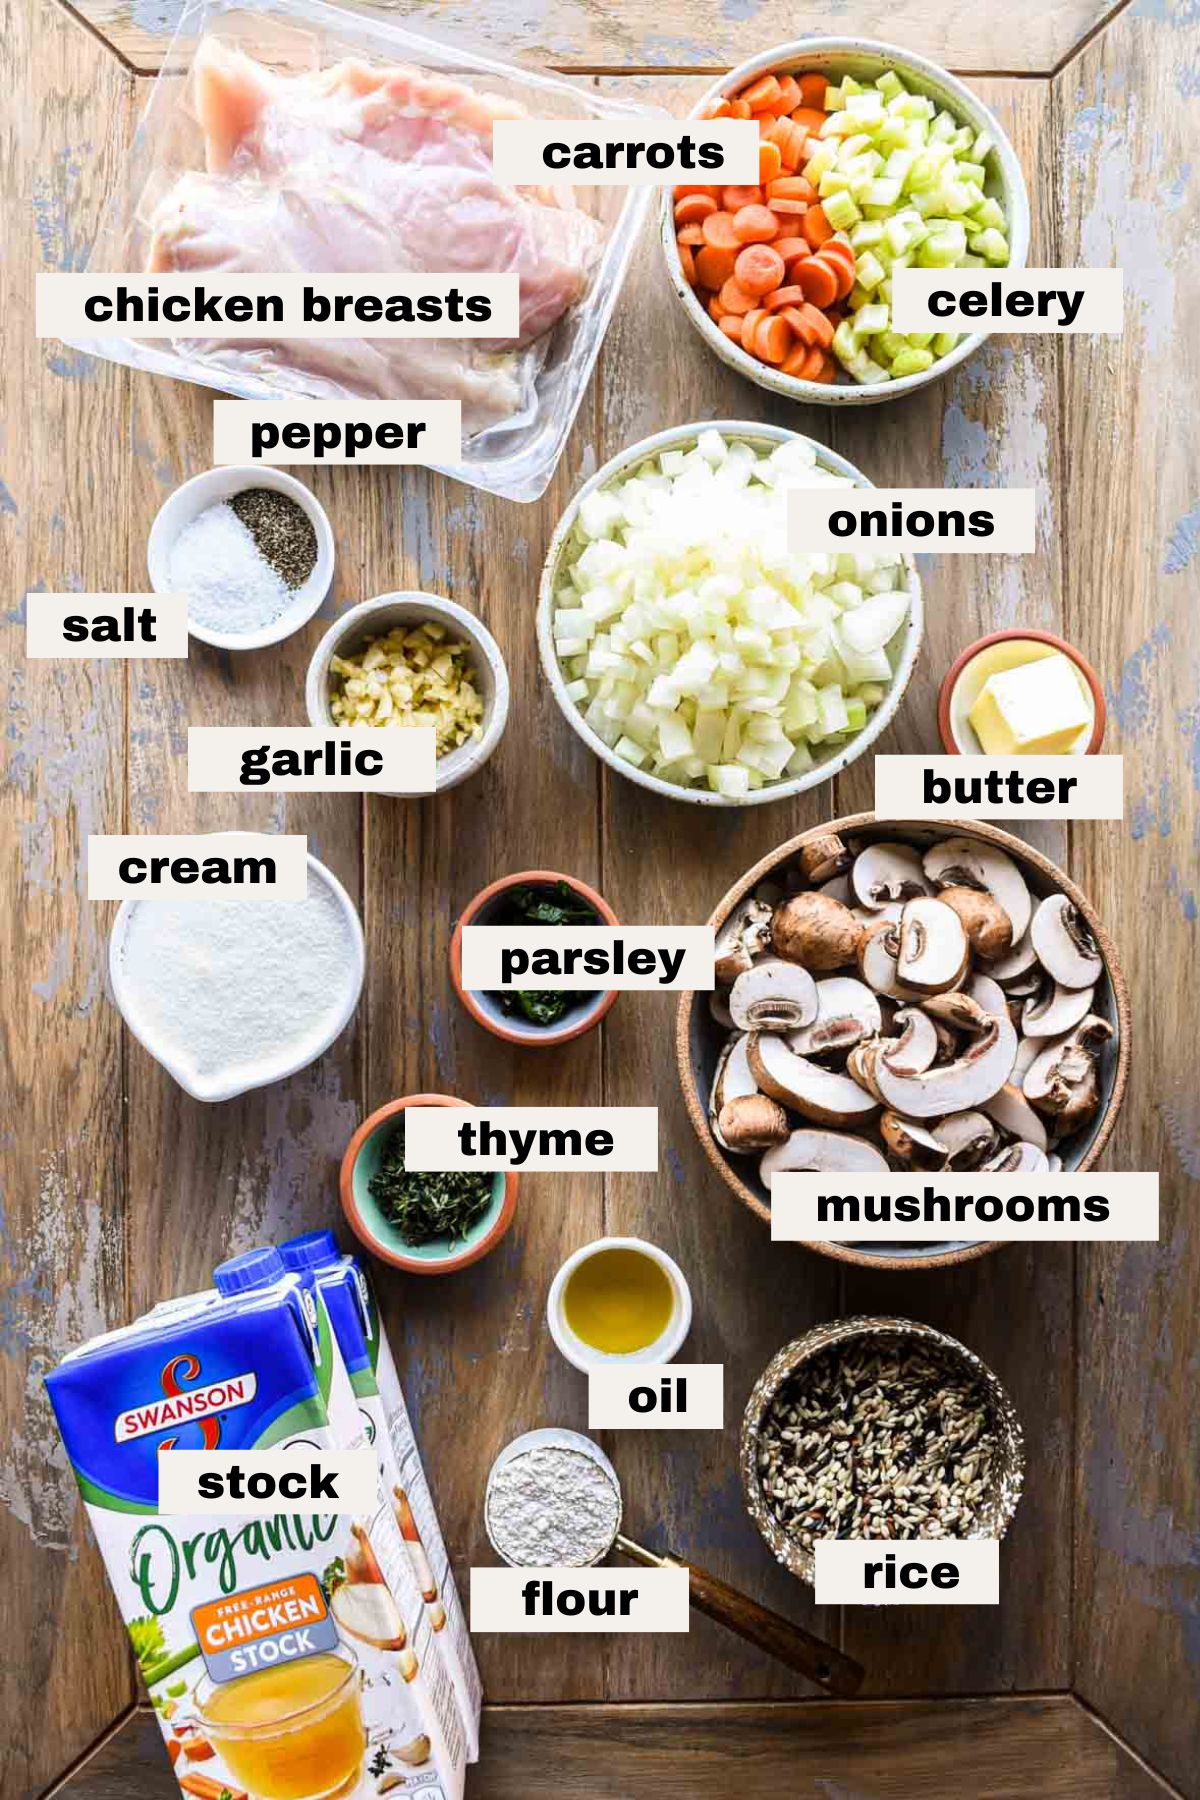
    • Mirepoix: Mirepoix is a mixture of onions, carrots, and celery that is used often as the base of soups and stews. Typically it’s a 2:1:1 ratio (meaning there’s double the amount of onions as there is carrots or celery). 
    • Sometimes I buy the mini carrots and just chop those; it removes the added steps of peeling and slicing whole carrots. 
    • Garlic: Plenty of garlic to help flavor the dish, specifically 4 cloves. But measure this with your heart.
    • Mushrooms: Baby bella mushrooms are my go-to. Adding mushrooms to this soup gives it such a rich earthy flavor that pairs really well with the wild rice. Remove the stem if it looks very earthy or just trim it. 
    • Flour: Adding a bit of all purpose flour helps thicken the soup a little so it’s not so liquidy and a bit creamier. 
    • Chicken breast: Boneless skinless chicken breasts. They get added right into the soup and cooked in there. Then you pull them out once cooked, shred them up, then add them back in. 
    • Wild rice: I love the different colors in wild rice and the slightly nutty flavor. This, similar to the chicken, gets cooked right in the soup. I used the wild rice blend from Lundberg.
    • Chicken stock or chicken broth: The base of the liquid part of the soup. Bonus points if you have homemade chicken stock on hand!
    • Fresh herbs: Using both thyme and parsley in this soup gives it delicious herbaceousness and freshness. 
    • Heavy cream: Heavy cream of course adds the creaminess to the soup.
    • Olive oil & butter: Use of both olive oil and unsalted butter at different points to sauté the veggies.
    • Kosher salt and black pepper: standard seasonings

    Ingredient Substitutions

    If you need to make any substitutions or swaps for this Chicken Mushroom Wild Rice Soup, below are some that will work! 

    • Chicken breast: you can substitute boneless skinless chicken thighs, chicken tenderloins, or even rotisserie chicken (or any leftover shredded chicken you may have) . Each will require a different time to cook though, so keep that in mind for calculating when to add to the simmering broth. For example, thighs will take longer to cook, but rotisserie chicken needs no additional cooking time. 
    • Wild rice: instead of a wild rice mix you can use really any kind of rice you like (eg wild rice, white rice), just watch the cooking time. You can cook the rice separately as well.
    • Chicken stock: you can use vegetable broth instead. 
    • Herbs: really use whatever you love! Fresh rosemary or sage would be great additions. 
    • Heavy cream: make it dairy free by using unsweetened full fat coconut cream or coconut milk instead. 

    Step by step instructions

    Check out the instructions below for how to make this super cozy creamy soup. Full recipe can be found in the recipe card below.

    Overview 

    Sauté the vegetables and thyme, add the flour, add the stock and rice, simmer, half way through add the raw chicken, continue to simmer. Shred the chicken, add the cream and parsley.

    Detailed instructions

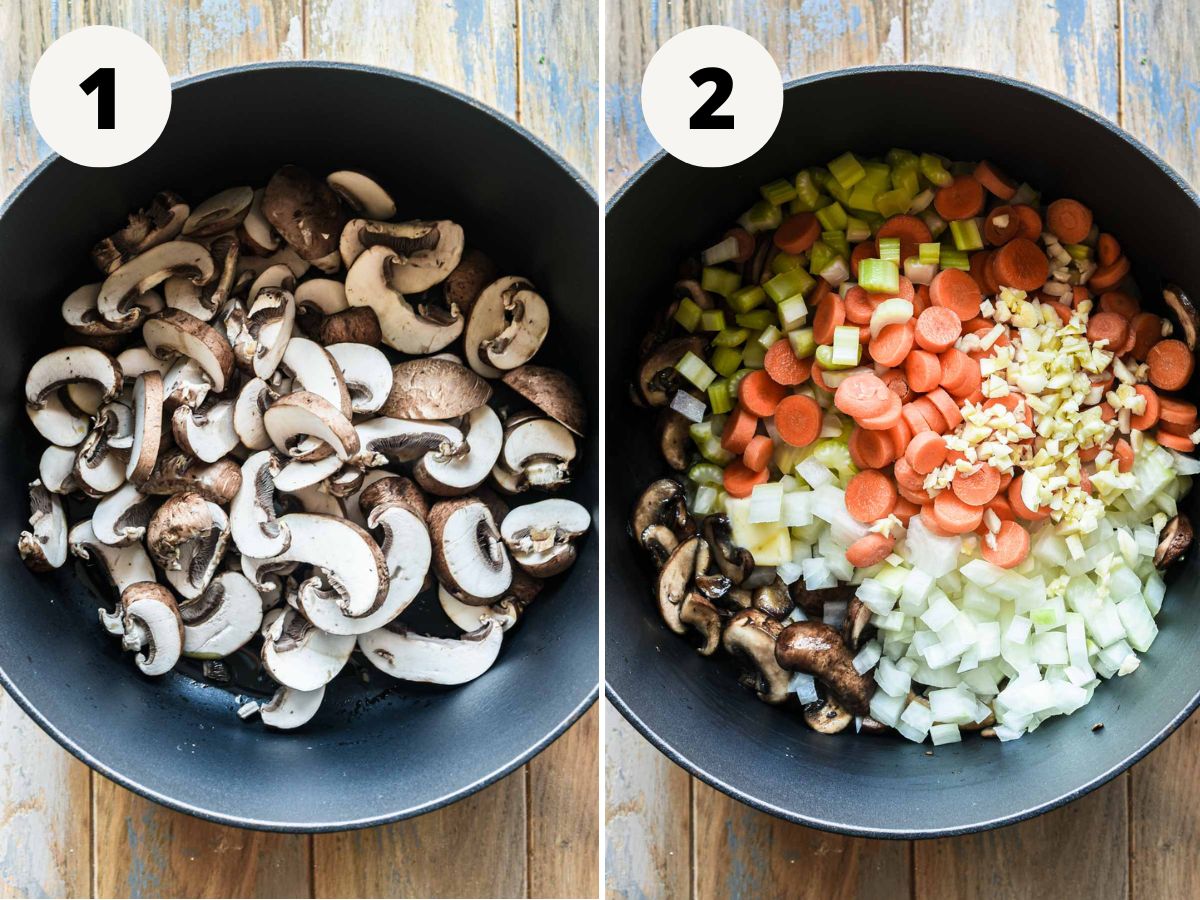
    1. Sauté the mushrooms. Grab a large pot (such as a dutch oven) and set it over medium heat. Add the olive oil to the pot followed by the mushrooms. Sauté these for about 10 minutes, until they release their natural liquids and are tender. 

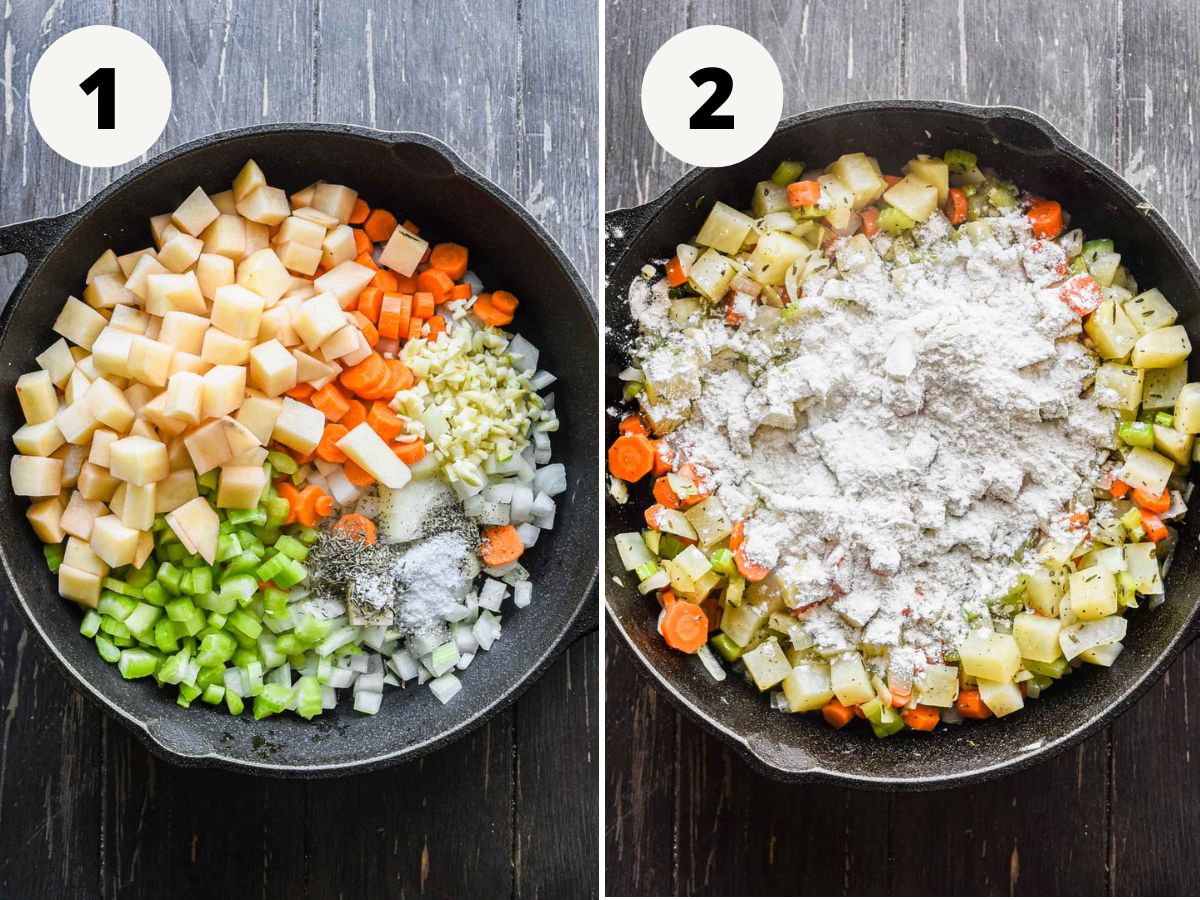
    2. Add the remaining vegetables. To the pot with the mushrooms, add the butter, onion, celery, carrots, garlic, salt, and pepper. Sauté that until it all starts to soften, about 5 minutes. 

    Side by side images of sautéing mushrooms and vegetables.

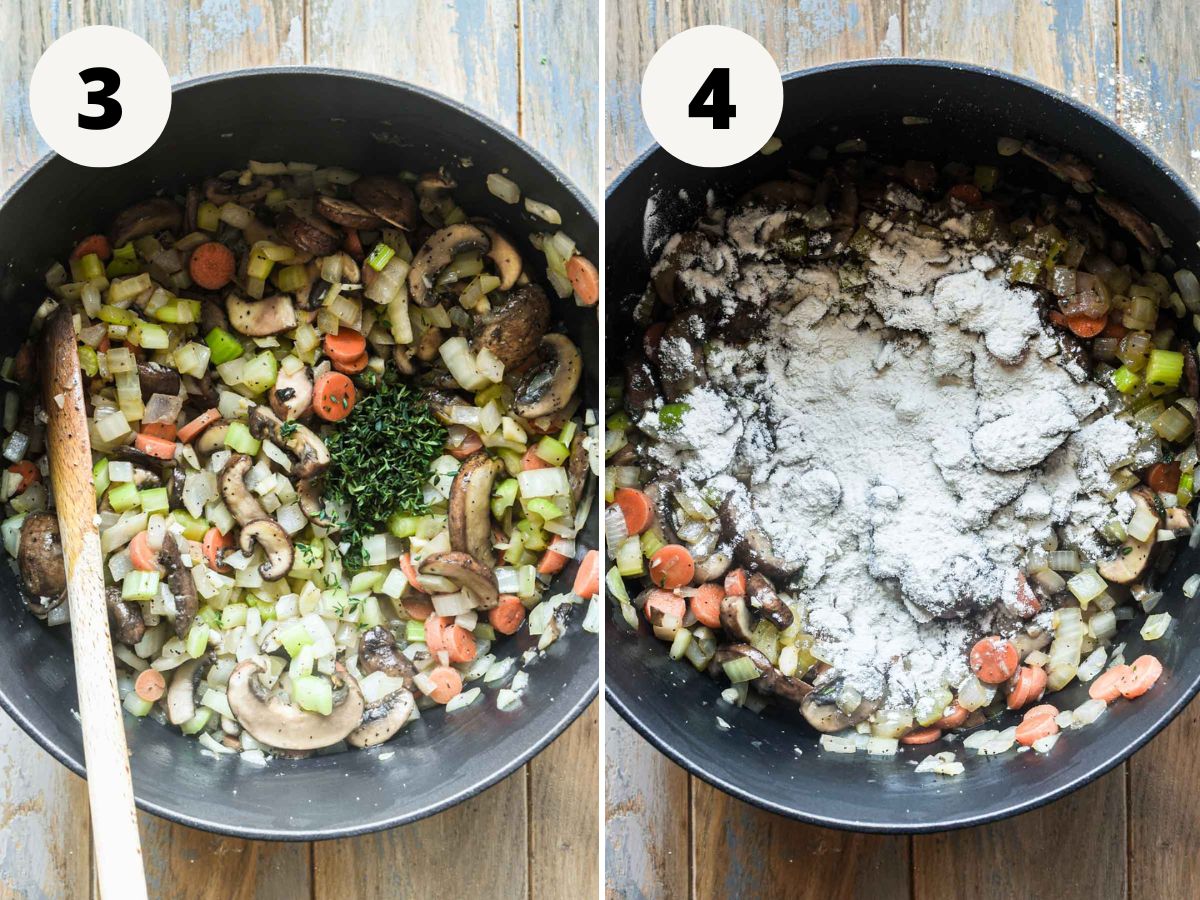
    3. Add the thyme. Add in the fresh thyme to the pot and let that cook for a few minutes to infuse the flavor. 

    4. Add the flour. Then add in the flour to the pot and cook until no more dry flour remains, about 1-2 minutes. 

    Side by side images of adding thyme and flour to the soup.

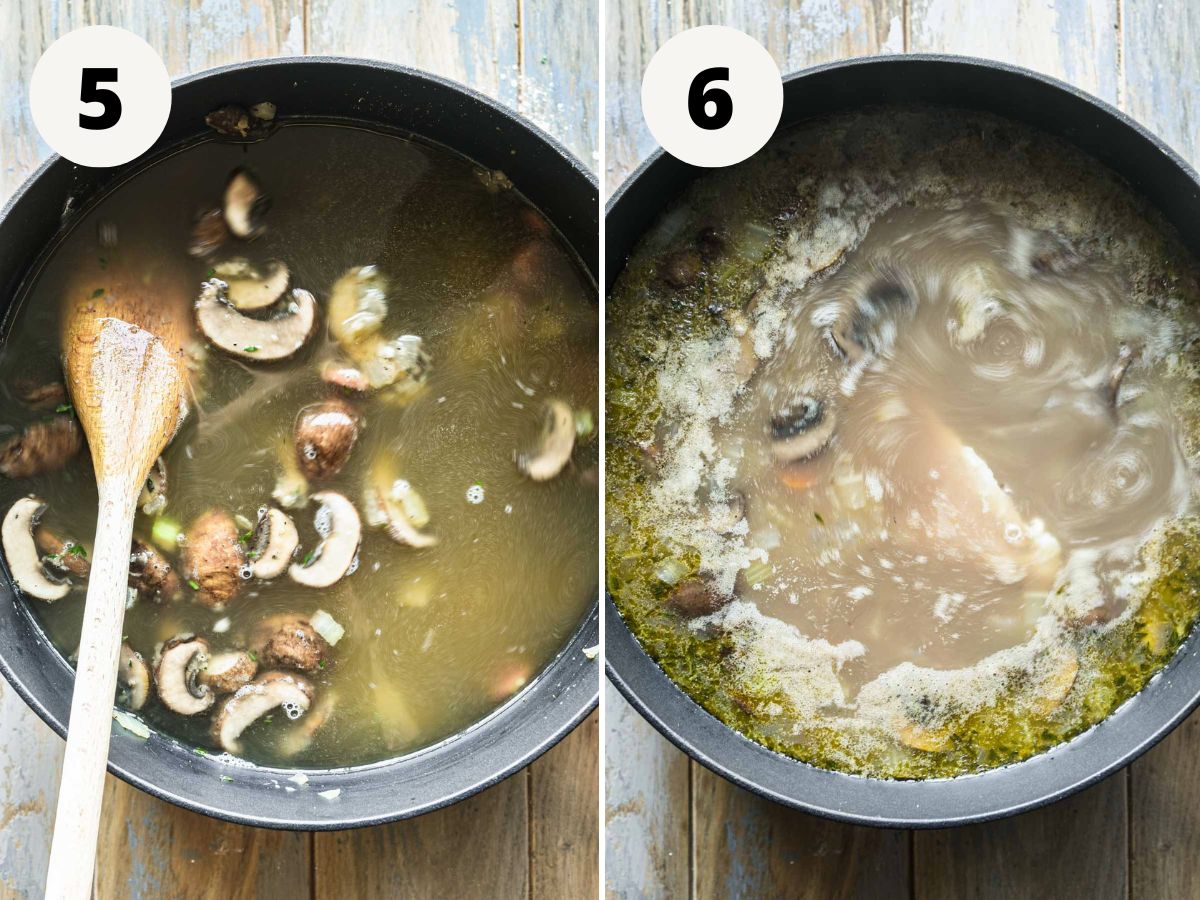
    5. Add the stock and rice. Pour in all the stock and add the uncooked rice. Bring it to a boil, reduce to a simmer, then cover and cook for 30 minutes. 

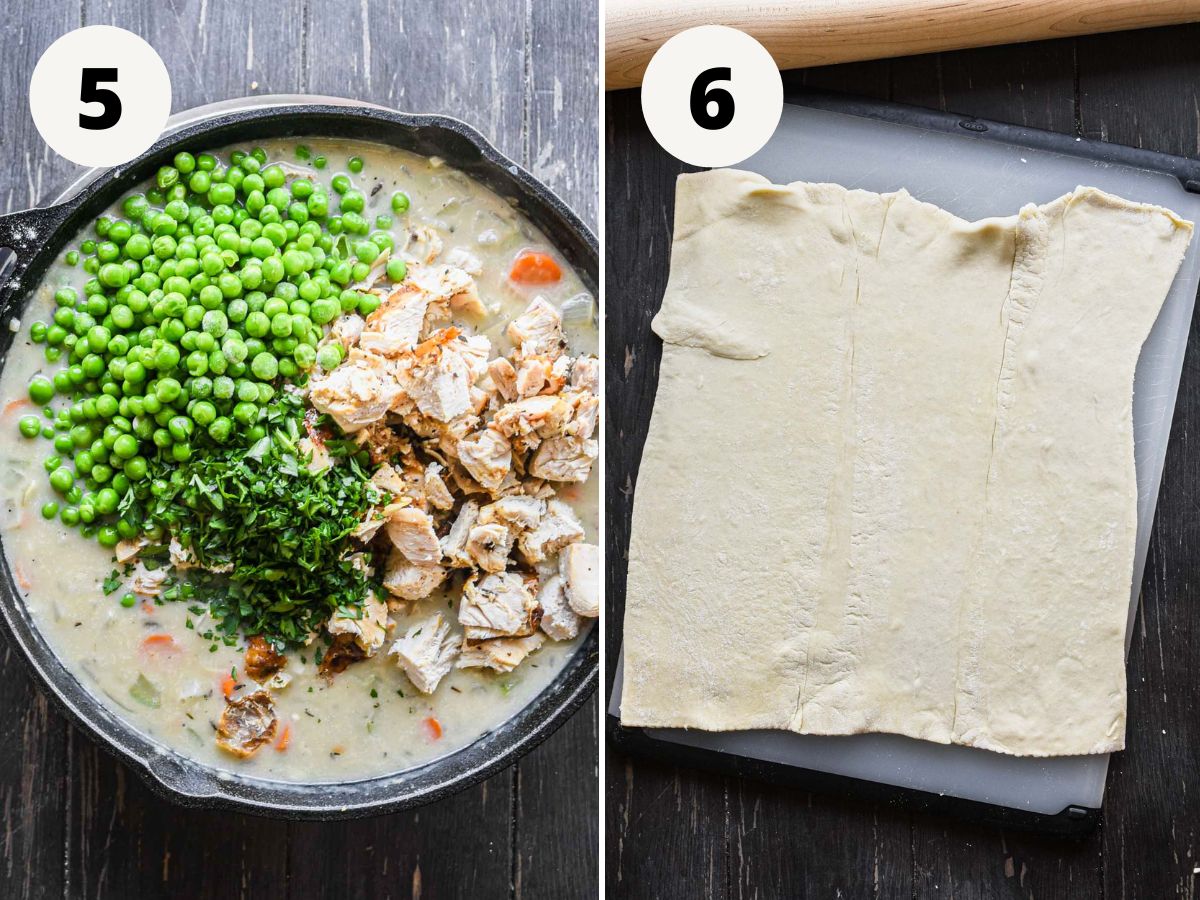
    6. Add the chicken. While the rice cooks, remove the lid from the pot and add the raw chicken breasts in. Cover it again and continue to simmer for an additional 15 minutes. 

    Side by side images of adding broth, rice, and chicken to the soup.

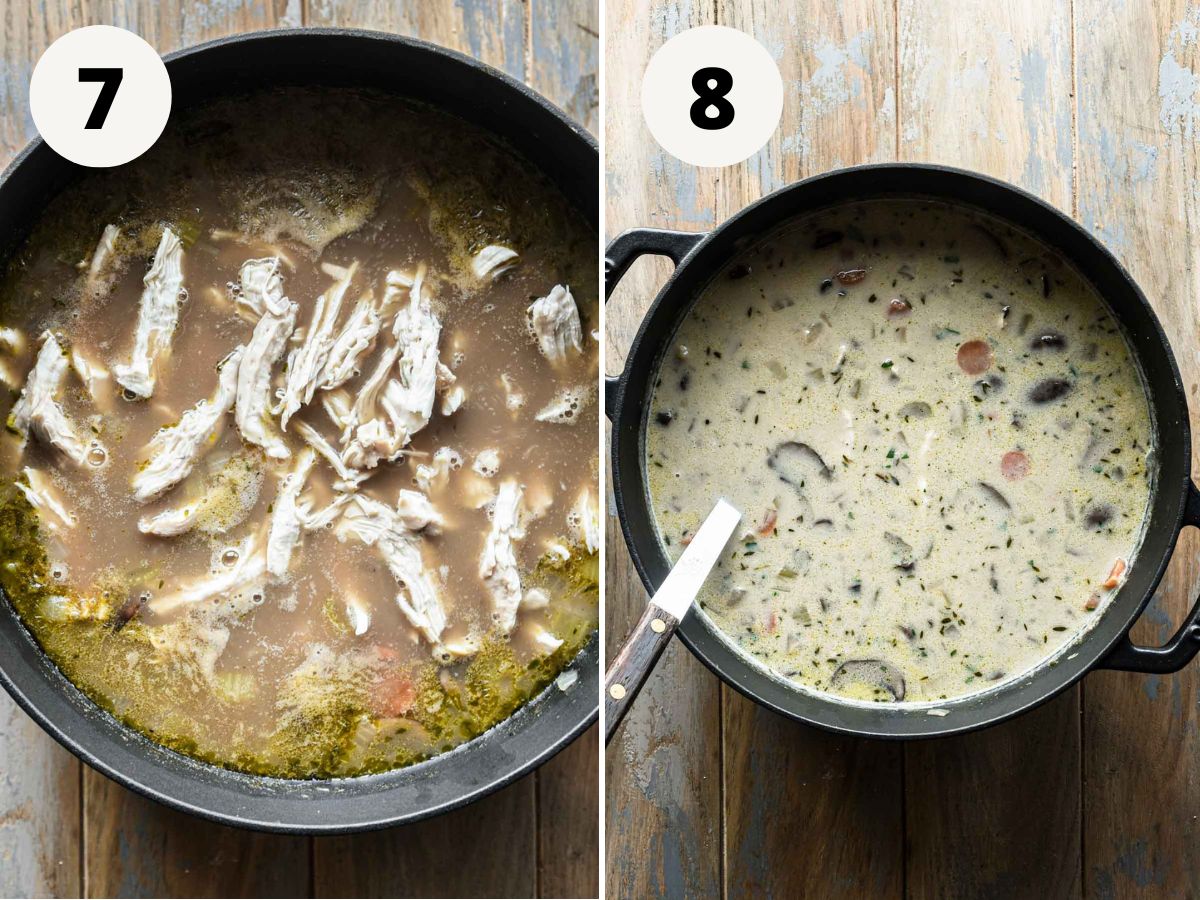
    7. Shred the chicken. Take the cooked chicken out of the pot and shred it, then add it back in.

    8. Add the heavy cream and parsley. To finish the soup, stir in the heavy cream and fresh parsley. 

    Side by side images of adding shredded chicken and heavy cream to the soup.

    Tips and tricks 

    Tips and tricks below are to help you nail making this super hearty and comforting soup.

    • Rinse the wild rice before cooking it! It’s super important to rinse your rice before you add it with the broth. This will rinse off the excess starch, which, if kept on, will not only make the rice super mushy and cause it to stick together, but will also leave the overall soup with a starchy weird texture. 
    • How to effectively rinse wild rice: add it to a fine mesh strainer then run cold water over top for about 1 minute until the water runs clear and is no longer cloudy. It’s best to shake the strainer a bit to toss up the rice as you are running the water over it. 
    • Two easy ways to shred chicken: one, use two forks and do a pull-apart method. Two, use a hand mixer or stand mixer.  
    • To get a nice brown on the mushrooms, don’t move them for the first few minutes of sautéing. 
    • You can cook the rice separately and add it to the soup at the end, then all you really need is the 15 minutes of simmering to cook the chicken. 
    • Use whatever type of mushrooms you like best. I used baby bella mushrooms, which are the same as cremini mushrooms. You could also use portobello, button, shiitake, oyster, or porcini. 
    • Serve with some crusty bread or cornbread, and a sprinkling of fresh grated parmesan cheese. 
    • If you like a little hit of acidity in your dishes, try squeezing some lemon juice in at the very end or a dash of vinegar.

    Storage and reheating

    • Storage: allow it to cool to room temperature then store in an airtight container in the fridge for up to 3 days. 
    • Reheating: reheat either in the microwave for a few minutes or on the stovetop.
    • Freezing: allow the soup to come to room temp then put in a freezer-safe container. Can be kept frozen for about 2 months. However, if your plan is to freeze this, don’t add the heavy cream. Add the heavy cream once you reheat it. To reheat from frozen, put it in a pot on low heat and let it slowly melt. Once fully warmed through, add the heavy cream. 

    FAQs

    What are the health benefits of wild rice? 

    Wild rice is a whole grain and each cooked cup has 3 grams fiber, 7 grams of protein, and only .6 grams of fat. It’s also considered heart healthy. More on wild rice here.

    Can I add potatoes?

    Yes! Regular russet potatoes or even sweet potatoes would be great in this recipe. Cube them up, then add them in while the soup is simmering with about 15 minutes left (so around when you add the chicken). 

    Is it safe to put raw chicken directly in soup?

    Yes, as long as the soup is at a simmer and you’re cooking the chicken all the way through (to at least 165°F). As the chicken cooks, any bacteria will be cooked off. 

    How long does wild rice take to cook?

    Wild rice takes about 45 minutes to cook; it’s one of the varieties that takes a bit longer. Which is why you’ll notice in the recipe we cook it for 30 minutes, then add the chicken, then cook for another 15 minutes. This is because the chicken only takes about 15 minutes, so we add it part of the way through the rice cooking. 

    More soup recipes

    • Thumbnail
      4 Ingredient Potato Soup
    • Tortellini Soup In The Pot
      Creamy Tortellini Tomato and Pesto Soup

    Did you make this recipe? Leave a rating and review below and tag me on social!

    📖 Recipe

    Bowl of creamy chicken mushroom wild rice soup.

    Chicken Mushroom Wild Rice Soup

    This creamy Chicken Mushroom Wild Rice Soup is wildly delicious and comforting, filled with shredded chicken, tender mushrooms, and hearty wild rice, all in a creamy, herby broth. A perfect cold weather soup recipe to snuggle up with this time of year.
    5 from 2 votes
    Print Pin Rate
    Prep Time: 15 minutes minutes
    Cook Time: 1 hour hour 20 minutes minutes
    Total Time: 1 hour hour 35 minutes minutes
    Servings: 4 servings

    Ingredients

    • 1 tablespoon olive oil
    • 3 cups baby bella / cremini mushrooms sliced
    • 2 tbsp unsalted butter
    • 2 cups onion diced - 1 large onion
    • 1 cup carrots diced - 3 carrots
    • 1 cup celery chopped - 3 stalks celery
    • 4 cloves garlic chopped
    • 1 ½ teaspoon kosher salt
    • 1 teaspoon black pepper
    • 1 tablespoon fresh thyme chopped
    • ¼ cup all purpose flour
    • 1 cup wild rice rinsed
    • 8 cups chicken stock (2 quarts)
    • 1 lb boneless skinless chicken breast
    • 1 tablespoon fresh parsley chopped
    • 1 cup heavy cream

    Instructions

    • Grab a large pot (such as a dutch oven) and set it over medium heat. Add the olive oil to the pot followed by the mushrooms. Sauté these for about 10 minutes, until they release their natural liquids and are tender. 
    • To the pot with the mushrooms, add the butter, onion, celery, carrots, garlic, salt, and pepper. Sauté that until it all starts to soften, about 5 minutes. 
    • Add in the fresh thyme to the pot and let that cook for a few minutes to infuse the flavor. 
    • Then add in the flour to the pot and cook until no more dry flour remains, about 1-2 minutes. 
    • Pour in all the stock and add the uncooked rice. Bring it to a boil, reduce to a simmer, then cover and cook for 30 minutes. 
    • While the rice cooks, remove the lid from the pot and add the raw chicken breasts in. Cover it again and continue to simmer for an additional 15 minutes (until it reaches at least 165°F). 
    • Take the cooked chicken out of the pot and shred it, then add it back in.
    • To finish the soup, stir in the heavy cream and fresh parsley. 

    Video

    Notes

    • Rinse the wild rice before cooking it! It’s super important to rinse your rice before you add it with the broth. This will rinse off the excess starch, which, if kept on, will not only make the rice super mushy and cause it to stick together, but will also leave the overall soup with a starchy weird texture. 
    • How to effectively rinse wild rice: add it to a fine mesh strainer then run cold water over top for about 1 minute until the water runs clear and is no longer cloudy. It’s best to shake the strainer a bit to toss up the rice as you are running the water over it. 
    • Two easy ways to shred chicken: one, use two forks and do a pull-apart method. Two, use a hand mixer or stand mixer.  
    • To get a nice brown on the mushrooms, don’t move them for the first few minutes of sautéing. 
    • You can cook the rice separately and add it to the soup at the end, then all you really need is the 15 minutes of simmering to cook the chicken. 
    • Use whatever type of mushrooms you like best. I used baby bella mushrooms, which are the same as cremini mushrooms. You could also use portobello, button, shiitake, oyster, or porcini. 
    • Serve with some crusty bread or cornbread, and a sprinkling of fresh grated parmesan cheese. 
    • If you like a little hit of acidity in your dishes, try squeezing some lemon juice in at the very end or a dash of vinegar.

    Nutrition Estimate

    Calories: 825kcal | Carbohydrates: 70g | Protein: 48g | Fat: 40g | Saturated Fat: 20g | Polyunsaturated Fat: 3g | Monounsaturated Fat: 13g | Trans Fat: 0.2g | Cholesterol: 169mg | Sodium: 1760mg | Potassium: 1723mg | Fiber: 6g | Sugar: 17g | Vitamin A: 6737IU | Vitamin C: 16mg | Calcium: 136mg | Iron: 4mg
    Course: Dinner
    Cuisine: American
    Keyword: Chicken, mushrooms, Soup
    Author: Haley

    Brioche French Toast Casserole

    straight-on image of a slice of brioche french toast casserole with blueberries.

    This Brioche French Toast Casserole is such an easy breakfast recipe to feed a crowd on weekend mornings. Moist buttery brioche bread soaked in a cinnamon-filled custard and baked until fluffy on the inside and golden on top. Top with powdered sugar, syrup, and berries! Great for a holiday morning, Mother’s Day, or any cozy Sunday! 

    straight-on image of a slice of brioche french toast casserole with blueberries.
    [feast_advanced_jump_to]

    Ingredients

    This easy french toast bake takes just a few simple ingredients outside of kitchen staples: 

    Ingredients for brioche french toast casserole on a table.
    • Brioche bread: brioche is different from other breads because it’s made with an enriched dough (specifically eggs, butter, flour) and has a slightly sweeter flavor. It’s incredibly soft and fluffy, making it perfect to soak up the custard mixture. 
    • Heavy cream and whole milk: these are the base of the creamy custard. I really like going 50/50 on these, but you could do all whole milk if you prefer. All cream might be a bit too thick. 
    • Eggs: large eggs. Get pasture raised if you can, this means the chickens have full range of a plot of land outside to live on. 
    • Cinnamon: plenty of cinnamon brings such a classic french toast flavor to this casserole.
    • Nutmeg: a little nutmeg just adds depth of flavor with the warm spice. 
    • Vanilla extract: another element of flavor – the combination of vanilla, cinnamon, and nutmeg is a perfect trio.
    • Salt: balances everything out. 
    • Butter: a little bit of unsalted butter to rub on the casserole dish before adding the bread. 

    Ingredient substitutions

    A few substitutions you can make are listed below in the event you don't have everything needed on hand.

    • Instead of brioche bread you could use challah or french bread
    • Make this french toast casserole dairy free by using coconut cream and coconut milk. I have not tried almond milk or oat milk, but if they are full-fat they are likely fine.
    • Use any combination of spices you’d like – cinnamon and cloves, cardamom and nutmeg, pumpkin pie spice, etc. – I’d recommend just saying within the “warm spices” category
    • Use vanilla bean paste in place of vanilla extract if you have it

    Step by step instructions

    This is a super easy french toast casserole with brioche, check out the steps below! Full recipe can be found in the recipe card at the bottom of this post.

    1. Cut the bread. Using a bread knife, cube the brioche bread slices into 1-inch cubes. 

    2. Make the custard. In a large mixing bowl, whisk together the heavy cream, whole milk, eggs, cinnamon, nutmeg, vanilla extract, and a pinch of salt. 

    Side by side images of bread being cut and custard being mixed.

    3. Prep the baking dish. Grab your 11x7 baking dish (you can also use a 9x13) and rub the butter all over it. 

    4. Add your bread. Place the bread cubes into your buttered casserole dish, doing so pretty densely to make sure there are no large holes. 

    Side by side images of the buttered baking dish with the dry bread put inside.

    5. Add the custard. Pour the milk mixture over the top of the casserole in the baking dish. Make sure it’s covering the entire surface level and all pieces of bread are wet. Cover with plastic wrap and set it in the fridge for at least 2 hours or overnight. 

    6. Bake. Remove the casserole from the fridge at least 30 minutes before baking (so your dish doesn’t crack). Bake in a preheated 350°F oven for 50 minutes until golden. 

    side by side images of the casserole soaking and after baking.

    Tips and tricks

    Absolutely crush this baked french toast casserole recipe by following the tips and tricks below.

    • How to avoid a soggy french toast casserole – let the custard fully absorb into the bread, make sure your oven is at the right temperature, and bake it for the full 50 minutes. All of these steps combined should ensure a non-soggy casserole. A casserole gets soggy when the custard to bread ratio is off, it is not soaked for enough time, and/or it is not baked long enough.
    • Make sure when you put the cubed brioche bread into your casserole dish you’re really packing it in there – fill any gaps! 
    • If you want, add fresh blueberries or chocolate chips into the casserole before you bake so they bake right in there.
    • Keep an eye on it in the oven – when it’s done it’ll be puffed up and the center will have just a little jiggle. 
    • This recipe actually doesn’t use any sweetener because brioche is a rather sweet bread, but if you want, you can add some maple syrup, brown sugar, or granulated sugar to the custard mixture. Alternatively, you can top it with a cinnamon sugar mixture before baking for a sweet little crust. 
    • If you can’t find a brioche loaf, you can use brioche rolls and cut them into smaller pieces.

    What to serve with french toast casserole

    This breakfast casserole will be the star of the table and pairs so nicely with a variety of other breakfast foods. I recommend serving with:

    • Pure maple syrup
    • Homemade whipped cream
    • Powdered sugar
    • Bacon or sausage
    • Fresh fruit or fresh berries 
    • Overnight oats
    • Scrambled eggs or other egg dish (such as a quiche)

    Storage and reheating

    Instructions on storing, reheating, and freezing this brioche french toast casserole are below:

    To store, cut the casserole into serving sizes and store in an airtight container in the fridge for up to 4 days. 

    Reheat in the oven at 350°F until warmed through, or in the microwave for a few minutes.

    To freeze, let it come to room temperature, cut it into individual servings, then wrap tightly. It’s good in the fridge for a few months. Reheat in the microwave. 

    • Overhead image of french toast in a casserole dish with powdered sugar and blueberries.
    • Overhead image of slice of brioche french toast casserole with a bite taken out.

    FAQs

    Can I make this in advance? 

    Yes! You can soak the bread overnight (up to 12 hours) in the fridge and bake it off the next morning. Just take out 20-30 minutes before you bake it to get the chill off. 

    What’s an enriched dough?

    An enriched dough is one that is made from fats, sugar and dairy. It is different because other breads are typically made of water, yeast, and flour. Learn more about it here.

    Where is brioche bread from?

    Brioche originated in Normandy (France) in the middle ages.

    Do I need to use stale bread?

    Nope! Not necessarily. Freshly baked would be too soft, but it doesn’t need to be stale. 

    More brunch recipes 

    • 1:1 shot of the pancakes with a pour of maple syrup.
      Fluffy Almond Milk Pancakes
    • Close up image of the finished dutch baby with whipped cream and berries.
      Fluffy Buttermilk Dutch Baby Pancake
    • Up close of french toast with berries, syrup, and butter.
      Sourdough French Toast
    • Fresh baked muffins in a muffin tin.
      Lemon Ricotta Blueberry Muffins

    📖 Recipe

    straight-on image of a slice of brioche french toast casserole with blueberries.

    Brioche French Toast Casserole

    This Brioche French Toast Casserole is such an easy breakfast recipe to feed a crowd on weekend mornings. Moist buttery brioche bread soaked in a cinnamon-filled custard and baked until fluffy on the inside and golden on top. Top with powdered sugar, syrup, and berries! Great for a holiday morning, Mother’s Day, or any cozy Sunday! 
    5 from 2 votes
    Print Pin Rate
    Prep Time: 15 minutes minutes
    Cook Time: 50 minutes minutes
    Resting time: 2 hours hours
    Servings: 6 servings

    Ingredients

    • 1 cup heavy cream
    • 1 cup whole milk
    • 6 large eggs
    • 1 lb brioche bread
    • 1 teaspoon cinnamon
    • ½ teaspoon nutmeg
    • ½ teaspoon kosher salt
    • 1 teaspoon vanilla extract or vanilla bean paste
    • 1 tablespoon unsalted butter

    Instructions

    • Using a bread knife, cube the brioche bread slices into 1-inch cubes. 
    • In a large mixing bowl, whisk together the heavy cream, whole milk, eggs, cinnamon, nutmeg, vanilla extract, and a pinch of salt. 
    • Grab your 11x7 baking dish (you can also use a 9x13) and rub the butter all over it. 
    • Place the bread cubes into your buttered casserole dish, doing so pretty densely to make sure there are no large holes. 
    • Pour the milk mixture over the top of the casserole in the baking dish. Make sure it’s covering the entire surface level and all pieces of bread are wet. Cover with plastic wrap and set it in the fridge for at least 2 hours or overnight. 
    • Remove the casserole from the fridge at least 30 minutes before baking (so your dish doesn’t crack). Bake in a preheated 350°F oven for 50 minutes until golden. 

    Video

    Notes

    • How to avoid a soggy french toast casserole – let the custard fully absorb into the bread, make sure your oven is at the right temperature, and bake it for the full 50 minutes. All of these steps combined should ensure a non-soggy casserole. A casserole gets soggy when the custard to bread ratio is off, it is not soaked for enough time, and/or it is not baked long enough.
    • Make sure when you put the cubed brioche bread into your casserole dish you’re really packing it in there – fill any gaps! 
    • If you want, add fresh blueberries or chocolate chips into the casserole before you bake so they bake right in there.
    • Keep an eye on it in the oven – when it’s done it’ll be puffed up and the center will have just a little jiggle. 
    • This recipe actually doesn’t use any sweetener because brioche is a rather sweet bread, but if you want, you can add some maple syrup, brown sugar, or granulated sugar to the custard mixture. Alternatively, you can top it with a cinnamon sugar mixture before baking for a sweet little crust. 
    • If you can’t find a brioche loaf, you can use brioche rolls and cut them into smaller pieces.

    Nutrition Estimate

    Calories: 575kcal | Carbohydrates: 38g | Protein: 17g | Fat: 40g | Saturated Fat: 22g | Polyunsaturated Fat: 2g | Monounsaturated Fat: 6g | Trans Fat: 0.1g | Cholesterol: 370mg | Sodium: 637mg | Potassium: 171mg | Fiber: 0.2g | Sugar: 3g | Vitamin A: 1626IU | Vitamin C: 0.3mg | Calcium: 152mg | Iron: 2mg
    Course: Breakfast, Brunch
    Cuisine: American
    Keyword: Brioche, French toast
    Author: Haley

    Puff Pastry Chicken Pot Pie

    Close up shot of finished dish with a slice removed.

    This Puff Pastry Chicken Pot Pie is a wonderfully delicious and hearty recipe. Made with rotisserie chicken, potatoes, mirepoix, and plenty of garlic and herbs, topped with flaky buttery store-bought puff pastry crust. It’s perfect to feed a hungry crowd, and truly the perfect comfort food. 

    Close up shot of completed puff pastry chicken pot pie dish with a slice removed.
    [feast_advanced_jump_to]

    Ingredients

    Tabletop image of ingredients for puff pastry chicken pot pie.
    • Rotisserie chicken: Grocery store rotisserie chicken is a perfect short cut to help simplify this chicken pot pie recipe. Cut it into roughly 1 inch cubes. 
    • Potato: A single russet potato, peeled and cut into half-inch chunks.
    • Mirepoix: A mix of onion, carrots, and celery. Traditionally, the ratio is 2 parts onion to 1 part carrot and 1 part celery. However in this recipe we do equal parts onion and carrot.
    • Garlic: Plenty of cloves chopped up. Measure garlic with your heart. 
    • Peas: Frozen petite peas are my favorite, but frozen sweet peas are also fine. 
    • Herbs: A mixture of dried thyme for the classic pot pie flavor, and fresh parsley for a little extra something special.  
    • Flour: All purpose flour. This will help thicken the sauce.
    • Milk: Whole milk to make the creamy filling.
    • Chicken stock: This combines with the milk to make the sauce of the filling. 
    • Puff pastry: (Thawed) frozen store bought puff pastry sheets (usually sold as 2 sheets in a package). All-butter puff pastry is the best.

    Ingredient substitutions

    • Rotisserie chicken: You can use cubed chicken breast instead of rotisserie chicken. If you do this, cook the chicken until no longer pink on the outside as the first step. Then continue with the recipe. You can also use leftover turkey.
    • Peas: You can use fresh peas or canned peas (drain and rise if you go the canned route). For either of these options, add them to the dish just before you bake otherwise you run the risk of them getting too mushy. 
    • Herbs: Adding some fresh rosemary or sage would also be delicious. You can use fresh thyme instead of dried – use about 1 tablespoon fresh.
    • Milk: Make it dairy free by using full fat coconut milk. Make it extra creamy by using heavy cream.
    • Chicken stock: Use chicken broth or vegetable broth / stock. 
    • Veggies: You can add more vegetables to the filling mixture such as chopped green beans or mushrooms.
    • Puff pastry: I use store bought, but if you want to make your own try this recipe.

    Step by step instructions

    While there are a few steps required to make this puff pastry chicken pot pie recipe, they’re all relatively straightforward and easy to accomplish! Let’s get to it: 

    1. Cook the mirepoix. Heat your large skillet and olive oil over medium heat. Add the mirepoix, cubed potatoes, dried thyme, salt, and black pepper. Cook until softened, 5 minutes.

    2. Add the flour. Lower the heat to medium-low and sprinkle the flour over the vegetables. Stir it all together until all the flour is no longer dry. 

    Side by side cooking veggies and adding flour.

    3. Add the milk. Still on medium-low heat, stir in the milk and cook for 2 minutes until it coats everything. 

    4. Add the stock. Stir in the chicken stock and raise to medium-high heat until it comes to a simmer, then lower to medium-low and simmer until slightly thickened – about 5-8 minutes. You want it to be able to coat the back of a spoon (this is the sauce/gravy).

    Side by side images adding milk and stock.

    5. Add the remainder of the ingredients. Once the sauce is thickened, add the cubed cooked chicken, frozen peas, and fresh parsley to the pot pie filling. Stir to combine.

    6. Roll out the puff pastry. On a clean surface, roll out the sheet of puff pastry dough using a rolling pin until it is wide enough to cover the circumference of your pan with some extra hang room. 

    Side by side images adding final filling ingredients and rolling out puff pastry.

    7. Make an egg wash. Crack the egg into a small bowl and whisk until scrambled. 

    8. Cover the pot pie. Gently place the puff pastry centered over the pot pie, folding the edges on top of themselves. 

    Side by side images of egg wash and puff pastry laid on top of skillet.

    9. Brush with egg wash. Evenly brush egg wash over the puff pastry and cut a few slits in the center using a sharp knife to allow air to escape. 

    10. Bake. Bake the puff pastry chicken pot pie in a 400℉ oven for 20 minutes until the puff pastry is golden brown and puffed. 

    Side by side images of before and after baking the puff pastry chicken pot pie.

    Tips and tricks

    • Use a 10-inch oven safe skillet. I find it’s the perfect size for this recipe. A little bigger would be okay (for example, 12-inch skillet), however, any smaller and it won’t all fit.
    • If using cast iron, use one that is well seasoned so the food doesn’t stick.
    • Bake the chicken pot pie on a large baking sheet that way if there’s any spillage it won’t end up on the bottom of your oven. 
    • Defrost your puff pastry in the fridge at least 5-6 hours prior to using it. If you’re in a pinch you can defrost it at room temp, it’ll take about 30 mins-1 hour. But once defrosted put it back in the fridge if possible to firm back up. 
    • Preheat your oven before you start cooking the recipe. Puff pastry shouldn’t be at room temperature for long because the butter will melt and it won’t get as puffy, so the quicker you can go from rolling it out to putting it in the oven, the better!
    • Don’t skip the egg wash - it makes the puff pastry golden and give it the shiny top.
    • Store bought chicken stock is perfectly fine, but if you have homemade chicken stock definitely use that it's so good!!

    Storage and reheating

    To store this recipe, you can keep it in the skillet or dish you baked it in, and cover and keep in the fridge for up to 2-3 days. Alternatively, you can scoop the filling into an airtight container then cut the remaining puff pastry into smaller pieces and add on top. 

    To reheat, warm in the oven at 350℉ until warmed through, about 15 minutes.

    Make ahead instructions

    Make the filling mixture (up to step 5). Allow it to cool to room temperature, then store in the fridge (ideally just overnight) either in the skillet or in a baking dish. When you’re ready to bake, take it out of the fridge to get the chill off while you roll out the puff pastry. Then continue according to directions to finish. 

    FAQs

    Can I make these in individual sizes? 

    Sure! Cook the filling mixture as instructed, then pour into oven safe mini ramekins. Cut the puff pastry into smaller pieces to cover each individual serving, brush each with egg wash, cut a slit, and bake according to instructions. 

    How do I make this gluten free?

    Use a gluten free flour in place of all purpose flour in the sauce. For the topping, I’d recommend making (or buying) a gluten free pie crust in place of the puff pastry, as puff pastry has gluten. 

    Can I freeze this recipe?

    Yes. You can freeze it either before or after you bake it. With either, wrap tightly and freeze for up to 3 months. If you froze before baking, just take it out of the freezer, brush with egg wash, and bake at 400℉ until golden (roughly 20-30 minutes). If you froze after baking, simply bake again at 350℉until warmed through (roughly 20 minutes). 

    Is there a bottom crust?

    This recipe does not call for a double crust, because puff pastry wouldn't hold up in the same way as a pie crust and would be soggy.

    How is chicken pot pie and chicken pie different?

    While generally the same, chicken pie typically has a double crust (top and bottom) and chicken pot pie just has the top crust.

    More chicken recipes

    • Chicken parmesan meatballs in a skillet freshly baked.
      Skillet Chicken Parmesan Meatballs
    • Up close of the wings on a round serving plate.
      Air Fryer Lemon Pepper Chicken Wings
    • Thumbnail
      Instant Pot Pulled BBQ Chicken
    • Apple Cider Braised Chicken Thighs
      Apple Cider Braised Chicken Thighs

    Did you make this recipe? Leave a rating and review below and tag me on social!

    📖 Recipe

    Close up shot of finished dish with a slice removed.

    Puff Pastry Chicken Pot Pie

    This Puff Pastry Chicken Pot Pie is a wonderfully delicious and hearty recipe. Made with rotisserie chicken, potatoes, mirepoix, and plenty of garlic and herbs, topped with flaky buttery store-bought puff pastry crust. It’s perfect to feed a hungry crowd, and truly the perfect comfort food. 
    5 from 2 votes
    Print Pin Rate
    Prep Time: 15 minutes minutes
    Cook Time: 35 minutes minutes
    Total Time: 50 minutes minutes
    Servings: 4 servings

    Ingredients

    • 2 cups cubed rotisserie chicken
    • 1 russet potato peeled and cubed
    • 1 cup yellow onion diced (1 onion)
    • 1 cup carrots chopped (about 3-4 thin stalks)
    • ½ cup celery sliced (about 2-3 stalks)
    • 1 teaspoon dried thyme
    • 4 cloves garlic minced
    • ¼ cup flour
    • ½ cup whole milk
    • 2 cups chicken stock
    • 1 cup frozen peas
    • 1 sheet puff pastry thawed
    • 1 egg beaten (egg wash)
    • 1 teaspoon salt
    • ½ teaspoon pepper

    Instructions

    • Preheat your oven to 400℉
    • Heat your large skillet and olive oil over medium heat. Add the mirepoix, cubed potatoes, dried thyme, salt, and black pepper. Cook until softened, 5 minutes.
    • Lower the heat to medium-low and sprinkle the flour over the vegetables. Stir it all together until all the flour is no longer dry. 
    • Still on medium-low heat, stir in the milk and cook for 2 minutes until it coats everything. 
    • Stir in the chicken stock and raise to medium-high heat until it comes to a simmer, then lower to medium-low and simmer until slightly thickened – about 5-8 minutes. You want it to be able to coat the back of a spoon (this is the sauce/gravy).
    • Once the sauce is thickened, add the cubed cooked chicken, frozen peas, and fresh parsley to the pot pie filling. Stir to combine.
    • On a clean surface, roll out the sheet of puff pastry dough using a rolling pin until it is wide enough to cover the circumference of your pan with some extra hang room. 
    • Crack the egg into a small bowl and whisk until scrambled. 
    • Gently place the puff pastry centered over the pot pie, folding the edges on top of themselves. 
    • Evenly brush egg wash over the puff pastry and cut a few slits in the center using a sharp knife to allow air to escape. 
    • Bake the puff pastry chicken pot pie for 20 minutes until the puff pastry is golden brown and puffed. 

    Video

    Nutrition Estimate

    Calories: 769kcal | Carbohydrates: 63g | Protein: 47g | Fat: 37g | Saturated Fat: 10g | Polyunsaturated Fat: 4g | Monounsaturated Fat: 15g | Trans Fat: 0.01g | Cholesterol: 162mg | Sodium: 1382mg | Potassium: 754mg | Fiber: 6g | Sugar: 10g | Vitamin A: 5805IU | Vitamin C: 24mg | Calcium: 107mg | Iron: 4mg
    Course: Main Course
    Cuisine: American
    Keyword: Chicken, Puff pastry
    Author: Haley

    Butternut Squash and Spinach Lasagna

    Overhead image of lasagna fresh out of the oven with sage on top.

    This Butternut Squash Lasagna is layers upon layers of delicious homemade roasted butternut squash sauce with roasted garlic and a cheesy spinach mixture, all baked until golden with crispy edges and topped with fresh sage. Perfect for any dinner table, especially on holidays or serving a crowd! 

    Overhead image of lasagna fresh out of the oven with sage on top.
    [feast_advanced_jump_to]

    Ingredients 

    This delicious butternut squash and spinach lasagna skips the classic red sauce and instead uses a seasonal creamy butternut squash sauce that is so good when paired with spinach and ricotta layers.

    Ingredients on a table for butternut squash lasagna.
    • Lasagna noodles: Regular lasagna noodles. I like the ones with the curly edges. They get cooked to al-dente before being layered together and baked which finishes them off 
    • Butternut squash: The star of the show - it's a relatively sweet squash but paired in this recipe gets a balance of savory. It's cubed and roasted which gives it a stronger butternut squash flavor that is so good.
    • Spices: A mixture of cinnamon and nutmeg give the butternut squash sauce such a fabulous depth of flavor.
    • Heavy cream: Smooth out and help serve as the base of the butternut squash sauce. 
    • Garlic: A full head of garlic gets roasted and added into the sauce. It’s a game changer.
    • Spinach: Frozen chopped spinach is the easiest route here. 
    • Onion: Yellow onion is sautéd and added into the spinach mixture for more flavor. 
    • Cheeses: A combination of four cheeses – ricotta, mozzarella, gruyere, parmesan – all blended for the perfect gooeyness and cheesy flavor. 
    • Egg: Acts as the binder to the spinach mixture so it doesn’t melt all over the place.

    Ingredient substitutions

    • Lasagna noodles: can substitute no boil noodles, just add some vegetable broth to the butternut squash sauce to add extra moisture to help the noodles cook. 
      • You can also use whole wheat noodles or gluten-free noodles if you’d like.
    • Butternut squash: you can use pumpkin instead. You can also use frozen butternut squash, just defrost it slightly then roast. 
    • Spices: pumpkin pie spice is a good sub, but if you use it, use that as the only spice as it includes both cinnamon and nutmeg.
    • Heavy cream: use full fat coconut milk 
    • Frozen spinach: use fresh spinach instead, add it to the onions when they’re just about done and sauté until wilted.  

    Step by step instructions

    Lasagnas are a bit of a labor of love with a bunch of different components, but it’s definitely worth it! This is really a great vegetarian main dish that the whole family will truly love. Fall comfort food at its finest.

    1. Roast the butternut squash and garlic. Toss the butternut squash cubes with olive oil, salt, pepper, nutmeg, and cinnamon. Spread them in an even layer on a parchment paper lined baking sheet. Separately, cut the top ¼ off a head of garlic and drizzle it with olive oil then wrap it in aluminum foil. Add it to the baking sheet with the butternut squash. Roast at 425F for about 30-40 minutes until tender. 

    2. Make the sauce. To a high powered blender or food processor, add the roasted butternut squash, heavy cream, and squeeze the roasted garlic out of the bulb. Blend until smooth. In a medium bowl add the butternut squash puree and mix in the ricotta cheese.

    Side by side of squash being roasted and blended into a sauce.

    3. Sauté the onions. Warm a sauté pan over medium heat. Add a little olive oil and the onions. Cook, stirring frequently, until soft and translucent - about 5-8 minutes. 

    4. Make the spinach ricotta mixture. In large bowl, add the thawed chopped spinach, sautéed onions, ricotta cheese, parmesan cheese, ½ of the mozzarella cheese, gruyere cheese, egg, salt, and pepper. Mix until combined. 

    Side by side of sauteeing onions and making the cheese mixture.

    5. Par-cook the noodles. Boil a large pot of water. Add the lasagna noodles and cook until al dente – a few minutes less than the box directions. Drain and set aside in an even layer to prevent sticking. 

    6. Assemble. Use a 9x13 or 10x7 baking dish / casserole dish. There's going to be 3 layers of noodles. First, put ¼ cup of sauce on the bottom of the dish. Then layer 3 noodles side by side. Next add ⅓ of the remaining sauce and spread to an even layer. Follow with ½ of the cheese mixture and spread to an even layer. Then repeat – noodles, ⅓ sauce, rest of the cheese. For the final layer, add noodles, remaining sauce, and sprinkle the remaining mozzarella cheese on the top of the lasagna.

    Steps of assembling the lasagna.

    7. Bake. Cover the lasagna with aluminum foil and bake at 375F for 30 minutes, then remove the foil and bake for another 10 until lightly browned. Option to broil for a few minutes if desired. Top with fresh sage leaves if desired. 

    Final step fresh baked lasagna.

    Tips and tricks

    • If you’re using a blender that doesn’t have a vent, let the butternut squash cool a little before you blend it in the sauce. You don’t want the blender getting too hot. 
    • Buy pre-cubed butternut squash if you want a bit of a shortcut.
    • To cut butternut squash, cut the top and bottom off. Then cut it in half to separate the "neck" from the "bulb". Then stand each piece up, slicing off the skin with downward cuts. Then cut into cubes! For the bulb, make sure you remove the seeds first. 
    • To pick a ripe butternut squash, look for one that has a solid beige color. 
    • Make sure you’re using full fat ricotta cheese, it helps make the lasagna nice and rich, and is a bit thicker. Lower fat content will be a bit more runny. 
    • Let the lasagna sit for at least 10-15 minutes before you slice into it to help it set – no runny lasagna here!
    • If you don't want this to be a meatless lasagna, you can ad some ground or shredded turkey or chicken, or ground beef even. It can be put between the sauce and cheese layers or over the cheese layer (it’s a great way to use up Thanksgiving leftovers!). 

    What to serve with lasagna

    Lasagna is a pretty heavy dish, so you’ll want to even it out with lighter accompaniments. 

    • Green salad! Something simple like arugula, lemon juice, olive oil, and shreds of parmesan would be great. 
    • Veggies! Roast some broccoli, green beans, or brussels sprouts alongside the lasagna as it bakes. 
    • Soup! A broth-based soup would be best so it’s not so heavy. 

    Storage and reheating

    Storage: store in an airtight container in the fridge for up to 5 days. 

    Reheating: microwave is the easiest method, but you can reheat in the oven covered at 350 for 15ish minutes until warmed through. 

    FAQs

    Is this recipe vegan? 

    It is not, but you can swap the cheeses and heavy cream for vegan alternatives. 

    Is lasagna a traditional Italian dish? 

    Yes! It originated in Naples. This version is a bit more American-ized though. 

    Can I prep this in advance?

    Yes! You can assemble the lasagna up to 2 days in advance. Then just remove from the oven 1 hour before baking to get rid of its chill, and bake according to instructions. 

    Can I freeze this recipe?

    Yes. Assemble according to instructions and then cover tightly and freeze up to 1 month. To bake, follow instructions but add an additional 20 minutes if baking straight from frozen. Also, if you assembled in a ceramic or glass dish, make sure you thaw it before baking as your dish will likely break. 

    Is butternut squash heathly?

    It's low in calories but high in nutrients - read about the specifics here.

    More vegetarian pasta recipes

    • Mushroom mascarpone pasta in a bowl with fresh parsley on top.
      Creamy Mushroom Mascarpone Pasta
    • Brown bowl of fettuccini pasta with butternut squash sauce on top.
      Creamy Butternut Squash Sauce with Fettuccini
    • Finished creamy pumpkin pasta sauce in a dutch oven.
      Creamy Pumpkin Pasta Sauce
    • Thumbnail
      Creamy Roasted Red Pepper Pasta

    📖 Recipe

    Overhead image of lasagna fresh out of the oven with sage on top.

    Butternut Squash and Spinach Lasagna

    This Butternut Squash Lasagna is layers upon layers of delicious homemade roasted butternut squash sauce with roasted garlic and a cheesy spinach mixture, all baked until golden with crispy edges and topped with fresh sage. Perfect for any dinner table, especially on holidays or serving a crowd! 
    5 from 3 votes
    Print Pin Rate
    Prep Time: 45 minutes minutes
    Cook Time: 40 minutes minutes
    Total Time: 1 hour hour 25 minutes minutes
    Servings: 8 servings

    Ingredients

    • 9 lasagna noodles

    Butternut Squash Sauce

    • 6 cups butternut squash cubed 1 inch pieces
    • 2 tablespoon olive oil
    • 2 teaspoon kosher
    • ½ teaspoon pepper
    • ½ teaspoon cinnamon
    • ½ teaspoon nutmeg
    • ½ cup ricotta cheese
    • ½ cup heavy cream
    • 1 bulb garlic

    Spinach and Cheese Mixture

    • 1 cup frozen chopped spinach thawed
    • 1 yellow onion sliced
    • 3 cups ricotta cheese
    • ½ cup grated parmesan cheese
    • 1 cup shredded mozzarella cheese
    • 1 cup shredded gruyere cheese
    • 1 large egg
    • 1 teaspoon kosher salt
    • 1 tsp pepper

    Instructions

    Make the butternut squash sauce

    • Preheat your oven to 425℉.
    • Toss the cubed butternut squash with olive oil, salt, pepper, nutmeg, and cinnamon. Spread them in an even layer on a parchment paper lined baking sheet.
    • Cut the top ¼ off the bulb of garlic and drizzle it with olive oil then wrap it in aluminum foil. Add it to the baking sheet with the butternut squash.
    • Roast the garlic and squash for about 30-40 minutes until tender. 
    • To a high powered blender or food processor, add the roasted butternut squash, heavy cream, and squeeze the roasted garlic out of the bulb. Blend until smooth.
    • In a medium bowl add the butternut squash puree and mix in the ricotta cheese.

    Make the spinach and cheese mixture

    • Warm a sauté pan over medium heat. Add a little olive oil and the onions. Cook, stirring frequently, until soft and translucent - about 5-8 minutes. 
    • In large bowl, add the thawed chopped spinach, sautéed onions, ricotta cheese, parmesan cheese, ½ of the mozzarella cheese, gruyere cheese, egg, salt, and pepper. Mix until combined. 
    • Boil a large pot of water. Add the lasagna noodles and cook until al dente – a few minutes less than the box directions. Drain and set aside in an even layer to prevent sticking. 

    Assemble & bake

    • Lower the oven to 375℉.
    • Use a 9x13 or 10x7 baking dish / casserole dish. There's going to be 3 layers of noodles. First, put ¼ cup of sauce on the bottom of the dish. Then layer 3 noodles side by side.
    • Add ⅓ of the remaining sauce and spread to an even layer. Follow with ½ of the cheese mixture and spread to an even layer.
    • Then repeat – noodles, sauce, rest of the cheese.
    • For the final layer, add noodles, remaining sauce, and sprinkle the remaining mozzarella cheese on the top of the lasagna.
    • Cover the lasagna with aluminum foil and bake for 30 minutes, then remove the foil and bake for another 10 until lightly browned. Option to broil for a few minutes if desired. Top with fresh sage leaves if desired. 

    Video

    Nutrition Estimate

    Calories: 591kcal | Carbohydrates: 43g | Protein: 29g | Fat: 34g | Saturated Fat: 19g | Polyunsaturated Fat: 2g | Monounsaturated Fat: 11g | Trans Fat: 0.003g | Cholesterol: 127mg | Sodium: 1311mg | Potassium: 705mg | Fiber: 4g | Sugar: 5g | Vitamin A: 14483IU | Vitamin C: 24mg | Calcium: 618mg | Iron: 2mg
    Course: Lunch/Dinner, Main Course
    Cuisine: American, Italian
    Keyword: Butternut Squash, lasagna, Pasta, Vegetarian
    Author: Haley

    Bourbon Mashed Sweet Potatoes

    Close up shot of finished dish in a bowl.

    These Bourbon Mashed Sweet Potatoes are a true treat (one of my favorite side dishes!!) with such depth of flavor from only a few really great ingredients. Roasted sweet potatoes combined with smoky bourbon, pure maple syrup, butter, and nutmeg then whipped until absolute silky perfection. 

    Finished dish in a bowl with a serving spoon.
    [feast_advanced_jump_to]

    Ingredients 

    Check out the ingredients needed below to make this bourbon mashed sweet potato dish

    Ingredients for bourbon mashed sweet potatoes.
    • Sweet potatoes: Sweet potatoes are fantastic this time of year with their orange flesh and pleasantly sweet flavor. 
    • Bourbon: Adds a little kick with a smoky edge to a classic sweet potato dish. A little goes a long way here. 
    • Pure maple syrup: Really helps the natural sweetness of the sweet potatoes shine. Be sure you’re using pure maple syrup, not the artificial stuff with added sugars and ingredients. 
      • You could sub light brown sugar if you prefer.
    • Butter: Unsalted butter is preferred that way you can add salt to taste. 
      • If you don’t have unsalted butter, you can use salted butter but pull back on the added salt until after you’ve made the dish and can taste it. 
    • Nutmeg: Just a hint of this warm wintery spice adds the perfect little hint of flavor. 
      • You can use cinnamon or pumpkin pie spice instead. 
    • Pecans: Chopped pecans or pecan halves added on top to serve add the perfect crunch. 
    • Salt: Kosher salt! 

    Step by step instructions

    With this easy recipe that's just a few steps you’ll have this sweet potato side dish ready to go.

    1. Roast the potatoes. Pierce the potatoes with a fork, wrap them in aluminum foil, and roast at 375℉ for 1 hour until fork tender. 

    Wrapped sweet potatoes on a sheet tray.

    2. Mash the potatoes. Discard skins and add the sweet potatoes to either a large bowl or food processor. Add the remaining ingredients – melted unsalted butter, bourbon, pure maple syrup, nutmeg, and salt. Mash or whip on high speed until desired consistency. Taste and add more salt if desired.

    Before and after blending the sweet potatoes in a food processor.

    3. Serve. Scoop the potato mixture into a serving bowl. Serve with a pat of butter and a sprinkling of chopped pecans. 

    Finished sweet potatoes in a bowl.

    How to mash and whip sweet potatoes

    There are a few different ways to mash sweet potatoes and it all boils down to the texture you prefer. 

    • If you like them really smooth and silky: whip them in a high powered food processor
    • If you like them smooth and silky with a little texture: whip them with an electric mixer (hand mixer) or stand mixer
    • If you like them a little chunkier: mash them by hand with either a potato masher or a fork.

    Tips and tricks

    • If you’re using small sweet potatoes, an hour in the oven should be good. But if you’re using large sweet potatoes, they may need a bit longer. 
    • Make sure when you wrap the potatoes they’re fully covered and sealed in, this will help make sure they steam properly. 
    • To get the sweet potatoes out of the skin after baking, cut them in half and then when cool enough to the touch you can pinch the top and the inside should slip out. 
    • I used plain bourbon, but if you can find maple bourbon that would be delicious too.
    • If you prefer a stronger taste of bourbon, add an extra splash!
    • If you’re serving this dish to kids, you can skip the bourbon. It doesn’t get cooked, so there is a bit of alcohol in these potatoes. Add a dash of vanilla extract to get a similar flavor profile. 
    • If you love sweet potato casserole, after you mash these you can put them in a baking dish, top with mini marshmallows, and bake for 20 minutes at 350℉ until the marshmallows are golden brown. 
    • If you want even more depth of flavor, try browning your butter before you add it to the sweet potatoes!

    Storage and reheating 

    To store this dish: allow it to come to room temp, then place in an airtight container and store in the fridge for up to 5 days. 

    To reheat this dish: warm in the microwave for a few minutes until heated through. You could also warm on the stove over low heat stirring often.

    What to serve with mashed sweet potatoes

    This dish leans on the sweeter side, so I’d serve with something savory to balance it out. P.S. it’s a great side dish to serve on Thanksgiving!

    Roasted chicken, turkey, or braised short ribs would be delicious. 

    Side dishes such as brussels sprouts, green beans, and a fresh salad would compliment the potatoes perfectly. 

    FAQs

    What’s the difference between a sweet potato and a yam?

    While often confused for one another, sweet potatoes and yams are actually completely different, although they are both root vegetables. Visually, a sweet potato has more of a warm reddish-brown skin with a bright orange inside, and a yam has a brownish skin with a white inside. Taste wise, sweet potatoes are sweeter and have a creamier texture, whereas yams are starchier and closer in flavor to a russet potato. More on their differences here.

    What’s the difference between bourbon and whiskey?

    Bourbon is a type of whiskey that’s made in the USA with 40% alcohol content. Other types of whiskey include scotch which is made in Scotland, Irish whiskey which is made in Ireland, and Canadian whiskey and Japanese whiskey, which are made in Canada and Japan respectively. 

    Is this dish vegan? 

    Close to it. If you swap the butter for vegan butter, then it is! Sweet potatoes, pure maple syrup, bourbon, nutmeg, and pecans are all vegan. 

    Can I make this dish in advance?

    Sure! I’d recommend no more than 2 days in advance, and skip adding the pecans until you’re ready to serve. Warm in the microwave. 

    Can I boil the sweet potatoes instead of roasting?

    Sure! Peel them, cut them into large cubes, then boil just the sweet potato chunks in a large pot for about 15-20 minutes until fork tender. From there, follow the recipe starting at step 2.

    More sweet potato recipes

    • Finished mediterranean sweet potatoes on a serving tray.
      Mediterranean Sweet Potatoes
    • Sweet Potato Quinoa Burger
      Sweet Potato Quinoa Burger
    • Close up of breakfast skillet with eggs, bacon, and potatoes.
      Potato, Egg and Bacon Breakfast Skillet

    📖 Recipe

    Close up shot of finished dish in a bowl.

    Bourbon Mashed Sweet Potatoes

    These Bourbon Mashed Sweet Potatoes are a true treat (one of my favorite side dishes!!) with such depth of flavor from only a few really great ingredients. Roasted sweet potatoes combined with smoky bourbon, pure maple syrup, butter, and nutmeg then whipped until absolute silky perfection. 
    5 from 3 votes
    Print Pin Rate
    Prep Time: 10 minutes minutes
    Cook Time: 1 hour hour 10 minutes minutes
    Total Time: 1 hour hour 20 minutes minutes
    Servings: 4 servings

    Ingredients

    • 5 medium sweet potatoes
    • 2 tablespoon pure maple syrup
    • 3 tablespoon bourbon whiskey
    • 4 tablespoon unsalted butter melted
    • ½ teaspoon nutmeg
    • 1 ½ teaspoon kosher salt
    • ¼ cup chopped pecans

    Instructions

    • Preheat your oven to 375℉.
    • Pierce the potatoes with a fork, wrap them in aluminum foil, and roast for 1 hour until fork tender. 
    • Discard skins and add the sweet potatoes to either a large bowl or food processor. Add the remaining ingredients – 4 tablespoon melted unsalted butter, 3 tablespoon bourbon, 2 tablespoon pure maple syrup, ½ teaspoon nutmeg, and 1 ½ teaspoon kosher salt. Mash or whip on high speed until desired consistency. Taste and add more salt if desired.
    • Scoop the potato mixture into a serving bowl. Serve with a pat of butter and a sprinkling of chopped pecans. 

    Video

    Notes

    • If you’re using small sweet potatoes, an hour in the oven should be good. But if you’re using large sweet potatoes, they may need a bit longer. 
    • Make sure when you wrap the potatoes they’re fully covered and sealed in, this will help make sure they steam properly. 
    • To get the sweet potatoes out of the skin after baking, cut them in half and then when cool enough to the touch you can pinch the top and the inside should slip out. 
    • I used plain bourbon, but if you can find maple bourbon that would be delicious too.
    • If you prefer a stronger taste of bourbon, add an extra splash!
    • If you’re serving this dish to kids, you can skip the bourbon. It doesn’t get cooked, so there is a bit of alcohol in these potatoes. Add a dash of vanilla extract to get a similar flavor profile. 
    • If you love sweet potato casserole, after you mash these you can put them in a baking dish, top with mini marshmallows, and bake for 20 minutes at 350℉ until the marshmallows are golden brown. 
    • If you want even more depth of flavor, try browning your butter before you add it to the sweet potatoes!

    Nutrition Estimate

    Calories: 445kcal | Carbohydrates: 65g | Protein: 5g | Fat: 16g | Saturated Fat: 8g | Polyunsaturated Fat: 2g | Monounsaturated Fat: 6g | Trans Fat: 0.5g | Cholesterol: 30mg | Sodium: 1030mg | Potassium: 1007mg | Fiber: 9g | Sugar: 18g | Vitamin A: 40432IU | Vitamin C: 7mg | Calcium: 105mg | Iron: 2mg
    Course: Side Dish
    Cuisine: American
    Keyword: easy side, Sweet Potato
    Author: Haley

    Easy Skillet Broken Lasagna with Meat Sauce

    Close up image of lasagna in pot.

    This Broken Lasagna is a delicious weeknight meal made in one skillet with noodles cooked right in a homemade tomato sauce with ground chicken and it’s all topped with mozzarella and ricotta cheese broiled until melty.

    Close up image of broken lasagna with serving spoon.
    [feast_advanced_jump_to]

    Ingredients

    Some pretty standard ingredients are used to make this one pot deconstructed lasagna but they come together in an absolutely delicious way. 

    Ingredients on a table for broken lasagna recipe.
    • Lasagna noodles: Regular uncooked lasagna pasta noodles, I love the ones with the wavy edges for added texture in the dish. Break them into pieces roughly 2 inches big. You do not need the no-boil for these. 
    • Ground chicken: Whichever brand you like - stays nice and tender in the sauce. 
    • Onion: Yellow onion helps serve as the flavor base for the tomato sauce. 
    • Garlic: Measure garlic with your heart. I used about 4 garlic cloves which equates to roughly 1.5 tbsp
    • Tomato paste: Deepens the tomato flavor in the sauce. When we add the broth to help cook the noodles it dilutes the tomato flavor, so adding the paste makes sure it still has tons of that classic flavor! 
    • Tomato puree: Nice and smooth pureed tomatoes. 
    • Chicken broth: Adds just enough liquid to cook the lasagna noodles without totally drying up the sauce. 
    • Dried spices: A mixture of dried parsley, dried basil, and dried oregano adds great flavor to the sauce. 
    • Brown sugar: Helps bring out the tomato flavor – canned tomatoes can get a little metallic tasting, and this balances that out. 
    • Fresh basil: To serve!
    • Ricotta cheese: Whole milk ricotta cheese will yield the creamiest result. 
    • Mozzarella cheese: A ball of fresh mozzarella cheese cut into chunks. 

    Ingredient substitutions and variations

    • Ground beef, sweet italian sausage, or ground turkey would also work well. 
    • Vegetable broth would be great.
    • Crushed tomatoes instead of tomato puree work great if you prefer those.
    • Granulated sugar instead of brown sugar is fine.  
    • Shredded mozzarella cheese or the mini balls would work. 
    • Make it vegetarian by omitting the meat or subbing it for chopped mushrooms or a meat substitute. 
    • Add some calabrian chili peppers or red chili flakes for some heat. 

    Step by step instructions

    This easy skillet lasagna comes together by first making the meat sauce, then cooking the lasagna noodles, then finishing with cheese. No dealing with layering here! 

    1. Cook the chicken. Warm a deep large skillet over medium heat with 1 tablespoon olive oil. Once warm, add the chicken breaking it into small pieces with a wooden spoon and cook until about ½ way done, 5 minutes.

    2. Add the onion. Sauté the onion with the chicken for 5 minutes until softened and the chicken is cooked through. 

    Side by side image of chicken being cooked and onions being added.

    3. Add the garlic and spices. Add in the garlic and spices and cook for 1-2 minutes until very fragrant.

    4. Add the tomato paste. Stir in the tomato paste until evenly distributed with the chicken/onion/garlic. 

    Side by side image of garlic and spices being added, then tomato paste.

    5. Add the tomato puree, broth, and sugar. Stir in the tomato puree, broth, and brown sugar until evenly combined with everything. Bring to a gentle simmer.

    6. Add the noodles. Carefully mix the raw broken lasagna noodles into the sauce until fully submerged.

    Side by side image of tomato sauce being made, and lasagna noodles being added.

    7. Cook until al dente. Keep at a simmer, cover the dish and cook, stirring often, for about 20-30 minutes until the noodles are al dente. Add more chicken broth if needed. 

    8. Top with cheese and broil. Top with dollops of ricotta cheese and mozzarella cheese and broil until melted and golden. Serve warm with fresh basil.

    Side by side images of lasagna pre and post broil with cheese.

    Tips and tricks

    • Truly make sure you stir the dish often once the noodles are added. They’ll stick together and not cook properly if not. 
    • If you want, you can cook the noodles separately in a large pot of salted water and add to the sauce, but if you do this, omit the chicken broth entirely. 
    • Break the lasagna noodles by just snapping them with your hands, or put them in a bag and give it a few whacks with a rolling pin or wood spoon. 
    • Use a skillet with deep sides to ensure there’s enough room for everything. 
    • The best way to tell if your pasta is al dente in this recipe is to take a bite! Also look at the “floppiness” of the noodles, if they are still pretty stiff, they’re likely not ready. 
    • If you love cheese like I do, top the finished dish with parmesan cheese too. 
    • Add salt to taste, if it needs extra seasoning for your taste with a pinch more salt, go for it.
    • If you want to add some veggies in there, when the noodles are almost done cooking stir in some fresh spinach or peas.

    Storage and reheating

    Store in an airtight container in the fridge for up to 1 week.

    Reheat in the microwave until warmed through. 

    FAQs

    Can I use different pasta shapes?

    Sure! Follow the recipe the same way, just keep an eye on them while they're cooking as depending on the shape may take more or less time to cook.

    What kind of skillet should I use?

    Any large skillet with high sides that can go from stovetop to oven for broil. I used my Staub enamel cast iron braiser with a glass lid.

    Can I use a different kind of cheese?

    Ricotta and mozzarella cheeses give this dish the classic lasagna taste and texture – you can use a different cheese, just know you may lose some of the lasagna essence. If you can, stick with a melty cheese such as provolone, fontina, or gruyere. 

    More pasta recipes

    • Mushroom mascarpone pasta in a bowl with fresh parsley on top.
      Creamy Mushroom Mascarpone Pasta
    • Thumbnail
      Creamy Roasted Red Pepper Pasta
    • Close up of half-eaten bowl of lemon ricotta pasta
      One Pot Lemon Ricotta Pasta
    • Close up shot of stuffed shells being served.
      Stuffed Shells with Spinach and Pesto

    Did you make this recipe? Leave a rating and review below and tag me on social!

    📖 Recipe

    Close up image of lasagna in pot.

    One Skillet Broken Lasagna with Meat Sauce

    This Broken Lasagna is a delicious weeknight meal made in one skillet with noodles cooked right in a homemade tomato sauce with ground chicken and it’s all topped with mozzarella and ricotta cheese broiled until melty.
    5 from 4 votes
    Print Pin Rate
    Prep Time: 5 minutes minutes
    Cook Time: 40 minutes minutes
    Total Time: 45 minutes minutes
    Servings: 4 servings

    Ingredients

    • 1 tablespoon olive oil
    • 1 lb ground chicken
    • 1 yellow onion diced
    • 4 cloves garlic minced
    • 2 tablespoon tomato paste
    • 1 teaspoon dried oregano
    • ½ teaspoon dried basil
    • ½ teaspoon dried parsley
    • 1 teaspoon kosher salt
    • ½ tsp black pepper
    • 28 oz tomato puree
    • 2 cups chicken broth
    • 1 tablespoon brown sugar
    • 8 oz lasagna noodles broken
    • ¼ cup ricotta cheese
    • ¼ cup fresh mozzarella cut into chunks

    Instructions

    • Warm a deep large skillet over medium heat with 1 tablespoon olive oil. Once warm, add the chicken breaking it into small pieces with a wooden spoon and cook until about ½ way done, 5 minutes.
    • Add the diced onion and sauté it with the chicken for 5 minutes until softened and the chicken is just about cooked through. 
    • Add in the 4 cloves of garlic and spices (1 teaspoon kosher salt, ½ teaspoon pepper, 1 teaspoon dried oregano, ½ teaspoon dried parsley, ½ teaspoon dried basil) and cook for 1-2 minutes until very fragrant.
    • Stir in the 2 tablespoon tomato paste until evenly distributed with the chicken/onion/garlic. 
    • Stir in the 28oz tomato puree, 2 cups broth, and 1 tablespoon brown sugar until evenly combined with everything. Bring to a gentle simmer.
    • Carefully mix the 8oz raw broken lasagna noodles into the sauce until fully submerged.
    • Keep at a simmer, cover the dish and cook, stirring often, for about 20-30 minutes until the noodles are al dente. Add more chicken broth if needed. 
    • Top with dollops of ricotta cheese and mozzarella cheese and broil until melted and golden. Serve warm with fresh basil.

    Video

    Notes

    • Truly make sure you stir the dish often once the noodles are added. They’ll stick together and not cook properly if not. 
    • If you want, you can cook the noodles separately in a large pot of salted water and add to the sauce, but if you do this, omit the chicken broth entirely. 
    • Break the lasagna noodles by just snapping them with your hands, or put them in a bag and give it a few whacks with a rolling pin or wood spoon. 
    • Use a skillet with deep sides to ensure there’s enough room for everything. 
    • The best way to tell if your pasta is al dente in this recipe is to take a bite! Also look at the “floppiness” of the noodles, if they are still pretty stiff, they’re likely not ready. 
    • If you love cheese like I do, top the finished dish with parmesan cheese too. 
    • Add salt to taste, if it needs extra seasoning for your taste with a pinch more salt, go for it.
    • If you want to add some veggies in there, when the noodles are almost done cooking stir in some fresh spinach or peas.

    Nutrition Estimate

    Calories: 569kcal | Carbohydrates: 70g | Protein: 35g | Fat: 18g | Saturated Fat: 6g | Polyunsaturated Fat: 3g | Monounsaturated Fat: 8g | Trans Fat: 0.1g | Cholesterol: 113mg | Sodium: 1267mg | Potassium: 1783mg | Fiber: 7g | Sugar: 17g | Vitamin A: 1264IU | Vitamin C: 26mg | Calcium: 156mg | Iron: 6mg
    Course: Dinner
    Cuisine: Italian
    Keyword: italian, lasagna, one pot, one skillet, Pasta
    Author: Haley

    Cinnamon Swirl Loaf Cake

    Overhead image of cake sliced on a wood board.

    This homemade Cinnamon Swirl Loaf Cake is an easy quick bread recipe that's moist and tender with a big cinnamon sugar swirl and topped with the most perfectly crunchy streusel. 

    Overhead image of cake sliced on a wood board.
    [feast_advanced_jump_to]

    Ingredients

    Pretty staple baking ingredients are used to make this cinnamon cake – check them out below.

    • Labeled ingredients on a table for cinnamon swirl cake.
    • Granulated sugar: Just a perfect hint of sweetness.
    • Eggs: Large eggs are the perfect size for baking. Pasture raised is best if you can find them, if not, free-range is the next best thing. Try to take them out of the fridge at least 30 minutes before making the batter.
    • Full fat plain Greek yogurt: Adds a ton of moisture and a little tang. A lower fat content is fine, but make sure it’s plain flavored. Chobani is always a great go-to. In a pinch you could use sour cream instead.
    • Vanilla extract: Builds up the flavor in the cake. Vanilla bean paste is also great!
    • Canola oil: Adds to the moisture with the other wet ingredients. You could also sub vegetable oil or any other neutral oil here.
    • All purpose flour: Go-to baking flour. You can sub 1:1 gluten free flour if needed.
    • Baking powder: Leavening agent. Make sure it’s not expired. 
    • Cinnamon: It wouldn't be cinnamon loaf without cinnamon, right?!
    • Salt: Kosher salt. 
    • Butter: Melted unsalted butter is the binder of the streusel. 
    • Brown sugar: Just a bit of light brown sugar gets added into the streusel to give it a deeper flavor. 

    Step by step instructions

    This easy cinnamon swirl quickbread comes together in a few straightforward steps. 

    1. Combine the eggs and sugar. In a large mixing bowl whisk together the eggs and granulated sugar.

    2. Add the rest of the wet ingredients. To the mixing bowl add the greek yogurt, vanilla extract, and canola oil. 

    Side by side images of the wet ingredients being whisked together.

    3. Add the dry ingredients. To the wet mixture, add the all purpose flour, baking powder, cinnamon, and salt. Whisk until just combined. 

    4. Make the cinnamon-sugar mixture. In a small bowl combine the granulated sugar and cinnamon.

    Side by side images of dry ingredient being added to batter and the cinnamon mixture being combined.

    5. Assemble. To a prepared loaf pan (lined, greased), pour half of the batter and spread into an even layer. Then sprinkle ¾ of the cinnamon sugar on top. Using a knife or offset spatula, gently swirl the cinnamon sugar filling into the bottom layer of batter without fully mixing them together. Top with the remaining batter and sprinkle the remaining cinnamon mixture over top. 

    Side by side images of layering of the cinnamon sugar mixture.

    6. Make the streusel. Combine the melted butter, sugars, flour, cinnamon, and salt. Sprinkle in an even layer over the top of the loaf.

    7. Bake. 350F for 50-60 minutes until deeply golden. Baking time may vary depending on your oven.

    Side by side images of streusel in a bowl and on top of the cake.

    Tips and tricks 

    • Preheat the oven before you start making the batter so it’s at temperature when you’re finished assembling. 
    • Use an oven thermometer to help make sure your oven is at the right temperature. (for example, mine preheats hot, and I have to wait for it to come down to temperature before I add the food in).
    • Bake with room temperature ingredients – let them sit at room temperature for at least 30 minutes (an hour is better) before making the batter. 
    • It may seem like a lot of cinnamon sugar, but when it bakes it becomes a delicious gooey layer inside, and a crunchy layer on the top. 
    • Don’t over mix the batter. The more you mix, the less tender the cake will be.
    • Use a light-colored baking pan. Darker pans get hot faster and the outside will cook more quickly. 
    • To tell if the cake is done cooking, insert a toothpick or cake tester into the middle and if it comes out with just a few crumbs, it’s done. If it has any wet batter on it, it’s not done. 
    • Let the cake cool for about 10 minutes before taking it out of the baking pan, this will let it settle. After the 10-minute mark put it on a wire rack to finish cooling.
    • Make a simple sugar glaze with powdered sugar, milk, and a little vanilla to drizzle over top – it’ll be reminiscent of a cinnamon roll!!
    • You can make this in a stand mixer with the paddle attachment on medium speed if you prefer.

    Storage and reheating

    Tips below on how to store and reheat this cinnamon swirl loaf cake.

    • Store: let the cake come to room temperature and store in an airtight container. It’s good for up to 3 days at room temperature or up to 5 days in the fridge. 
    • Freeze: cut it into individual slices, wrap in plastic wrap then aluminum foil, and put in a freezer safe bag for up to 3 months. 
    • Reheat: warm in the microwave until heated through. 

    How to serve

    This cinnamon swirl bread is great recipe any way you slice it, and is perfect for breakfast or a dessert.

    Serve alongside an extravagant breakfast with eggs, fruit, and bacon. Or as a quick slice with a cup of morning coffee.

    For dessert, it's simply a perfect cake on its own along side coffee or tea!

    FAQs

    What’s the difference between a cake and a loaf? 

    Really just the shape! Cake is baked in a square, round, or rectangular baking dish. Whereas a loaf is baked in a loaf pan. 

    How do I line a loaf pan?

    I usually spray with non-stick spray, then do one long strip of parchment paper along the wide side of the pan with at least 1 inch of overhang. This is the one I use.

    Can I make this in a different pan?

    Yes! You can use a regular cake pan, muffin tin, or mini loaf pan. Cake would cook about 30 minutes, muffins about 20 minutes, and mini loaf pan also about 30 minutes depending on the size of the pan. 

    More loaf cake recipes

    • Thumbnail
      Lemon Pistachio Loaf Cake
    • Spiced Apple Cider Loaf Cake
    • Overhead image of sliced loaf of orange zucchini bread.
      One Bowl Orange Zucchini Bread
    • Slices of blood orange cake on a cutting board.
      Blood Orange Olive Oil Cake

    Did you make this recipe? Leave a rating and review below and tag me on social!

    📖 Recipe

    Overhead image of cake sliced on a wood board.

    Cinnamon Swirl Loaf Cake

    This homemade Cinnamon Swirl Loaf Cake is an easy quick bread recipe that's moist and tender with a big cinnamon sugar swirl and topped with the most perfectly crunchy streusel. 
    5 from 6 votes
    Print Pin Rate
    Prep Time: 15 minutes minutes
    Cook Time: 1 hour hour
    Total Time: 1 hour hour 15 minutes minutes
    Servings: 8 servings

    Ingredients

    For the cake:

    • 2 large eggs room temp
    • 1 cup granulated sugar
    • 1 cup plain whole fat Greek yogurt
    • 1 ½ teaspoon vanilla extract
    • ½ cup canola oil
    • 2 cups all purpose flour
    • 1 ½ teaspoon baking powder
    • ½ teaspoon cinnamon
    • 1 teaspoon salt

    For the swirl:

    • ½ cup granulated sugar
    • 1 tablespoon cinnamon

    For the streusel:

    • 3 tablespoon unsalted butter melted
    • 2 tablespoon light brown sugar
    • 2 tablespoon granulated sugar
    • ¼ cup all purpose flour
    • ¼ teaspoon cinnamon
    • ¼ teaspoon salt

    Instructions

    • Preheat your oven to 350℉ and prep a standard loaf pan by greasing it with non-stick spray, butter, or ghee and lining it with parchment paper.
    • In a large mixing bowl whisk together the 2 eggs and 1 cup granulated sugar.
    • To the mixing bowl add the 1 cup greek yogurt, 1 ½ vanilla extract, and ½ cup canola oil. 
    • To the wet mixture, add the 2 cups all purpose flour, 1 ½ teaspoon baking powder, ½ teaspoon cinnamon, and 1 teaspoon kosher salt. Whisk until just combined. 
    • Make the cinnamon sugar mixture: In a separate small bowl combine the ½ cup granulated sugar and 1 tablespoon cinnamon.
    • To a prepared loaf pan (lined, greased), pour half of the batter and spread into an even layer. Then sprinkle ¾ of the cinnamon sugar on top. Using a knife or offset spatula, gently swirl the cinnamon sugar filling into the bottom layer of batter without fully mixing them together. Top with the remaining batter and sprinkle the remaining cinnamon mixture over top. 
    • Make the streusel: Combine the 3 tablespoon melted butter, 2 tablespoon light brown sugar, 2 tablespoon granulated sugar, ¼ cup flour, ¼ teaspoon cinnamon, and ¼ teaspoon kosher salt. Sprinkle in an even layer over the top of the loaf.
    • Bake at for 50-60 minutes until deeply golden. Baking time may vary depending on your oven.

    Video

    Nutrition Estimate

    Calories: 493kcal | Carbohydrates: 72g | Protein: 8g | Fat: 20g | Saturated Fat: 4g | Polyunsaturated Fat: 4g | Monounsaturated Fat: 10g | Trans Fat: 0.2g | Cholesterol: 53mg | Sodium: 470mg | Potassium: 101mg | Fiber: 2g | Sugar: 44g | Vitamin A: 195IU | Vitamin C: 0.04mg | Calcium: 100mg | Iron: 2mg
    Course: Brunch, Dessert
    Cuisine: American
    Keyword: Loaf Cake
    Author: Haley
    • « Previous Page
    • 1
    • …
    • 13
    • 14
    • 15
    • 16
    • 17
    • …
    • 32
    • Next Page »

    HEY THERE!

    Welcome to Cozy Cravings! Happy to have you. Here, you’ll find comfort food recipes & other delicious things to enjoy and devour.

    POPULAR POSTS

    • Close up of broccoli au gratin.
      Broccoli Au Gratin (Broccoli Casserole)
    • Finished french onion pasta in a bowl.
      One Pot French Onion Pasta
    • close up image of maple candied bacon on a plate.
      Maple Candied Bacon
    • Overhead image of lasagna fresh out of the oven with sage on top.
      Butternut Squash and Spinach Lasagna

    Footer

    ↑ back to top

    about

    • ABOUT
    • CONTACT
    • PRIVACY POLICY

    Let's Keep In Touch!

    Subscribe here for delicious recipes, updates & more!

    Thank you!

    You have successfully joined our subscriber list.

    .

    recipe index

    • APPETIZERS
    • BREAKFAST & BRUNCH
    • LUNCH & DINNER
    • SNACKS & SIDES
    • DESSERTS

    Copyright © 2026 · CozyCravings.com

    Rate This Recipe

    Your vote:


    A rating is required
    A name is required
    An email is required