• Recipes
  • Contact
  • About
  • Shop

Cozy Cravings

menu icon
go to homepage
  • RECIPES
  • ABOUT
  • CONTACT
  • SUBSCRIBE
    • Facebook
    • Instagram
    • Pinterest
  • subscribe
    search icon
    Homepage link
    • RECIPES
    • ABOUT
    • CONTACT
    • SUBSCRIBE
    • Facebook
    • Instagram
    • Pinterest
  • ×
    Home

    Small Charcuterie Board

    Cropped finished charcuterie board.

    Charcuterie boards are one of my favorite things, and this small charcuterie board is perfect for truly any occasion, or even when you just don't feel like cooking. It's easy to scale up or down depending on how many people you are serving!

    [feast_advanced_jump_to]

    Components of a charcuterie board

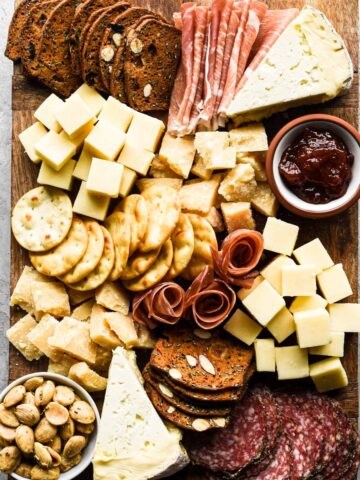
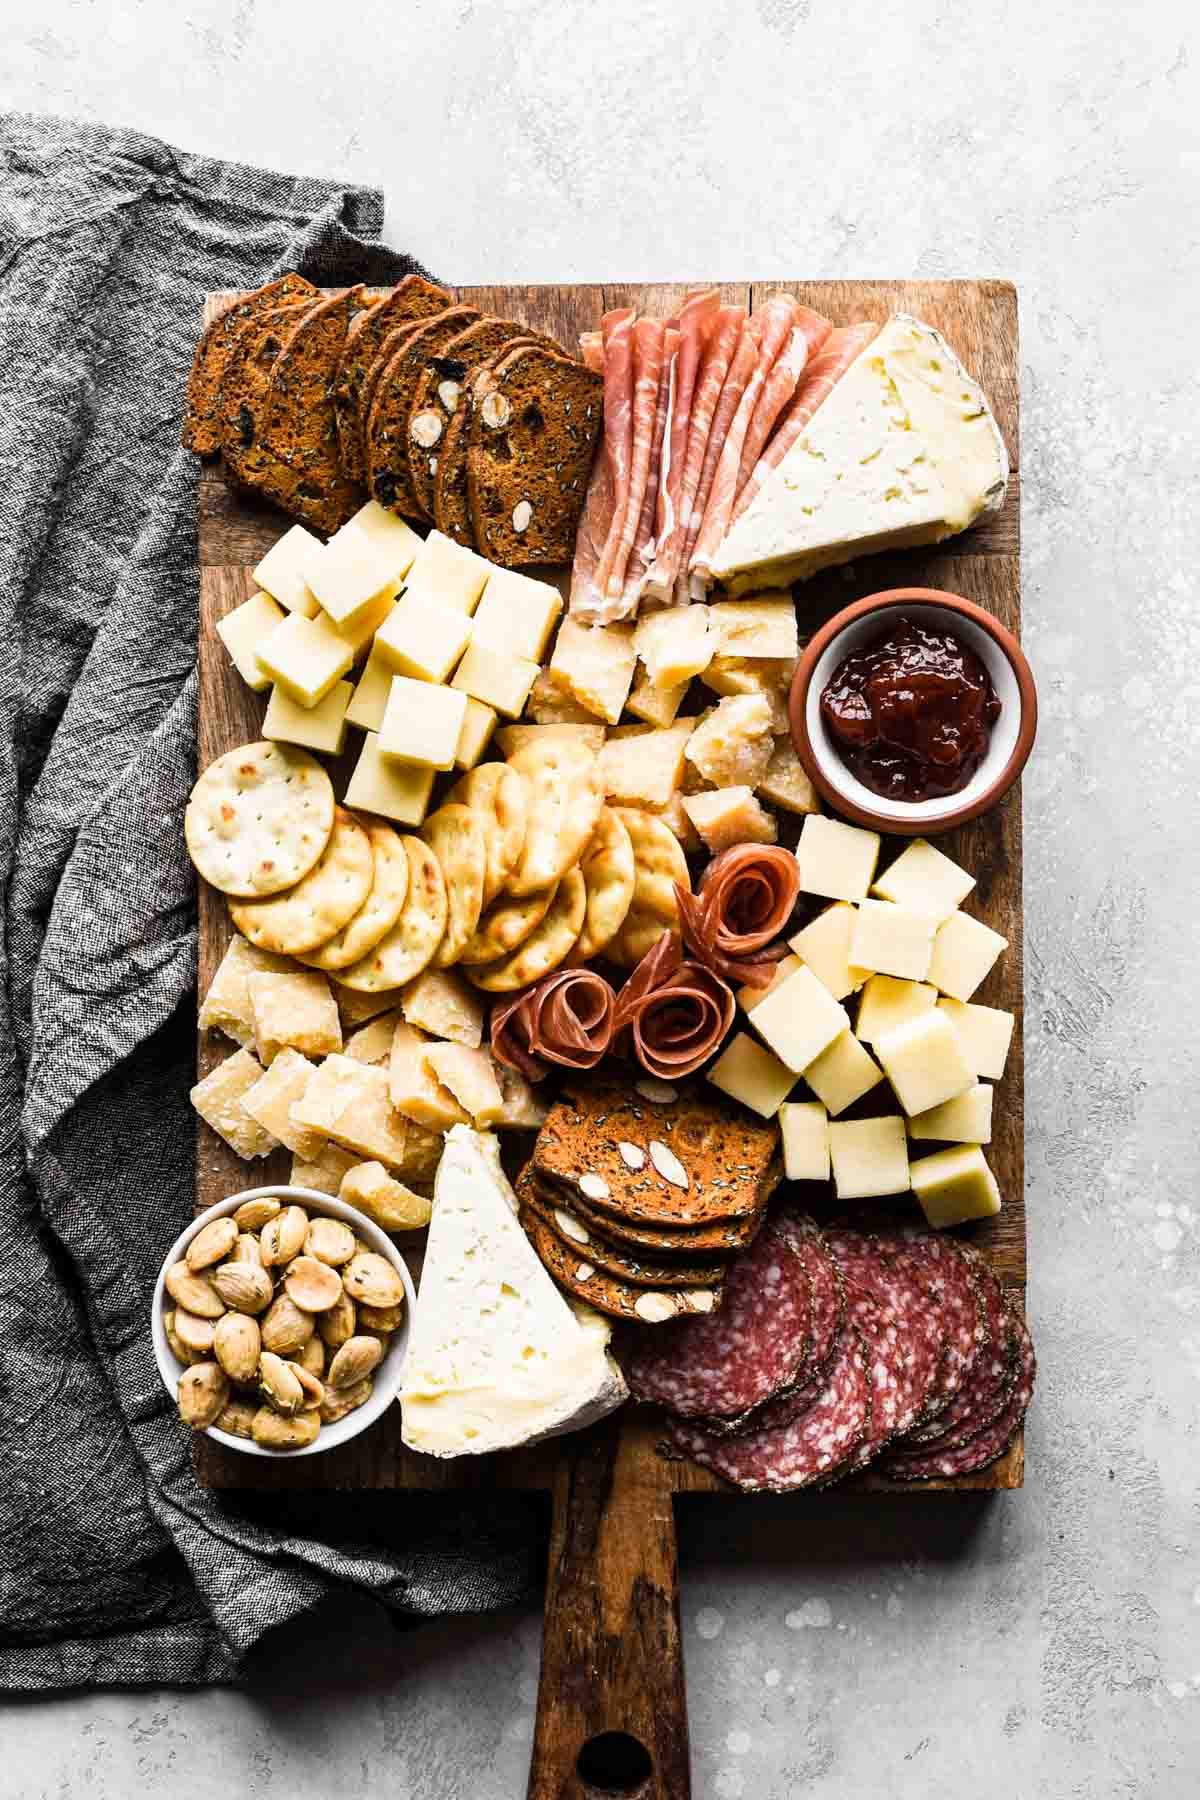
    When building a simple charcuterie board, the main thing you want to keep in mind is variety – in shape, texture, color, and size. Meaning, you want circles/triangles/squares, crunchy and soft, pops of color, and both bigger and smaller items. Not only does this make the board look visually appealing, but it's also delicious to try many different things together in one bite!

    One of the best things about charcuterie boards is that you really can make it your own with all your favorite things. Below are some suggestions, but it really is a "world is your oyster" kind of situation.

    My charcuterie boards are usually full of Trader Joe's products because they're delicious and affordable, so I highly recommend shopping there if you have one near you!

    CHEESE!

    Some might say this is the most important element of a charcuterie board, and those people would be correct. For a small charcuterie board, you want 2-3 cheeses. I always go with cheeses of varying hardness - so you want one soft, one semi-hard, and one hard cheese.

    • Soft cheeses: brie, chèvre, camebert, or something more tangy like goat.
    • Semi-hard cheeses: cheddar (extra sharp is my favorite!), manchego, pepper jack, gruyere, or gouda.
    • Hard cheeses: parmesan, pecorino romano, grana padano.

    MEATS!

    A very close second in importance are the meats. Similar to cheeses, for this small charcuterie board I like to do 2-3 meats – one more classic and one a bit more fun; for example prosciutto and peppered or spicy salami. The best charcuterie meats:

    • Prosciutto di Parma
    • Peppered salami
    • Spicy salami
    • Mortadella
    • Sopressata
    • Chorizo

    CRACKERS/CARBS!

    With all the delicious meats and cheeses, a good vehicle for eating them is necessary. Similar to my recommendation for cheese and meats: 2-3 is best, and variety is even better! I like doing one more plain and simple, and one with a flavor or nuts/fruit baked in. Some good options:

    • Water crackers
    • Pita crackers (not pita chips, pita crackers! Pita chips are a little too thick for this)
    • Sourdough crackers
    • Fruit & nut crackers - pick your favorite combo!
    • Basil (or other herb) crackers
    • Red pepper crackers
    • Everything bagel seasoned crackers

    ACCOMPANIMENTS!

    These are the items that really fill out the board and make it looks super full! I like to use little dishes and fill them with my favorite jams, nuts, honeys fruits, dried fruits, etc. This is your opportunity to take a look in your pantry and grab whatever you have. You can use as few or many of these as you'd like. Some items work particularly well on a charcuterie board:

    • Blueberry jam
    • Strawberry jam
    • Fig jam
    • Pecans
    • Almonds
    • Marcona almonds
    • Herbed nuts
    • Honeycomb
    • Grapes
    • Berries
    • Apples/pears
    • Dried apricots

    How to assemble a charcuterie board

    Similar to what you put on your board, how you make it is really up to you and whatever is easiest for you. But below is how I like to assemble! Try to keep in mind that you want people to be able to reach everything from no matter where they're sitting. And you'll likely need to shift things around as you go, which is no problem at all!!

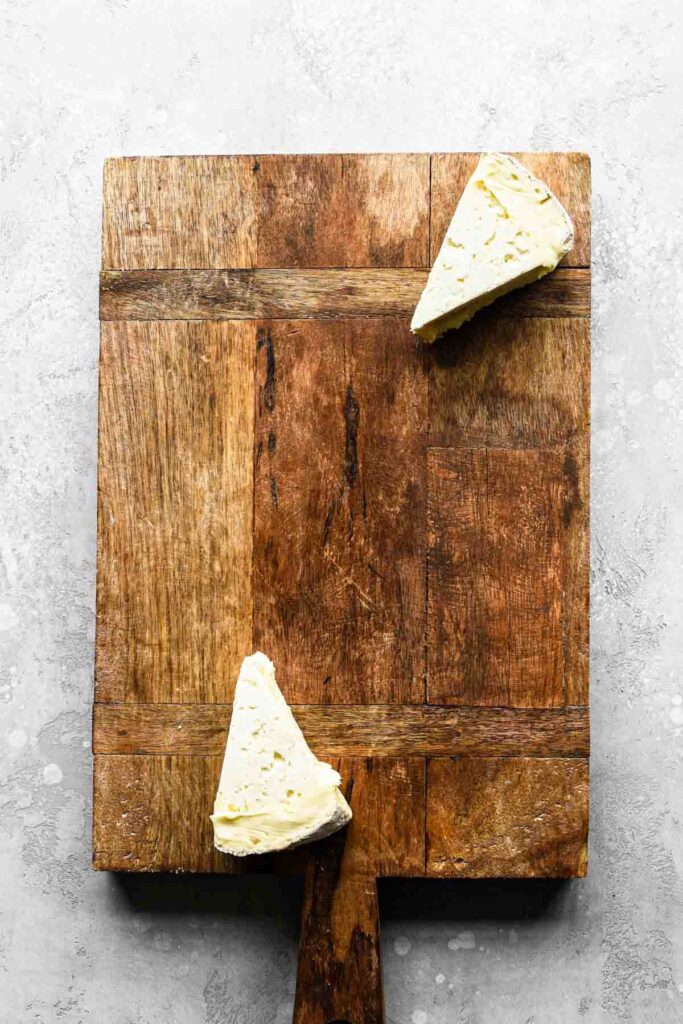
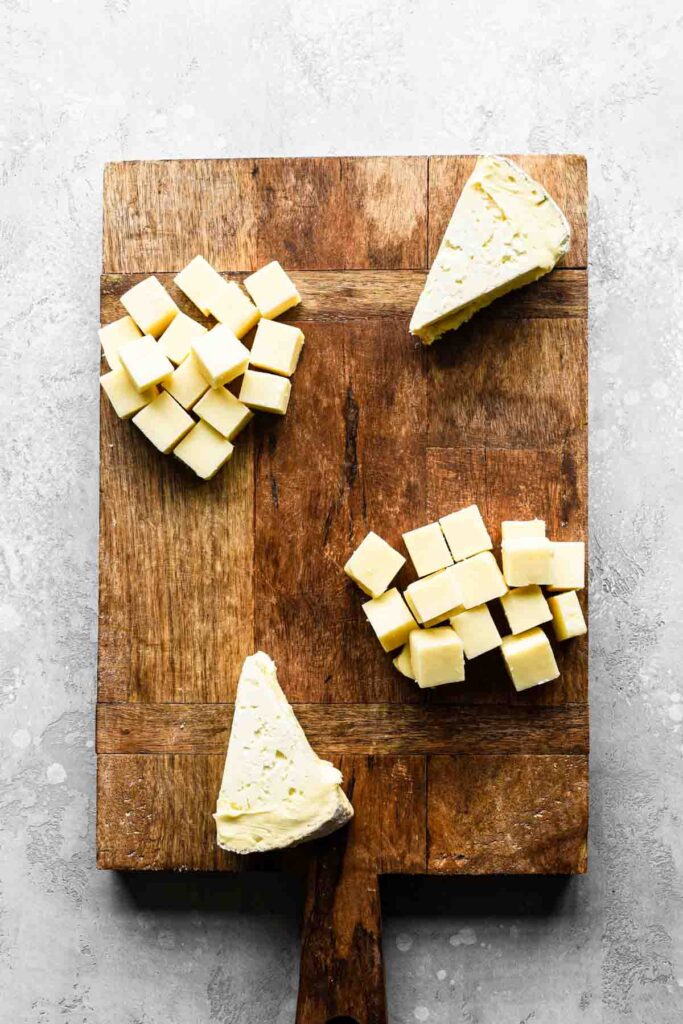
    Step 1: Cheese! No matter which cheeses you have, try to cut them in different ways - triangles, cubes, slices, etc. Then lay them on your board in imperfect diagonals.

    Step 2: Meats! Close by to the cheeses, lay your meats. Depending on the meat, I try to lay them in a way that fluffs them up a bit - rolling, twisting, layering, etc.

    Step 3: Accompaniments! This is when I like to add in little bowls of jams/nuts/etc. where the larger spaces are.

    Step 4: Crackers! The finishing touch is layering crackers basically anywhere there's an open spot!

    If there are any holes, an option is to fill them with additional fresh fruit, more crackers, or just leave it! It doesn't have to be perfect.

    Tips and tricks

    • Make it yours: As I said earlier, you can REALLY make this your own - don't feel like it has to be perfect or fit any kind of expectation. Use what you love.
    • Use what you have: Check your pantry! There's no need to buy anything new, and because most of the items are noshes, you can finish up anything that is almost empty.
    • Keep it affordable: You don't have to break the bank to make something impressive. Aside from using what you have, try to shop in places where you know prices are reasonable (but still with good quality!). Basically, you don't need to get the cheese straight from the farm itself. Also, keeping the number of items you include can help keep the price down. You don't need to have 2-3 types of each item.
    • Make it smaller or bigger: If you're serving more or less people, you can either add additional types of each item (eg 4-5 cheeses) OR you can simply buy multiple of the same item.
    • Serving size: Plan for each person to eat about 3-5oz of cheeses and meats.
    • Remove the chill: Don't serve a charcuterie board right out of the fridge. If you let the items sit room temp for about 20 minutes before serving, they lose their chill and taste even better.
    • Charcuterie board origin: The word charcuterie originated in France, and the traditional process of using salt to cure meats dates back to the Roman empire nearly 2,000 years ago. Because of this, I like to try to get products from these countries / Europe for my boards.
    • Serving: Keep it nosh-able! Serve with little plates and forks/toothpicks to grab each item.

    FAQs

    Can I prep a charcuterie board ahead of time?

    Yes! You can cut all the cheeses, prep the meats, etc. and put them in individual storage containers in the fridge. If you're prepping same-day, you can even build the board and place it in the fridge until you're ready to serve (take it out of the fridge 20 mins before hand).

    What do I do with charcuterie board leftovers?

    Some of the best left overs! I honestly eat the leftovers as mini grazing boards for myself. But you could make a delicious chopped salad, a sandwich, or a wrap.

    What drinks pair well with charcuterie boards?

    WINE! Light-bodied whites (Sauvignon Blanc, Pinot Grigio), or medium-bodied reds (Pinot Noir, Merlot) are best to balance flavors but not overwhelm your palette.

    What kind of plate/board can I use to serve a charcuterie board?

    The classic answer here is a wood board. But you could really use so many other things - marble board (I like to line it so that the oils from the cheese don't stain it), a serving platter, a baking sheet,

    More appetizer recipes

    • Prosciutto and melon crostini
    • Air fryer lemon pepper chicken wings
    • Roasted garlic baked ricotta dip
    • Loaded vegetarian nachos

    📖 Recipe

    Cropped finished charcuterie board.

    Small Charcuterie Board

    Charcuterie boards are one of my favorite things, and this small charcuterie board is perfect for truly any occasion, or even when you just don't feel like cooking. It's easy to scale up or down depending on how many people you are serving!
    5 from 3 votes
    Print Pin Rate
    Prep Time: 20 minutes minutes
    Cook Time: 0 minutes minutes
    Total Time: 20 minutes minutes
    Servings: 4 people

    Ingredients

    • 6 oz Brie cheese
    • 8 oz Extra sharp cheddar cheese
    • 6 oz Parmigiano reggiano cheese
    • 3 oz Prosciutto di Parma
    • 4 oz Peppered salami
    • 1 box Plain crackers
    • 1 box Fruit and nut crackers
    • ¼ cup strawberry jam
    • ¼ cup marcona almonds

    Instructions

    • Slice your cheeses in varying ways - cubes, triangles, slices, and lay them in rough diagonals sporadically across your board.
    • Close by to the cheeses, lay your meats. Depending on the meat, I try to lay them in a way that fluffs them up a bit - rolling, twisting, layering, etc.
    • Fill larger gaps with little bowls of jams/nuts/etc.
    • Layer In crackers anywhere there's an open spot!

    Nutrition Estimate

    Calories: 1148kcal | Carbohydrates: 64g | Protein: 53g | Fat: 75g | Saturated Fat: 36g | Polyunsaturated Fat: 10g | Monounsaturated Fat: 25g | Trans Fat: 1g | Cholesterol: 167mg | Sodium: 2588mg | Potassium: 430mg | Fiber: 2g | Sugar: 25g | Vitamin A: 1160IU | Vitamin C: 2mg | Calcium: 1101mg | Iron: 4mg
    Course: Appetizer
    Cuisine: French, Italian
    Keyword: Charcuterie Board
    Author: Haley

    4 Ingredient Potato Soup

    Thumbnail

    This 4 Ingredient Potato Soup is so simple to make with a silky creamy texture and such great flavor – all with just four ingredients! You can make it your own with any toppings you'd like. Ideal for a cold day or chilly night when you want something comforting with minimal effort and minimal ingredients.

    [feast_advanced_jump_to]

    Ingredients

    Just a few basic ingredients are needed to make this creamy soup the whole family will love.

    • Russet potatoes: Russet potatoes are the best potatoes for this recipe because they're very starchy. That potato starch will naturally thicken the soup. I recommend peeling the potatoes.
    • Onion: This one ingredient adds a lot of flavor – yellow onion or white onion both work. Yellow onions are what I usually use, so I'd recommend one of those over white, but both are fine.
    • Chicken broth: Using chicken broth instead of water is a great way to add more flavor into the dish with just that little tweak. You could use vegetable broth if you have that instead, but chicken broth will add the most flavor.
    • Butter: Good quality salted butter is best to use here. With so few ingredients, it's important we get the most flavor out of each. Kerrygold is my go to.

    Step by step instructions

    This simple potato soup recipe comes together in just a few steps:

    Prep: Peel and chop your potatoes to roughly 1 inch pieces, and chop the onion.

    1. Sauté the onion. Melt 1 tablespoon butter over medium heat on the stove top and sauté the chopped onion until translucent, about 5 minutes. Remove the onion and set aside.

    2. Cook the potatoes. In a large pot (can be the same one you cooked the onion in), add the cut potatoes and chicken stock. Bring to a boil on medium-high heat then reduce to a gentle boil and cook until fork tender. Do not drain.

    Side by side of sautéing onions and boiling potatoes.

    3. Puree the soup. To a blender (in batches depending on your blender size) add the cooked potato chunks, stock, and onions. Blend until smooth. Add more stock if needed.

    4. Add butter and season to taste. Return the pureed soup to the pot, on low heat stir in the remaining butter and season with salt and black pepper to taste.

    Side by side of blending potatoes and adding the butter.

    Tips and tricks

    • Russet potatoes are best for this recipe because of their starchiness and the fact that they break up so easily. If you don't have / don't like russet potatoes, you could use yukon gold potatoes or red potatoes instead. More on the differences of potatoes here.
    • Cut the potatoes in equal-sized pieces so they all cook at the same pace. You don't want some mushy and some hard potatoes because they won't blend together well to make a smooth soup!
    • You can tell when the potatoes are done cooking when a fork can poke into them smoothly with minimal force.
    • Skip the blender and use an immersion blender. It will work just as well to blend the soup together. Just beware of splashing!
    • If you want the soup to be a little chunky, just blend it until your desired consistency and leave some chunks in there.
    • If you want the soup to be even creamier, you can add some heavy cream, whole milk, or dairy-free milk (coconut milk would be great).
    • Sauté the onion in bacon fat if you're adding bacon as a topping. Cook the bacon first (transfer to a paper towel lined plate) and then sauté the onion in the bacon fat - it'll add so much flavor!
    • Avoid a bland soup by using high quality salted butter, a large onion, chicken broth, and seasoning appropriately with salt and pepper!

    What to serve with potato soup

    If you're looking for something to serve alongside this creamy potato soup, try my best garlic bread, cheddar chive biscuits (a little dip dunk action), or honey sriracha brussels sprouts.

    The best toppings for potato soup

    This 4-ingredient potato soup recipe is great on its own, but below are some great options for toppings – choose one, choose multiple, either way, you'll have a delicious meal.

    • Scallions / green onions
    • Cheddar cheese
    • Crispy bacon
    • Sour cream
    • Fresh thyme
    • Chopped Calabrian chilis
    • Pico de gallo

    Storage and reheating

    • Storage: to store potato soup, allow it to come to room temperature then transfer to an airtight container. Keep in the fridge for up to 3 days.
    • Reheating: to reheat potato soup, you can either warm in the microwave at 1-2 minute increments, stirring halfway through, or you can warm on the stovetop on medium-low heat until warmed through.
    • Freezing: this soup freezes pretty well! let it come to room temp then transfer to a freezer-safe container. It'll keep for up to 4 months. Reheat on the stovetop on low heat.

    FAQs

    Can I make this soup dairy free?

    Sure! Either omit the butter and use olive oil to sauté the onion, or use a dairy free butter.

    Do I need to add any kind of thickener to this soup?

    Nope! The natural starches in the potatoes and the fact that they get blended will make it plenty thick.

    What would be good spices to add?

    If you'd like to add spices, I'd recommend garlic powder, onion powder, paprika, a little cayenne.

    Can I skip peeling the potatoes?

    You can, but the skins won't blend up perfectly so there will be a little more texture in the final soup.

    Should I soak my potatoes?

    No! Soaking removes the excess starch, which we actually want for this recipe.

    Other soup recipes

    • Tortellini Soup In The Pot
      Creamy Tortellini Tomato and Pesto Soup
    • Close up image of brothy beans in a bowl topped with bacon.
      Brothy Beans
    • Bowl of creamy chicken mushroom wild rice soup.
      Chicken Mushroom Wild Rice Soup
    • zuppatoscana_4
      Spicy White Bean Zuppa Toscana

    📖 Recipe

    Thumbnail

    4 Ingredient Potato Soup

    This 4 Ingredient Potato Soup is so simple to make with a silky creamy texture and such great flavor – all with just four ingredients! You can make it your own with any toppings you'd like. Ideal for a cold day or chilly night when you want something comforting with minimal effort and minimal ingredients.
    4.75 from 4 votes
    Print Pin Rate
    Prep Time: 10 minutes minutes
    Cook Time: 25 minutes minutes
    Total Time: 35 minutes minutes
    Servings: 4 servings

    Ingredients

    • 3 lbs russet potatoes peeled and into 1 inch pieces
    • 1 medium yellow onion chopped
    • 5-6 cups chicken stock
    • 1 stick butter ½ cup
    • salt and pepper to taste

    Instructions

    • Melt 1 tablespoon butter over medium heat and sauté the chopped onion until translucent, about 5 minutes. Remove and set aside.
    • In a large pot (can be the same one you cooked the onion in), add the cut potatoes and chicken stock. Bring to a boil then reduce to a gentle boil and cook until fork tender. Do not drain!
    • To a blender (in batches depending on your blender size) add the potatoes, stock, and onions. Blend until smooth. Add more stock if needed.
    • Return the pureed soup to the pot, on low heat stir in the remaining butter and season with salt and pepper to taste.

    Nutrition Estimate

    Calories: 590kcal | Carbohydrates: 75g | Protein: 15g | Fat: 27g | Saturated Fat: 16g | Polyunsaturated Fat: 2g | Monounsaturated Fat: 8g | Trans Fat: 1g | Cholesterol: 70mg | Sodium: 649mg | Potassium: 1781mg | Fiber: 5g | Sugar: 8g | Vitamin A: 719IU | Vitamin C: 22mg | Calcium: 66mg | Iron: 4mg
    Course: Dinner
    Cuisine: American
    Keyword: Soup
    Author: Haley

    Chocolate Peanut Butter Rice Krispies Treats

    Thumbnail.

    These six ingredient no-bake Chocolate Peanut Butter Rice Krispies Treats are a fun twist on the classic marshmallow and cereal combo. With peanut butter melted into the marshmallows and a chocolate layer on top, they're truly addicting.

    [feast_advanced_jump_to]

    Ingredients

    • Rice Krispies: Make sure you're using a fresh box of cereal - a stale one will make the treats stale as well which we definitely don't want.
    • Mini marshmallows: I prefer mini marshmallows just because they melt quicker, but large marshmallows are fine too.
    • Unsalted butter: Always unsalted! We add a smidge of salt to balance all the flavors.
    • Peanut butter: You can use regular or natural peanut butter - smooth is best.
    • Chocolate chips: Semisweet chocolate chips! The perfect topping.
    • Vanilla extract: Adding vanilla extract adds a nice hint of flavor. You could leave this out, but I love it.

    Step by step instructions

    These no-bake peanut butter chocolate treats are incredibly easy to make, which means (just like me) you'll likely make them time and time again! If you're looking for something with a shortbread crust instead, try these Chocolate Krispie Peanut Butter Shortbread Bars.

    1. Make the peanut butter mixture. In a large sauce pot on medium-low, melt the butter with the peanut butter and vanilla extract. Stir in the salt.

    2. Stir in marshmallows. Once the peanut butter mixture is melty and combined, stir in the marshmallows until they are melted and only a few little clumps remain.

    3. Add the Rice Krispies. To the PB marshmallow mixture, fold in the Rice Krispies until just combined and sticky.

    4. Transfer to a pan. Grease and line an 8x8 pan/dish and transfer the Rice Krispies treats to it. Gently press into an even layer, without pressing too hard.

    5. Add the chocolate. In a microwave safe bowl, melt the chocolate chips in 30 second intervals, stirring after each. You should only need 1:30 total, with a good stir at the end - the residual heat will melt the rest of the chocolate. Pour the chocolate over the treats and either set aside at room temp or place in the fridge until set. Fridge will take about an hour, room-temp will take a few hours.

    Tips and tricks

    As easy as these Chocolate Peanut Butter Rice Krispies Treats are, below are some tips and tricks to help make sure you nail it.

    • Mini marshmallows are ideal, but if you want to use large 1 cup of mini is equivalent to about 8 large
    • Natural and not natural peanut butter are both fine here since they melt in with the butter. But if you use natural, make sure you the PB really well before adding to the dish that way any oils are back incorporated in evenly. You don't want your scoop of PB to be 90% oil!
    • Make sure you use medium-low heat the entire time you melt the butter/add the marshmallows. Any hotter and it could all burn.
    • When you add the marshmallows into the PB mixture, stir them in until JUST melted, even leaving a few still semi-whole. This makes them extra gooey.
    • When you press the treats into the pan, you want to press them in firmly enough so they stay together, but not so firm that they become so dense.

    FAQs

    How do I store these Rice Krispies Treats?

    They can stay at room temp for up to 3 days, or in the fridge for up to 1 week.

    Can I freeze Rice Krispies Treats?

    Yes! Cut them into their individual pieces, use wax paper to keep each treat separate, and store in a freezer-safe container or bag. To eat, thaw in the fridge then leave at room temp for a little bit.

    Are these gluten free?

    They aren't naturally gluten free, but you could make them so by using gluten free cereal and making sure you buy gluten free marshmallows.

    Can I use a different type of chocolate?

    Yes! I like semisweet because of its balance between sweet and bitter, but if you're a dark chocolate or milk chocolate person, you can definitely use one of those instead.

    Can I make these in the microwave instead of stovetop?

    Sure! Do the same steps but by melting everything in 30 second intervals, stirring between.

    📖 Recipe

    Thumbnail.

    Chocolate Peanut Butter Rice Krispies Treats

    These six ingredient no-bake Chocolate Peanut Butter Rice Krispies Treats are a fun twist on the classic marshmallow and cereal combo. With peanut butter melted into the marshmallows and a chocolate layer on top, they're truly addicting.
    5 from 1 vote
    Print Pin Rate
    Prep Time: 5 minutes minutes
    Cook Time: 15 minutes minutes
    Setting time: 1 hour hour
    Total Time: 1 hour hour 20 minutes minutes
    Servings: 16 treats

    Ingredients

    • ½ cup unsalted butter
    • ¾ cup smooth peanut butter
    • 10 oz mini marshmallows
    • 6 cups Rice Krispies
    • 1 teaspoon vanilla extract
    • ¼ teaspoon kosher salt
    • 2 ½ cups semisweet chocolate chips

    Instructions

    • In a large sauce pot on medium-low heat, melt the butter with the peanut butter and vanilla extract. Stir in the salt.
    • Once the peanut butter mixture is melty and combined, stir in the marshmallows until they are melted and only a few little clumps remain.
    • To the PB marshmallow mixture, fold in the Rice Krispies until just combined and sticky.
    • Grease and line an 8x8 pan/dish and transfer the Rice Krispies treats to it. Gently press into an even layer, without pressing too hard.
    • In a microwave safe bowl, melt the chocolate chips in 30 second intervals, stirring after each. You should only need 1:30 total, with a good stir at the end - the residual heat will melt the rest of the chocolate.
    • Pour the chocolate over the treats and either set aside at room temp or place in the fridge until set. Fridge will take about an hour, room-temp will take a few hours.

    Nutrition Estimate

    Calories: 382kcal | Carbohydrates: 40g | Protein: 6g | Fat: 23g | Saturated Fat: 11g | Polyunsaturated Fat: 2g | Monounsaturated Fat: 8g | Trans Fat: 1g | Cholesterol: 17mg | Sodium: 165mg | Potassium: 254mg | Fiber: 3g | Sugar: 23g | Vitamin A: 890IU | Vitamin C: 7mg | Calcium: 25mg | Iron: 5mg
    Course: Dessert
    Cuisine: American
    Keyword: Chocolate, No-Bake, Rice Krispies

    Stovetop Mac and Cheese with No Flour

    Close up shot of mac and cheese in a pot with a wood spoon.

    This one pot stovetop mac and cheese with no flour is the epitome of an easy, comforting meal. Made in under 30 minutes, it's everything you would expect a mac and cheese to be - creamy, cheesy, and so flavorful with sharp cheddar cheese.

    [feast_advanced_jump_to]

    Ingredients

    • Dry pasta: I used pipette - you can really use any short pasta with ribs
    • Whole milk: This makes the base of the sauce along with cooking the pasta
    • Vegetable broth: The other part of the sauce
    • Sharp cheddar cheese: You'll want a really good sharp cheddar cheese for this recipe since it's so cheese-flavor forward. Make sure you buy it on the block and shred it yourself
    • Garlic powder, onion powder: I love adding these two to mac and cheese always
    • Dijon mustard: The unsung flavor hero in mac and cheese. It may seem weird but don't skip it!

    Step by step instructions

    This is an EASY one let me tell ya.

    1. Cook the pasta. Bring the milk and vegetable broth to a gentle boil. Add the dry pasta and cook (keeping at a gentle boil) stirring frequently until the pasta is cooked, about 8 - 10 minutes. If the liquid is being absorbed too quickly add a bit more of either milk and/or vegetable broth. Do not drain any extra liquid.

    2. Mix in the spices, mustard, and cheese. To the same bowl with the cooked pasta, add the onion powder, garlic powder, mustard, salt, pepper, and shredded cheese. Stir to combine and melt the cheese. Serve immediately.

    Customizations and add ins

    This recipe is a great basic mac and cheese recipe, but that's not to say you can't make it your own and mix in some other ingredients! A few thought starters:

    • Cooked crispy bacon or ham
    • Chopped fresh scallions
    • Sautéd mushrooms
    • Sriracha or chopped jalapeños
    • Spinach or kale

    Tips and tricks

    • Freshly grate your cheese. It's very important for the cheese sauce to come together and melt properly that you grate your own cheese! Store-bought shredded cheese has additives and preservatives that make it more difficult to melt homogeneously.
    • Use sharp cheddar cheese. Sharp cheddar has the most classic mac and cheese flavor. You can use other cheeses in combination with sharp cheddar, though!
    • Other cheeses you can add in: gruyere, parmesan, gouda, or really any other cheese that easily melts!
    • Use a short pasta with a hollow center, more room for the cheese to get stuck.

    FAQs

    How do I store mac and cheese?

    In the fridge in an air tight container!

    How do I reheat mac and cheese?

    Either in the microwave or on the stovetop! Add milk as needed on the stovetop to help it get creamy.

    What to serve with mac and cheese?

    A nice big salad, chicken cutlets, meatballs, meatloaf, roasted veggies,

    More mac and cheese recipes

    • Copycat Panera Broccoli Cheddar Mac and Cheese
    • Roasted Butternut Squash Mac and Cheese

    📖 Recipe

    Close up shot of mac and cheese in a pot with a wood spoon.

    Stovetop Mac and Cheese with No Flour

    This one pot stovetop mac and cheese with no flour is the epitome of an easy, comforting meal. Made in under 30 minutes, it's everything you would expect a mac and cheese to be - creamy, cheesy, and so flavorful with sharp cheddar cheese.
    5 from 1 vote
    Print Pin Rate
    Prep Time: 5 minutes minutes
    Cook Time: 15 minutes minutes
    Total Time: 20 minutes minutes
    Servings: 4 servings

    Ingredients

    • 1 lb dry pasta such as pipette
    • 2 ½ cups whole milk
    • ½ cup vegetable broth
    • 8 oz sharp cheddar cheese shredded
    • ½ teaspoon garlic powder
    • ½ teaspoon onion powder
    • ½ teaspoon dijon mustard
    • ½ teaspoon kosher salt
    • ¼ teaspoon black pepper

    Instructions

    • Bring the milk and vegetable broth to a gentle boil. Add the dry pasta and cook (keeping at a gentle boil) stirring frequently until the pasta is cooked, about 8 - 10 minutes.
      If the liquid is being absorbed too quickly add a bit more of either milk and/or vegetable broth. Do not drain any extra liquid.
    • To the same bowl with the cooked pasta, add the onion powder, garlic powder, mustard, salt, pepper, and shredded cheese. Stir to combine and melt the cheese. Serve immediately.

    Nutrition Estimate

    Calories: 747kcal | Carbohydrates: 94g | Protein: 34g | Fat: 25g | Saturated Fat: 15g | Polyunsaturated Fat: 1g | Monounsaturated Fat: 7g | Cholesterol: 75mg | Sodium: 840mg | Potassium: 519mg | Fiber: 4g | Sugar: 11g | Vitamin A: 879IU | Vitamin C: 1mg | Calcium: 607mg | Iron: 2mg
    Course: Dinner, Main Course
    Cuisine: American
    Keyword: Mac and Cheese
    Author: Haley

    Garlic Red Skin Mashed Potatoes

    Finished mashed potatoes in a serving bowl with melted butter.

    These Garlic Red Skin Mashed Potatoes are creamy and full of garlic flavor with a great texture that is both creamy and chunky all at the same time. They're steakhouse style mashed potatoes made with skin on red potatoes which means tons of flavor but SO easy to make.

    [feast_advanced_jump_to]

    Ingredients

    • Red skin potatoes: I love using redskin potatoes in mashed potatoes because their skin is more tender which means you can leave it on (and skip the hassle of peeling!) and they have a lower starch content than other potato varieties, which means they have a great texture that's smooth and a little chunky at the same time.
    • Unsalted butter: I prefer to use unsalted butter that way I can really control the salt content - but if you have salted butter that's fine, just season with additional salt to taste.
    • Garlic: 4 cloves!! We love garlic around here. Make sure you grate the garlic and not chop - this helps it really infuse into the butter mixture.
    • Whole milk: This is my preferred liquid for these mashed potatoes, but heavy cream or buttermilk would be delicious as well.
    • Chives: Gotta have a fresh herb to sprinkle generously on top and brighten the dish up!
    • Salt & pepper: Seasoning potatoes is SO important, so definitely don't skip salt or pepper.

    Step by step instructions

    We love an easy mashed potato recipe - here we go:

    1. Cook the potatoes. Cut the potatoes in quarters and put them in a large pot. Fill the pot with water until the potatoes are fully submerged. Add 1 teaspoon of salt and bring the water to a boil. Cook until fork-tender, about 15-20 minutes. Drain the potatoes.

    2. Make the creamy garlic butter. While the potatoes are cooking, heat the garlic, butter, and whole milk on low heat until steamy and very fragrant, about 5 minutes.

    3. Mash the potatoes. Using a potato masher (or tool of choice), mash the potatoes until your desired consistency. Then gently mix in the warm creamy garlic butter, 2 teaspoon salt, and 1 teaspoon black pepper until fully combined. Transfer to a serving bowl and top with fresh chopped chives.

    Tips and tricks

    Making these garlic red skin mashed potatoes is easy breezy, but below are some tips and alterations should you want / need them!

    • Using red potatoes: I use redskin potatoes quite frankly because I like the texture and the color variety from leaving the skins on. You could also use yukon gold.
    • Mash vs. whip: Because of the higher starch content in red potatoes, they're a great candidate for mashing as opposed to whipping because of the texture. However if you're looking for your potatoes to be a really creamy texture, you can use a hand mixer to whip them.
    • Whole milk substitutes: Whole milk is my dairy of choice for this because of its richness but also being a bit more liquidy brings more moisture to the potatoes. You can easily substitute heavy cream for something more creamy, or buttermilk for something more tangy.
    • Grated garlic: Grating is one of my favorite ways to incorporate really great garlic flavor into a dish without getting little chunks of garlic from chopping. If you don't mind the chunks, chopping is fine! You could also add roasted garlic instead.
    • Don't over-mash! Be careful to not mash your potatoes into oblivion - potatoes can get tough if you over-mash them, so just mash until it's right where you want them.

    FAQs

    Can I make these mashed potatoes in advance of serving?

    Sure! When you're ready to reheat, put them into an oven-safe dish and add a few pats of butter on top. Cover with aluminum foil and bake at 350℉ for about 20-30 minutes until warmed through. Then mix the butter throughout.

    How do I store these mashed potatoes?

    This recipe is best stored in an air-tight container in the fridge for up to 4 days. To reheat all of it at once, follow the instructions above. To reheat in servings, microwave in 30 second increments until warmed through.

    More potato recipes!

    • Air Fryer Garlic Parmesan Smashed Potatoes
    • Roasted Chipotle Sweet Potatoes with Crispy Chickpeas
    • Potatoes Au Gratin
    • Loaded Twice Baked Potatoes
    • Twice Baked Brown Butter Sweet Potatoes

    📖 Recipe

    Finished mashed potatoes in a serving bowl with melted butter.

    Garlic Red Skin Mashed Potatoes

    These Garlic Red Skin Mashed Potatoes are creamy and full of garlic flavor with a great texture that is both creamy and chunky all at the same time. They're steakhouse style mashed potatoes made with skin on red potatoes which means tons of flavor but SO easy to make.
    5 from 5 votes
    Print Pin Rate
    Prep Time: 10 minutes minutes
    Cook Time: 20 minutes minutes
    Total Time: 30 minutes minutes
    Servings: 6 servings

    Ingredients

    • 2 ½ - 3 lbs red skin potatoes
    • ½ cup unsalted butter
    • 2 teaspoon grated garlic about 4 cloves
    • ½ cup whole milk
    • 1 tablespoon fresh chives chopped
    • 3 teaspoon salt divided - 1 teaspoon for salting water, 2 teaspoon for mixing in
    • 1 teaspoon black pepper

    Instructions

    • Cut the potatoes in quarters and put them in a large pot. Fill the pot with water until the potatoes are fully submerged. Add a large pinch of salt and bring the water to a boil. Cook until fork-tender, about 15-20 minutes. Drain the potatoes.
    • While the potatoes are cooking, heat the garlic, butter, and whole milk on low heat until steamy and very fragrant, about 5 minutes.
    • Using a potato masher (or tool of choice), mash the potatoes until your desired consistency. Then gently mix in the warm creamy garlic butter, 2 teaspoon salt, and 1 teaspoon black pepper until fully combined. Transfer to a serving bowl and top with fresh chopped chives.

    Nutrition Estimate

    Calories: 442kcal | Carbohydrates: 68g | Protein: 9g | Fat: 17g | Saturated Fat: 10g | Polyunsaturated Fat: 1g | Monounsaturated Fat: 4g | Trans Fat: 1g | Cholesterol: 43mg | Sodium: 1249mg | Potassium: 1933mg | Fiber: 7g | Sugar: 6g | Vitamin A: 558IU | Vitamin C: 36mg | Calcium: 74mg | Iron: 3mg
    Course: Side Dish
    Cuisine: American
    Keyword: Potatoes
    Author: Haley

    Butternut Squash and Bacon Crostini

    Thumbnail

    These Butternut Squash and Bacon Crostini are a delicious sweet and savory fall appetizer. Toasty bread, creamy ricotta cheese, sweet butternut squash, crispy bacon, and earthy sage - all make for a tasty treat that's perfect for the chilly season. It also makes for a great Thanksgiving or Holiday appetizer!

    [feast_advanced_jump_to]

    Ingredients

    • Butternut squash: Sweet butternut squash is best in the fall / winter and is the star of this dish!
    • Ricotta cheese: Lightly whipped ricotta cheese is so silky and smooth with a mild flavor, making it the perfect pairing for the squash.
    • Bread: A sliced baguette is my go-to, but you could use any kind of bread really.
    • Apple cider vinegar: A splash of vinegar balances the dish out so nicely.
    • Honey: Adding a touch of honey pulls the sweetness out of the butternut squash to help it shine without being too overwhelming.
    • Bacon: Crispy bacon for topping and the butternut squash gets cooked in the bacon fat, bringing such delicious flavor to this dish.
    • Sage: Sage and butternut squash are a perfect pairing, making it a no-brainer here.

    Step by step instructions

    Preparation:

    • Bread: Slice your bread into 1" slices and drizzle both sides with olive oil. Place under the broiler for a few minutes on both sides until golden - watch it, it could burn very easily.
    • Ricotta cheese: Using a food processor (or by vigorously whisking) whip your ricotta cheese until smooth and fluffy - about :30 - 1min depending on your machine.

    1. Cook the bacon: In a large skillet over medium heat cook the bacon until crispy - about 8-10 minutes. Remove with a slotted spoon and transfer to a plate topped with a paper towel to absorb the excess grease. Leave the bacon fat in the skillet.

    2. Cook the butternut squash: To the skillet with the bacon fat (still over medium heat) add the cubed butternut squash and cook stirring occasionally until tender. Add a bit of olive oil if the skillet gets dry.

    3. Finish the butternut squash: To the cooked squash, add the sage, apple cider vinegar, honey, salt, and pepper - mix to combine well and cook for about 2 minutes.

    4. Assemble: On each piece of toasted bread, top with an even amount of the ricotta cheese, followed by the butternut squash mixture, topped with the crispy bacon.

    What to serve with crostini

    Additional appetizers that would pair well with these butternut squash and bacon crostini are:

    • Air fryer lemon pepper chicken wings
    • Roasted poblano corn dip
    • Roasted garlic white bean dip
    • Everything bagel chicks in a blanket

    Recipe adaptions

    A few things you can change or add to make the recipe your own or tailor to specific food preferences:

    • Swap the ricotta cheese for goat cheese - you can whip the goat cheese or simply spread it on the bread
    • Top with a balsamic glaze for a bit more of a hit, but I'd recommend pulling back on the apple cider vinegar or perhaps omitting entirely if you go this route.
    • Add pomegranates on top for a little pop of freshness.

    FAQs

    Can I prep this dish in advance?

    Yes! You can prep the elements separately, and then re-heat and assemble up to an hour before you want to serve. Although I recommend cooking this right before you want to serve for the best texture of all the elements.

    How do I easily peel butternut squash?

    The two methods I use are: using a vegetable peeler (you may need to double-up on peeling to make sure you get enough of the skin off) or simply slicing it off once I have it halved/quartered and it's easier to manage.

    How do you know if butternut squash has gone bad?

    If you see dark spots on either the rind or flesh, your squash is likely going bad. Also keep an eye on any white patches as it could also be a sign of a spoiled squash.

    Is butternut squash healthy?

    Butternut squash has some great health benefits. It's a good source of fiber and potassium, and is beneficial for digestion, blood pressure, and promoting healthy skin and hair. Read more about its benefits here!

    📖 Recipe

    Thumbnail

    Butternut Squash and Bacon Crostini

    These Butternut Squash and Bacon Crostini are a delicious sweet and savory fall appetizer. Toasty bread, creamy ricotta cheese, sweet butternut squash, crispy bacon, and earthy sage - all make for a tasty treat that's perfect for the chilly season.
    5 from 8 votes
    Print Pin Rate
    Prep Time: 15 minutes minutes
    Cook Time: 30 minutes minutes
    Total Time: 45 minutes minutes
    Servings: 6 people

    Ingredients

    • 4 slices bacon
    • ½ medium butternut squash about 2 cups cubed
    • 1 cup ricotta cheese whipped
    • 1 baguette sliced and toasted
    • 2 tsp apple cider vinegar
    • 1 tablespoon honey
    • 1 tbsp fresh chopped sage
    • 1 teaspoon salt
    • ½ teaspoon pepper

    Instructions

    • In a large skillet over medium heat cook the bacon until crispy - about 8-10 minutes. Remove with a slotted spoon and transfer to a plate topped with a paper towel to absorb the excess grease. Leave the bacon fat in the skillet.
    • To the skillet with the bacon fat (still over medium heat) add the cubed butternut squash and cook stirring occasionally until tender - about 10-20 minutes depending on the size of the cubes. Add a bit of olive oil if the skillet gets dry.
    • To the cooked squash, add the sage, apple cider vinegar, honey, salt, and pepper - mix to combine well and cook for about 2 minutes.
    • On each piece of toasted bread, top with an even amount of the ricotta cheese, followed by the butternut squash mixture, topped with the crispy bacon.

    Nutrition Estimate

    Calories: 286kcal | Carbohydrates: 33g | Protein: 11g | Fat: 13g | Saturated Fat: 6g | Polyunsaturated Fat: 2g | Monounsaturated Fat: 4g | Trans Fat: 1g | Cholesterol: 31mg | Sodium: 777mg | Potassium: 348mg | Fiber: 2g | Sugar: 5g | Vitamin A: 6833IU | Vitamin C: 13mg | Calcium: 156mg | Iron: 2mg
    Course: Appetizer
    Cuisine: American
    Keyword: Crostini
    Author: Haley

    Honey Sriracha Brussels Sprouts

    Thumbnail image of honey sriracha brussels sprouts on a sheet tray.

    These Honey Sriracha Brussels Sprouts are incredibly crispy and doused in the most delicious sweet and spicy sauce that's totally addicting. It's a quick and easy recipe made with just a few ingredients that all pack a serious punch.

    [feast_advanced_jump_to]

    Ingredients

    Just a few simple ingredients are needed to make this perfect vegetarian side dish!

    • Brussels sprouts: The star of the show and the vessel for the delicious sauce – truly one of my favorite vegetables, they don't get the hype they deserve!
    • Avocado or olive oil: Plain olive oil (not extra virgin) or avocado oil works great for this recipe.
    • Sriracha: The spicy part of the sauce. Sriracha is a hot sauce made from chili pepper paste, distilled vinegar, garlic, and salt.
      • If you want a milder flavor / are not a fam of spicy food, try sweet chili sauce instead.
    • Honey: The sweet part of the sauce that balances out the spiciness of the sriracha. You can sub maple syrup or even agave if you want to make it vegan. The sweetness of the honey mixed with the sriracha makes this perfect sweet/spicy combo.
    • Rice vinegar: This brings a touch of acidity to the sauce. You could also use lime juice or lemon juice.
    • Garlic: A grated garlic clove really infuses into the sauce and adds great flavor.
      • You could use garlic powder if you're in a pinch but fresh garlic is really lovely.

    Step by step directions

    A few quick steps and barely any prep time, and you'll have these spicy brussels sprouts ready to devour.

    1. Roast the brussels sprouts. Trim off the stem of the brussels sprouts and cut them in half. Add them to a large bowl, toss them with avocado oil, salt and pepper. Place the brussels sprouts on a parchment paper lined large baking sheet. Roast them at 425℉ for 25 minutes, tossing half way through, until they're golden brown and crispy.

    2. Make the spicy honey sriracha sauce sauce. While the brussels sprouts are roasting, grab a small bowl and mix together the sriracha, honey, rice vinegar, and a grated garlic clove until well combined.

    3. Toss the brussels sprouts in the sauce. When the brussels sprouts are done roasting, pour the honey sriracha mixture over them and toss to combine. You can put them back in the oven for 5 more minutes to caramelize the sauce a bit, but that is optional!

    Tips and tricks

    Check out the below tips and tricks to help make sure you get the best results from this delicious recipe

    • Remove any outer leaves that are falling off, they run the risk of burning.
    • Roast the brussels sprouts in a single layer with the flat side down – this is the best way to get them nice and crispy.
    • Use a non-stick baking sheet pan or parchment paper – if you're confident in your non-stick, I recommend using that because you'll get a really nice golden brown. If not, use a layer of parchment paper! You'll still get a great crisp.
    • When buying brussels sprouts, look for the ones that are a nice vibrant / saturate green. If they're dull/brown looking, it's best to avoid.
    • Adjust spiciness level to your liking – if you want the sauce a bit spicier, just add more sriracha! if you want it a bit less spicy, pull back on the sriracha or add more honey.
    • If the brussels sprouts are different sizes, just make sure you cut them into pieces the same size so they bake evenly.
    • If you want some extra sauce to dip in just make 1.5 the recipe and save some on the side.

    Air fryer instructions

    Instead of oven-roasted brussel sprouts, you can you can cook them in the air fryer!

    To cook these in the air fryer - preheat it to 375℉ and prep the brussels sprouts in the same way as for roasting (trim, cut in half, toss with olive oil and salt). Arrange them in a single layer and air fry for 15 minutes, tossing half way through.

    If needed, air fry in two batches so you can really cook them in a single layer (this will make sure they get crispy!).

    Then make the sauce and toss with the cooked brussels sprouts.

    What to serve with brussels sprouts

    Brussels sprouts are truly so versatile you could serve a wide variety of dishes, but a few of my favorites are Instant Pot Pulled BBQ Chicken, Creamy Roasted Garlic and Bacon Gnocchi, or Apple Cider Braised Chicken Thighs.

    Storage and reheating

    Storage: allow the brussels sprouts to cool to room temperature, then store in an airtight container in the fridge for up to 4 days.

    Reheating: You can warm in the oven or in the microwave. If the oven, line a baking sheet with parchment paper and roast the brussels sprouts at 350 for 20ish minutes until warmed through. If microwave, simply warm for a few minutes.

    FAQs

    Can I prep this recipe in advance?

    Yes! You can trim/cut the brussels sprouts and make the sauce in advance (keep it in the fridge), but keep them separate. Then when you want to eat, just roast the brussels sprouts and toss in the finished sauce. Take the sauce out of the fridge when you start preheating the oven for so it can lose its chill.

    Can I use frozen brussels sprouts?

    Sure! They won't get as crispy, but to use frozen brussels sprouts preheat your oven to 400℉ and cook them for 15 minutes, flip, cook for 15 minutes more, then broil for a few minutes.

    What are the health benefits of brussels sprouts?

    There's really SO many! I wouldn't do them justice - so you can read about them here.

    More side dish recipes

    • Close up shot of finished dish in a bowl.
      Bourbon Mashed Sweet Potatoes
    • Finished mashed potatoes in a serving bowl with melted butter.
      Garlic Red Skin Mashed Potatoes
    • Air fryer butternut squash on a platter topped with chopped walnuts.
      Air Fryer Butternut Squash Cubes
    • Thumbnail
      Butternut Squash and Bacon Crostini

    📖 Recipe

    Thumbnail image of honey sriracha brussels sprouts on a sheet tray.

    Honey Sriracha Brussels Sprouts

    These Honey Sriracha Brussels sprouts are incredibly crispy and doused in the most delicious sweet and spicy sauce that's totally addicting and made with only 4 ingredients. A perfect easy side dish for just about any main!
    5 from 3 votes
    Print Pin Rate
    Prep Time: 10 minutes minutes
    Cook Time: 25 minutes minutes
    Total Time: 35 minutes minutes
    Servings: 4 servings

    Ingredients

    • 2 lbs brussels sprouts
    • 2 tablespoon avocado oil
    • 1 teaspoon salt
    • ½ teaspoon black pepper
    • 2 tablespoon sriracha
    • 2 tablespoon honey
    • 1 teaspoon rice vinegar
    • 1 clove garlic grated

    Instructions

    • Preheat your oven to 425℉.
    • Trim off the stem of the brussels sprouts and cut them in half. Toss with avocado oil and sprinkle with salt and pepper. Place in an even layer on a parchment paper lined baking sheet, cut-side down. Roast for 25 minutes, tossing half way through.
    • In a small bowl, mix together the sriracha, honey, rice vinegar, and grated garlic clove until well combined.
    • When the brussels sprouts are done roasting, pour the sauce over them and toss to combine. You can put them back in the oven for 5 more minutes to caramelize the sauce a bit, but that is optional!

    Nutrition Estimate

    Calories: 194kcal | Carbohydrates: 29g | Protein: 8g | Fat: 8g | Saturated Fat: 1g | Polyunsaturated Fat: 1g | Monounsaturated Fat: 5g | Sodium: 810mg | Potassium: 904mg | Fiber: 9g | Sugar: 14g | Vitamin A: 1722IU | Vitamin C: 198mg | Calcium: 99mg | Iron: 3mg
    Course: Side Dish
    Cuisine: American
    Keyword: Brussels Sprouts
    Author: Haley

    • « Previous Page
    • 1
    • …
    • 20
    • 21
    • 22
    • 23
    • 24
    • …
    • 32
    • Next Page »

    HEY THERE!

    Welcome to Cozy Cravings! Happy to have you. Here, you’ll find comfort food recipes & other delicious things to enjoy and devour.

    POPULAR POSTS

    • Close up of broccoli au gratin.
      Broccoli Au Gratin (Broccoli Casserole)
    • Finished french onion pasta in a bowl.
      One Pot French Onion Pasta
    • close up image of maple candied bacon on a plate.
      Maple Candied Bacon
    • Overhead image of lasagna fresh out of the oven with sage on top.
      Butternut Squash and Spinach Lasagna

    Footer

    ↑ back to top

    about

    • ABOUT
    • CONTACT
    • PRIVACY POLICY

    Let's Keep In Touch!

    Subscribe here for delicious recipes, updates & more!

    Thank you!

    You have successfully joined our subscriber list.

    .

    recipe index

    • APPETIZERS
    • BREAKFAST & BRUNCH
    • LUNCH & DINNER
    • SNACKS & SIDES
    • DESSERTS

    Copyright © 2026 · CozyCravings.com

    Rate This Recipe

    Your vote:


    A rating is required
    A name is required
    An email is required